
bigreis
Lifetime Member
- Joined
- Jul 10, 2011
- Messages
- 201
- Reaction score
- 19
- Points
- 818
- Location
- Central Minnesota
- Country
- USA
- Snowmobile
- 2007 Apex RTX
2009 Nytro XTX
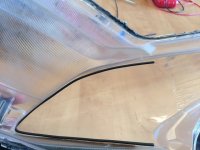
Since I have put on 0 miles so far this year due to lack of snow in my area, I decided to add some LED accents to my headlights. Two years ago I added HID projectors after reading the great how-to that Hansel (TY member) posted and thought it would be cool to take it one step further. I custom built these LED arrays and have yet to test them in real world conditions, but so far I think they look pretty cool!
If anyone is interested in trying this, let me know and I can add some additional photos and instructions.


If anyone is interested in trying this, let me know and I can add some additional photos and instructions.


- Joined
- Apr 13, 2003
- Messages
- 21,639
- Reaction score
- 9,264
- Points
- 2,103
- Location
- Schofield, WI
- Website
- www.totallyamaha.com
- Country
- USA
- Snowmobile
- 2020 Sidewinder SRX
That is cool as hell!!


Sasquatch
Lifetime Member
- Joined
- Apr 17, 2004
- Messages
- 3,699
- Reaction score
- 974
- Points
- 1,733
- Location
- North Western Ontario
- Website
- www.dptc.com
- Country
- Canada
- Snowmobile
- Yamaha's
Yep cool, wonder how they will show up with the lights on!


bigreis
Lifetime Member
- Joined
- Jul 10, 2011
- Messages
- 201
- Reaction score
- 19
- Points
- 818
- Location
- Central Minnesota
- Country
- USA
- Snowmobile
- 2007 Apex RTX
2009 Nytro XTX
They look awesome with the headlights on! The LEDs are very bright and add standout very nice. I will take a picture for you and post it tonight or tomorrow.Yep cool, wonder how they will show up with the lights on!
actionjack
TY 4 Stroke God
- Joined
- Apr 9, 2005
- Messages
- 2,519
- Reaction score
- 623
- Points
- 1,483
- Location
- Westminster, Maryland
- Website
- www.inspectorjack.com
- Country
- USA
- Snowmobile
- 2017 SideWinder LTX-LE
I would love to know the details


bigreis
Lifetime Member
- Joined
- Jul 10, 2011
- Messages
- 201
- Reaction score
- 19
- Points
- 818
- Location
- Central Minnesota
- Country
- USA
- Snowmobile
- 2007 Apex RTX
2009 Nytro XTX
Details...
This is my second attempt at LED accents. Last year I used some pre-made led strips that I bought on ebay, but I didn't like the way they looked because they were not very flexible (and therefore didn't fit the contours of the headlight very well) plus several of the LEDs burned out after a short time.
I think the LEDs were burning out due to the combination of excessive heat and voltage. The pre-made strips are designed to run at 12 volts, but my sled is putting out about 14.5 volts with the engine running, which puts the LEDs at or above their design limits. Because of this I decided to design my own lights that could safely operate at 14.5 volts and also fit the headlight shell perfectly.
After opening up the headlight (do this by heating the pod in an oven set at 225 F for about 10 minutes to soften the glue), I bent some 12 gauge insulated wire to fit the contours of the headlight shell to act as a support for the LEDs.


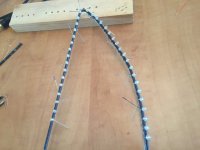
Next I made a jig to help hold the LEDs together during the soldering phase. I spaced the LEDs 1 cm apart and made 18 groups of 4 LEDs each (9 groups per side of the headlight). My design used 3 mm LEDs with an operating voltage of 3.1 volts and a current draw of 30 mA. I used a piece of 12 gauge wire to bend the leads of the LEDs around before soldering them together.


After soldering up all the groups of LED's, I slid the groups onto the support wire and began wiring the groups together in parallel. Each group of 4 LEDs required the use of a 70 ohm resistor per group.


After everything was wired up and tested, I sealed it all with several thick coats of liquid electrical tape. To secure the LED arrays in the headlight lens, I used some more liquid electrical tape in a few inconspicuous places... not sure if that was really necessary as the supports pretty much locked into place on their own.
Overall current draw for the entire system (both sides of the headlight) was 0.5 amps at 14.5 volts. For power, I tied into a switched source so that I could have the LEDs on without needed to start the sled. I haven't tested these on the trail yet, so I have no idea how long they are going to last. With my design, if 1 LED goes bad, it will increase the voltage to the other 3 in the group and undoubtedly burn them out in short order. The LEDs in the other groups will not be effected. If I run into problems with LEDs going bad, I will look for higher quality LEDs and possibly wire the entire system in parallel with each LED getting its own resistor. Only time will tell though... I am keeping my fingers crossed that these hold up!
This is my second attempt at LED accents. Last year I used some pre-made led strips that I bought on ebay, but I didn't like the way they looked because they were not very flexible (and therefore didn't fit the contours of the headlight very well) plus several of the LEDs burned out after a short time.
I think the LEDs were burning out due to the combination of excessive heat and voltage. The pre-made strips are designed to run at 12 volts, but my sled is putting out about 14.5 volts with the engine running, which puts the LEDs at or above their design limits. Because of this I decided to design my own lights that could safely operate at 14.5 volts and also fit the headlight shell perfectly.
After opening up the headlight (do this by heating the pod in an oven set at 225 F for about 10 minutes to soften the glue), I bent some 12 gauge insulated wire to fit the contours of the headlight shell to act as a support for the LEDs.


Next I made a jig to help hold the LEDs together during the soldering phase. I spaced the LEDs 1 cm apart and made 18 groups of 4 LEDs each (9 groups per side of the headlight). My design used 3 mm LEDs with an operating voltage of 3.1 volts and a current draw of 30 mA. I used a piece of 12 gauge wire to bend the leads of the LEDs around before soldering them together.


After soldering up all the groups of LED's, I slid the groups onto the support wire and began wiring the groups together in parallel. Each group of 4 LEDs required the use of a 70 ohm resistor per group.


After everything was wired up and tested, I sealed it all with several thick coats of liquid electrical tape. To secure the LED arrays in the headlight lens, I used some more liquid electrical tape in a few inconspicuous places... not sure if that was really necessary as the supports pretty much locked into place on their own.
Overall current draw for the entire system (both sides of the headlight) was 0.5 amps at 14.5 volts. For power, I tied into a switched source so that I could have the LEDs on without needed to start the sled. I haven't tested these on the trail yet, so I have no idea how long they are going to last. With my design, if 1 LED goes bad, it will increase the voltage to the other 3 in the group and undoubtedly burn them out in short order. The LEDs in the other groups will not be effected. If I run into problems with LEDs going bad, I will look for higher quality LEDs and possibly wire the entire system in parallel with each LED getting its own resistor. Only time will tell though... I am keeping my fingers crossed that these hold up!


nadekeys
Lifetime Member
- Joined
- Oct 20, 2009
- Messages
- 278
- Reaction score
- 92
- Points
- 1,048
- Location
- Green Bay, WI
- Country
- USA
- Snowmobile
- 2017 Sidewinder LTX LE
2009 Apex LTX GT
2008 Nytro MTX Turbo
Very cool looking, hopefully they hold up for you!
Similar threads
- Replies
- 77
- Views
- 27K
- Replies
- 11
- Views
- 5K
- Replies
- 19
- Views
- 6K
