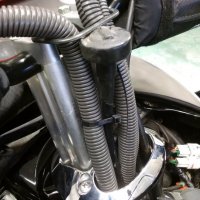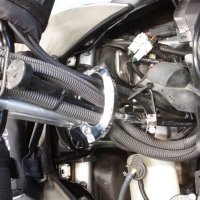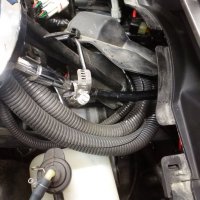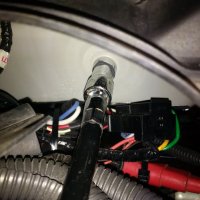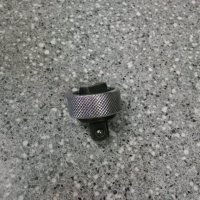

This has been done before. This is my version of the mod.
Here is a quick and easy mod for a remote headlight adjuster.
Parts needed:
JB Weld or similar epoxy
Black can of Plastic Dip
10mm socket
12"or longer flex extension 1/4 0r 3/8 will do. Shown here are two 8" extensions JB'd together
Thumb ratchet again 1/4 or 3/8
Small hose clamp
Steps:
Attach thumb ratchet to extension. Dip this end into Plastic Dip and then let dry. I find multi coats works the best. This will do a few things. 1. It will secure the connection between the two 2. Stop the thumb ratchet from ratcheting 3. Makes it look good.
Clean the 10mm socket and headlight adjustment bolt. Brake clean or acetone works well.
JB Weld the socket to the bolt. Let the epoxy set up over night.
Feed the flex extension thru the steering ring and lower loop on the column.
Pop the extension into the socket.
Mock up hose clamp to the lower loop and extension. Make notice where the clamp makes contact with the liner of the flex extension. Remove the extension and cut the liner so it can rotate freely when clamped.
Reinsert the extension and connect to the socket. Install the clamp. Tight enough to hold the extension in place but loose enough to allow it to rotate.
Attachments


- Joined
- Apr 13, 2003
- Messages
- 21,694
- Reaction score
- 9,289
- Points
- 2,103
- Location
- Schofield, WI
- Website
- www.totallyamaha.com
- Country
- USA
- Snowmobile
- 2020 Sidewinder SRX
This has been done before. This is my version of the mod.
Here is a quick and easy mod for a remote headlight adjuster.
Parts needed:
JB Weld or similar epoxy
Black can of Plastic Dip
10mm socket
12"or longer flex extension 1/4 0r 3/8 will do. Shown here are two 8" extensions JB'd together
Thumb ratchet again 1/4 or 1/8
Small hose clamp
Steps:
Attach thumb ratchet to extension. Dip this end into Plastic Dip and then let dry. I find multi coats works the best. This will do a few things. 1. It will secure the connection between the two 2. Stop the thumb ratchet from ratcheting 3. Makes it look good.
Clean the 10mm socket and headlight adjustment bolt. Brake clean or acetone works well.
JB Weld the socket to the bolt. Let the epoxy set up over night.
Feed the flex extension thru the steering ring and lower loop on the column.
Pop the extension into the socket.
Mock up hose clamp to the lower loop and extension. Make notice where the clamp makes contact with the liner of the flex extension. Remove the extension and cut the liner so it can rotate freely when clamped.
Reinsert the extension and connect to the socket. Install the clamp. Tight enough to hold the extension in place but loose enough to allow it to rotate.
How much did that cost you over all?


It cost about $40 for the:
Plastic Dip
Set of three thumb ratchets (1/4, 3/8.and 1/2 in a package)
Two packs of flex extensions each with one 1/4 and 3/8 extension
Two single 10mm sockets
This makes two adjusters. One 1/4 and one 3/8 drive.
Plastic Dip
Set of three thumb ratchets (1/4, 3/8.and 1/2 in a package)
Two packs of flex extensions each with one 1/4 and 3/8 extension
Two single 10mm sockets
This makes two adjusters. One 1/4 and one 3/8 drive.

JG231-
VIP Member
- Joined
- Nov 1, 2024
- Messages
- 26
- Reaction score
- 7
- Points
- 158
- Location
- N. Michigan
- Country
- USA
- Snowmobile
- 07 Attak
This is awesome.... I found a thumb ratchet set at harbor freight for $5.99, the extensions are being shipped from Amazon and I should have this functioning on the sled by Saturday.This has been done before. This is my version of the mod.
Here is a quick and easy mod for a remote headlight adjuster.
Parts needed:
JB Weld or similar epoxy
Black can of Plastic Dip
10mm socket
12"or longer flex extension 1/4 0r 3/8 will do. Shown here are two 8" extensions JB'd together
Thumb ratchet again 1/4 or 3/8
Small hose clamp
Steps:
Attach thumb ratchet to extension. Dip this end into Plastic Dip and then let dry. I find multi coats works the best. This will do a few things. 1. It will secure the connection between the two 2. Stop the thumb ratchet from ratcheting 3. Makes it look good.
Clean the 10mm socket and headlight adjustment bolt. Brake clean or acetone works well.
JB Weld the socket to the bolt. Let the epoxy set up over night.
Feed the flex extension thru the steering ring and lower loop on the column.
Pop the extension into the socket.
Mock up hose clamp to the lower loop and extension. Make notice where the clamp makes contact with the liner of the flex extension. Remove the extension and cut the liner so it can rotate freely when clamped.
Reinsert the extension and connect to the socket. Install the clamp. Tight enough to hold the extension in place but loose enough to allow it to rotate.
300 miles this year on the Attak and driving at night without being able to adjust on the fly is about the only thing that sucks about it
Last edited:

RobX-1
VIP Member
- Joined
- Apr 13, 2003
- Messages
- 2,304
- Reaction score
- 1,489
- Points
- 1,583
- Location
- Coldwater, OH
- Country
- USA
- Snowmobile
- 18 50th Apex XT-X, 08 40th Apex LTX GT, 08 40th Nytro RTX, & 03 RX-1
Just an FYI, but I opted for @Rockmeister EASY ADJUST Remote Headlight Adjuster Kit. Liked it so much I equiped both Apex's I ride with it. I even have a tank bag and with where the knob is, I can still easily adjust. I agree about not being able to adjust your headlights on the fly. 


RobX-1
VIP Member
- Joined
- Apr 13, 2003
- Messages
- 2,304
- Reaction score
- 1,489
- Points
- 1,583
- Location
- Coldwater, OH
- Country
- USA
- Snowmobile
- 18 50th Apex XT-X, 08 40th Apex LTX GT, 08 40th Nytro RTX, & 03 RX-1

JG231-
VIP Member
- Joined
- Nov 1, 2024
- Messages
- 26
- Reaction score
- 7
- Points
- 158
- Location
- N. Michigan
- Country
- USA
- Snowmobile
- 07 Attak
Yeah that's cool, but for 15 bucks and ten minutes of my time I can accomplish the same thing.... I may look into getting one of they're rad lights though, that seems like a no brainer with all the traffic I see on a weekend around here

JG231-
VIP Member
- Joined
- Nov 1, 2024
- Messages
- 26
- Reaction score
- 7
- Points
- 158
- Location
- N. Michigan
- Country
- USA
- Snowmobile
- 07 Attak
15 minutes with the welder and some krylon


RobX-1
VIP Member
- Joined
- Apr 13, 2003
- Messages
- 2,304
- Reaction score
- 1,489
- Points
- 1,583
- Location
- Coldwater, OH
- Country
- USA
- Snowmobile
- 18 50th Apex XT-X, 08 40th Apex LTX GT, 08 40th Nytro RTX, & 03 RX-1
Looks good and will certainly do the job. Whether or not that's the case as your cruising down the trail with gloves on and want to adjust. 
That was always my concern with that thumb ratchet. How well would I be able to turn it to adjust? Either way, an inexpensive way to adjust your headlights without having to disassemble everything.

That was always my concern with that thumb ratchet. How well would I be able to turn it to adjust? Either way, an inexpensive way to adjust your headlights without having to disassemble everything.


JG231-
VIP Member
- Joined
- Nov 1, 2024
- Messages
- 26
- Reaction score
- 7
- Points
- 158
- Location
- N. Michigan
- Country
- USA
- Snowmobile
- 07 Attak
It turns super easy, It's a heavy piece of metal and it only takes about .5 ft lbs of force to turn the adjuster, Worst case scenario I could take the metal cut off wheel and the Dremel and I could cut a few knurls into it for grip but the preliminary tests seem to indicate that it'll work good .Looks good and will certainly do the job. Whether or not that's the case as your cruising down the trail with gloves on and want to adjust.
That was always my concern with that thumb ratchet. How well would I be able to turn it to adjust? Either way, an inexpensive way to adjust your headlights without having to disassemble everything.
I should've actually taken the time to set the ratchet into the vice and done a proper job on the tack welds, cause thats gonna bug the hell out of me forever now lol.... I actually spent 11 bucks and got two of each size ratchets (1/4 3/8 & 1/2)...... I could redo it but honestly it works and it really looks worse in the pic than in real life.......
It just pains me how much money I spend in a month and if I can save a few bucks here and there I will..... Not counting the labor or the paint this is about a 14 dollar part......
Similar threads
- Replies
- 118
- Views
- 83K
-
This site uses cookies to help personalise content, tailor your experience and to keep you logged in if you register.
By continuing to use this site, you are consenting to our use of cookies.

