JayM
Expert
- Joined
- Oct 29, 2018
- Messages
- 476
- Reaction score
- 266
- Points
- 488
- Location
- Pickering, ON
- Country
- Canada
- Snowmobile
- 2017 Sidewinder R-TX SE
Hi Everyone, Will be using this thread do document my build, will try and be as informative as possible, lots planned for this thing but sometimes I get a little too focused and forget to take pictures lol
I'm coming from a 2010 Polaris Rush 600cc so this will be a "bit" of an upgrade. I'm just outside of Toronto, ON and ride where there is snow lol
I've been reading so much on various forums and already see the value in TY Forum lots of great threads and info here made me spend a LOT of money on "maintenance" stuff. I'm pretty anal about things, never had a new machine before so will do my best to keep it mint and making sure I do as much as possible to keep it running without issues all winter.
Sled:
2017 Sidewinder R-TX SE 129", new left over stock bought October 31st 2018 0km
List of completed and planned mods:
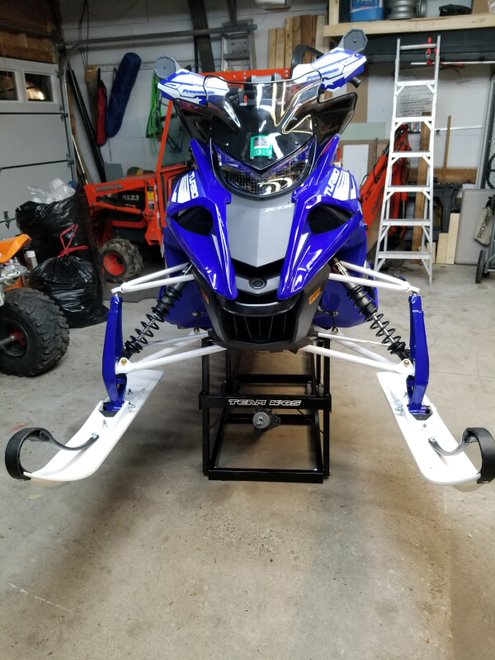
-Replace Tuner 3 skis with Slydog Trail and Shaper Bars - Nov 7th, 2018
-PowerMadd Sentinal Hand Guards with mirrors - Nov 8th, 2018 (Forgot to take pics of the process)
-Deluxe Heated Shield Outlet (SMA-8LR10-00-00) - Nov 8th, 2018 (Forgot to take pics of the process)
-Turbo Dynamics Super Quiet Exhaust - Nov 17th, 2018
-Rollover Valve Bypass - Nov 17th, 2018
-Turbo Dynamics Multi Map Bundle with Cluster Flash Tune - Nov 18th, 2018
-Custom DIY CAI - Nov 18th, 2018
-Yamaha Tunnel Protectors (SMA-8LR24-00-BK) - Nov 19th, 2018
-Woody's Megabite 1.575" studs - Nov 21st, 2018
-Turbo Dynamics 4th Wheel full replacement kit - Nov 22nd, 2018
-Yamaha Console Knee Pads (SMA-8LR24-00-BK) - Nov 24th, 2018
-Custom Registration Numbers - Nov 24th, 2018
-3BAR MAP Sensor - TBI (To Be Installed)
-Aftermarket BOV - TBI
-Clutch work (Primary/Secondary Rollers and springs, weights etc.) - TBI
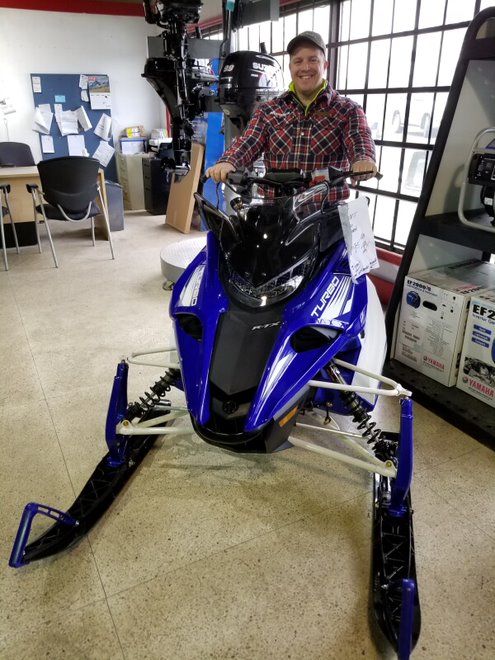
Me at the Dealer when going to check it out:
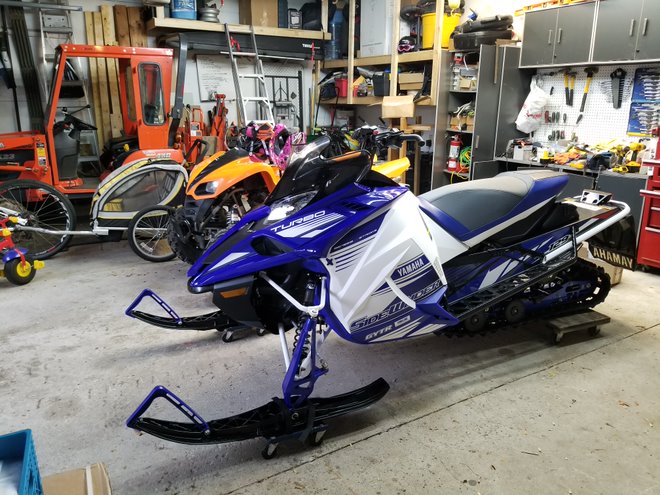
Got it home on Halloween day, excuse the messy garage:
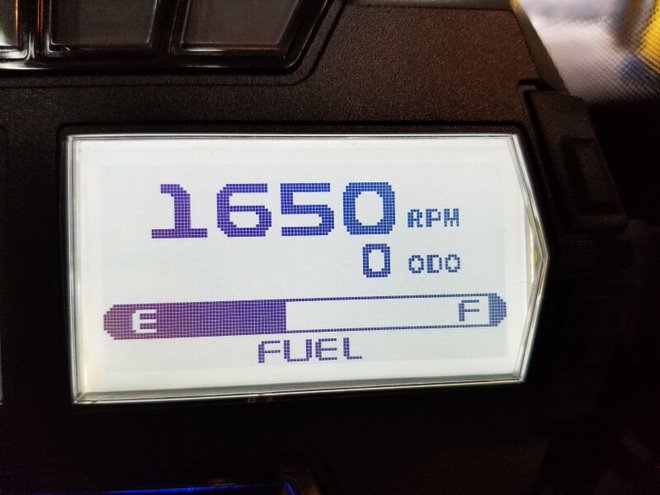
0km on the Odometer:
I'm coming from a 2010 Polaris Rush 600cc so this will be a "bit" of an upgrade. I'm just outside of Toronto, ON and ride where there is snow lol
I've been reading so much on various forums and already see the value in TY Forum lots of great threads and info here made me spend a LOT of money on "maintenance" stuff. I'm pretty anal about things, never had a new machine before so will do my best to keep it mint and making sure I do as much as possible to keep it running without issues all winter.
Sled:
2017 Sidewinder R-TX SE 129", new left over stock bought October 31st 2018 0km
List of completed and planned mods:
-Replace Tuner 3 skis with Slydog Trail and Shaper Bars - Nov 7th, 2018
-PowerMadd Sentinal Hand Guards with mirrors - Nov 8th, 2018 (Forgot to take pics of the process)
-Deluxe Heated Shield Outlet (SMA-8LR10-00-00) - Nov 8th, 2018 (Forgot to take pics of the process)
-Turbo Dynamics Super Quiet Exhaust - Nov 17th, 2018
-Rollover Valve Bypass - Nov 17th, 2018
-Turbo Dynamics Multi Map Bundle with Cluster Flash Tune - Nov 18th, 2018
-Custom DIY CAI - Nov 18th, 2018
-Yamaha Tunnel Protectors (SMA-8LR24-00-BK) - Nov 19th, 2018
-Woody's Megabite 1.575" studs - Nov 21st, 2018
-Turbo Dynamics 4th Wheel full replacement kit - Nov 22nd, 2018
-Yamaha Console Knee Pads (SMA-8LR24-00-BK) - Nov 24th, 2018
-Custom Registration Numbers - Nov 24th, 2018
-3BAR MAP Sensor - TBI (To Be Installed)
-Aftermarket BOV - TBI
-Clutch work (Primary/Secondary Rollers and springs, weights etc.) - TBI
Me at the Dealer when going to check it out:
Got it home on Halloween day, excuse the messy garage:
0km on the Odometer:
Last edited:
JayM
Expert
- Joined
- Oct 29, 2018
- Messages
- 476
- Reaction score
- 266
- Points
- 488
- Location
- Pickering, ON
- Country
- Canada
- Snowmobile
- 2017 Sidewinder R-TX SE
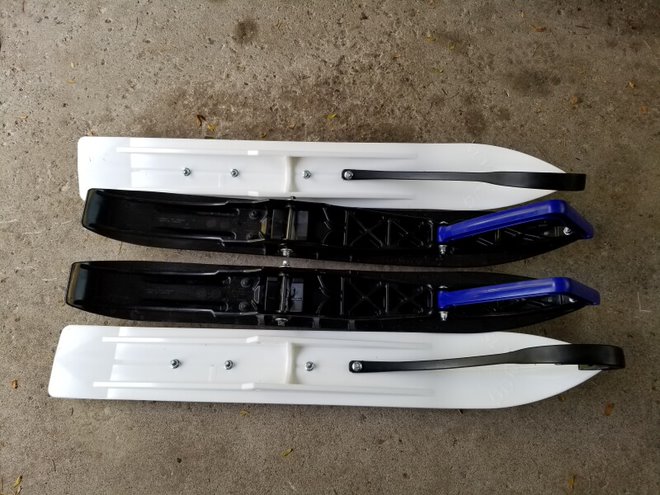
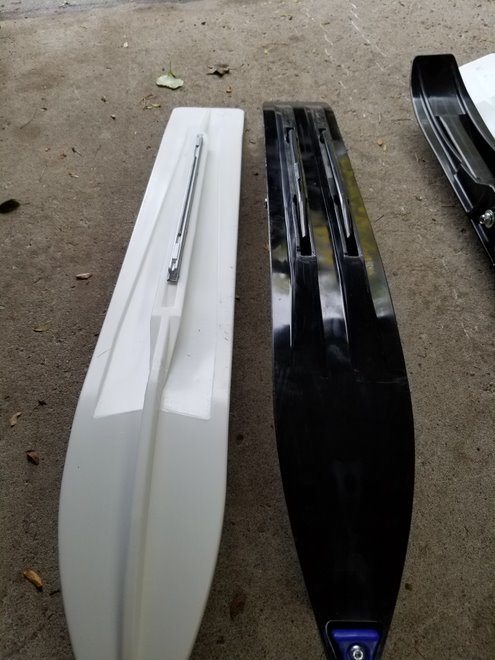
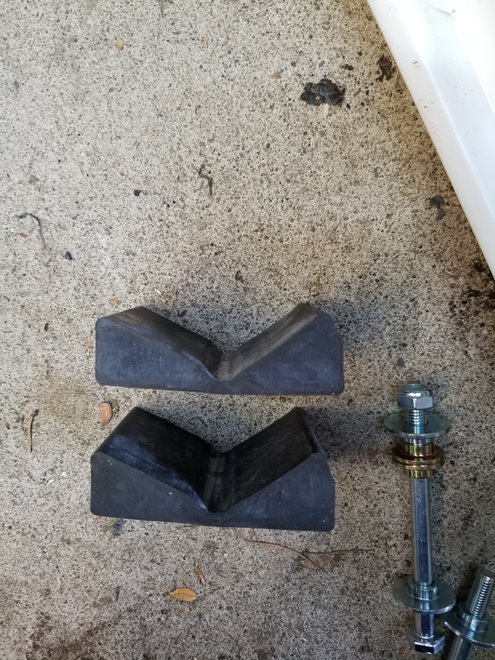
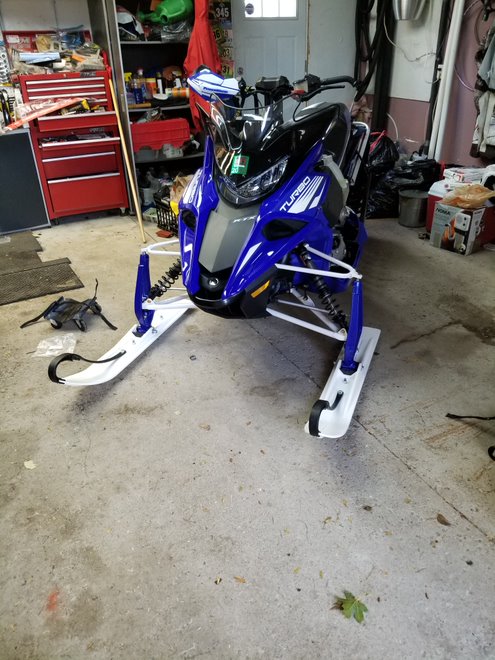
Replace Tuner 3 skis with Slydog Trail and Shaper Bars - Nov 7th, 2018
After seeing so many thread about the Tuner 3's being garbage and having tried those ski's on the Father in Laws sled last year I knew this was something I wanted to address as one of the first mods. I looked at SnowTrackers for the stock skis but the cost is very close to aftermarket and I can sell the Tuner 3's (if anyone is insane enough to want those) and recover some costs.
Lots of options out there, Cat Skis, C&A, Kimpex Rush, Curve, Slydog etc. I ended up choosing Slydog's 6" trail skis (https://slydogskis.com/shop/category/ski-packages-6-slydog-trail/) because the local distributor (Royal Distributing) has a really cheap package ($329 CDN for skis/mounts/carbides) and I ended up paying $70 more for the 9" Stud Boy Shaper Bars instead of the included 4" generic. This might be too much carbide but we'll see.
Install is extremely easy I think it speaks for itself, I'm going to pickup blue ski loops as it will look better")
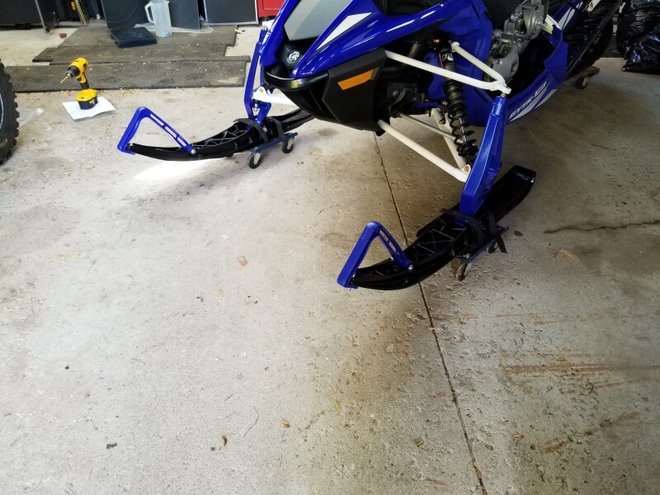
After seeing so many thread about the Tuner 3's being garbage and having tried those ski's on the Father in Laws sled last year I knew this was something I wanted to address as one of the first mods. I looked at SnowTrackers for the stock skis but the cost is very close to aftermarket and I can sell the Tuner 3's (if anyone is insane enough to want those) and recover some costs.
Lots of options out there, Cat Skis, C&A, Kimpex Rush, Curve, Slydog etc. I ended up choosing Slydog's 6" trail skis (https://slydogskis.com/shop/category/ski-packages-6-slydog-trail/) because the local distributor (Royal Distributing) has a really cheap package ($329 CDN for skis/mounts/carbides) and I ended up paying $70 more for the 9" Stud Boy Shaper Bars instead of the included 4" generic. This might be too much carbide but we'll see.
Install is extremely easy I think it speaks for itself, I'm going to pickup blue ski loops as it will look better
Last edited:
JayM
Expert
- Joined
- Oct 29, 2018
- Messages
- 476
- Reaction score
- 266
- Points
- 488
- Location
- Pickering, ON
- Country
- Canada
- Snowmobile
- 2017 Sidewinder R-TX SE
Placeholder
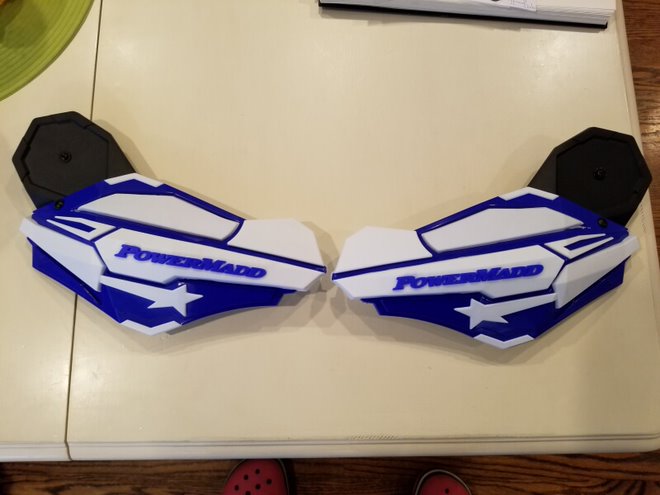
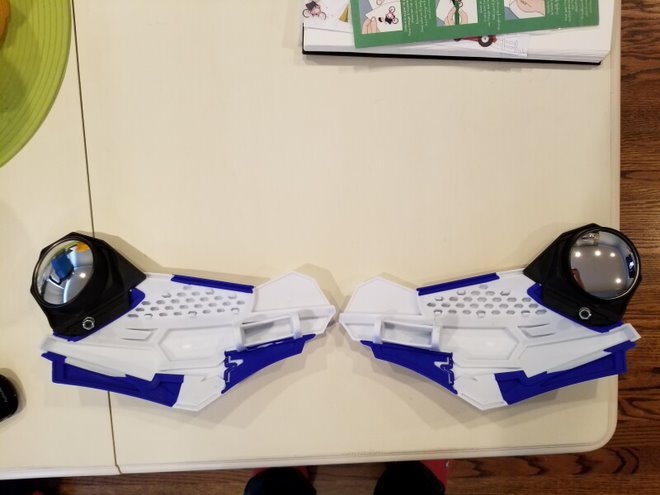
-PowerMadd Sentinal Hand Guards with mirrors - Nov 8th, 2018 (Forgot to take pics of the process) The only suggestion here is to make sure to buy the Mount Kit for the Hayes Brakes (Part # - 34454) or else it won't work well.
http://www.powermadd.com/emailMarketing/2014/aug/powermadd_sentinel_handguard.html
-Deluxe Heated Shield Outlet (SMA-8LR10-00-00) - Nov 8th, 2018 (Forgot to take pics of the process)
Last edited:
JayM
Expert
- Joined
- Oct 29, 2018
- Messages
- 476
- Reaction score
- 266
- Points
- 488
- Location
- Pickering, ON
- Country
- Canada
- Snowmobile
- 2017 Sidewinder R-TX SE
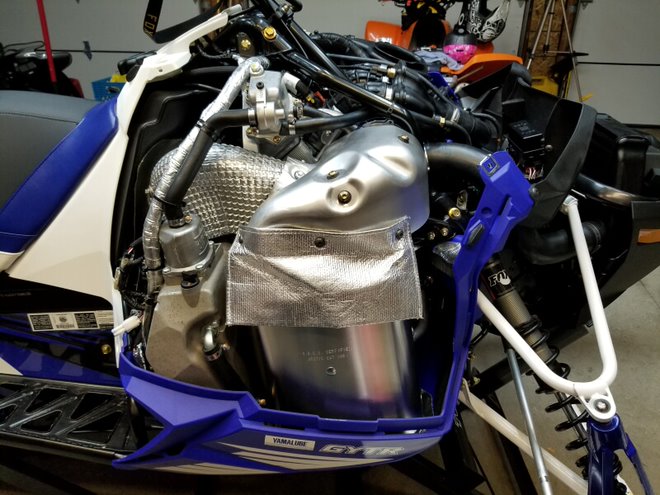
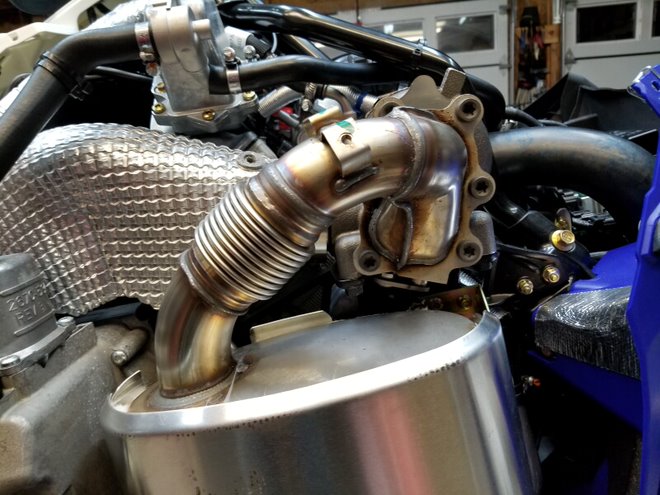
-Turbo Dynamics Super Quiet Exhaust - Nov 17th, 2018
-Rollover Valve Bypass - Nov 17th, 2018
I looked at all of the aftermarket companies, spoke to a few of them at the Toronto Snowmobile Show and all seemed good. I leaned more towards Turbo Dynamics so I rolled with them
First thing to install is their SuperQuiet Exhaust, I read a lot in threads about the exhaust bolts being very difficult to take out once the sleds been run and suggestions to chase the threads etc. (Thanks @ROCKERDAN )
Stock Exhaust, many have seen this of course:
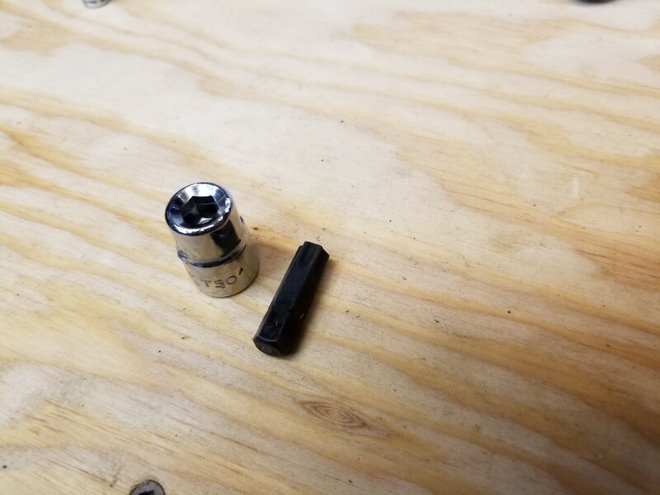
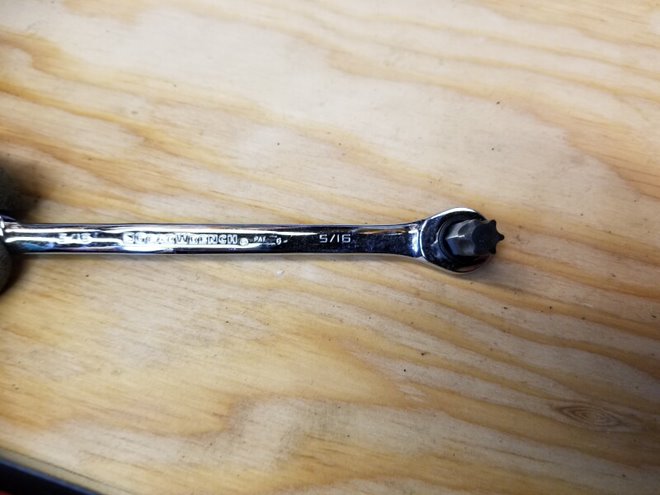
Since my sled has 0km and 0.3 hours the stock exhaust bolts came out SUPER easy I was very happy. For the 2 that are hard to get to I took a second T50 socket and punched out the Hex T50, used a 5/16th wrench and these 2 bolts came out really easy.
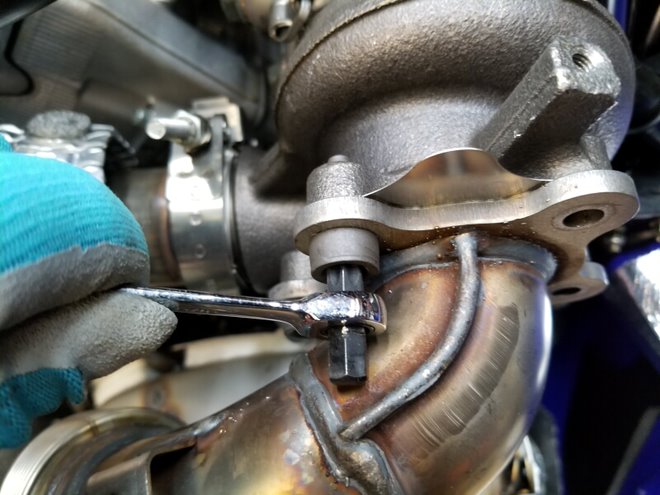
Chased the threads with a M8x1.25 tap, I was surprised to see a decent amount of stuff come out when tapping the holes:
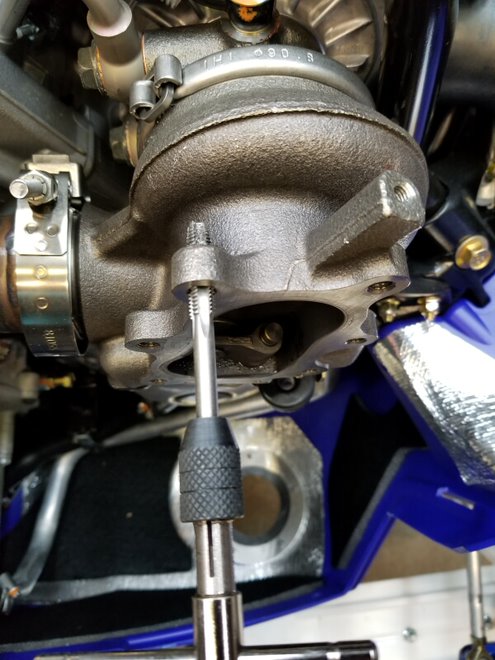
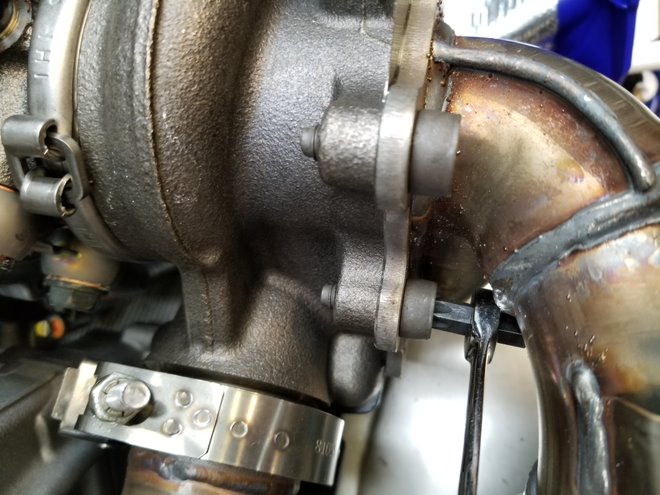
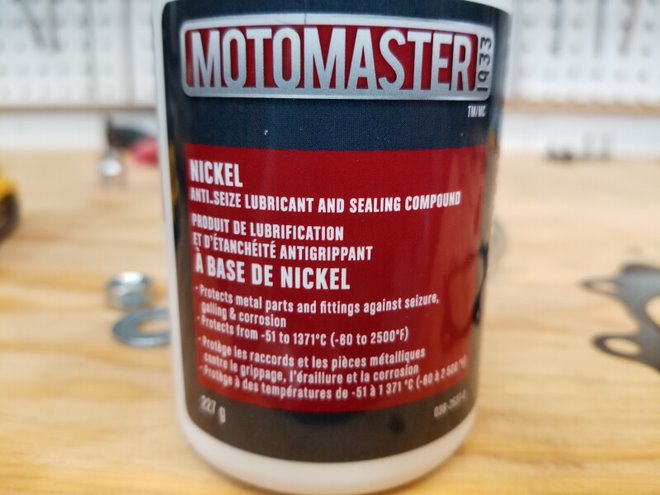
Used some Nickel based Anti Seize as it's the higher temp one I could easily find, I used the stock T50 bolts with the TD supplied lock washers and torqued them down 9ft-lbs then 18ft-lbs as recommended in the manual
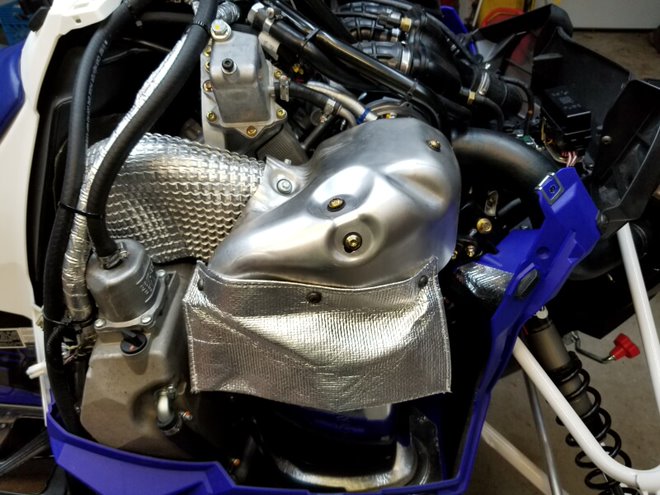
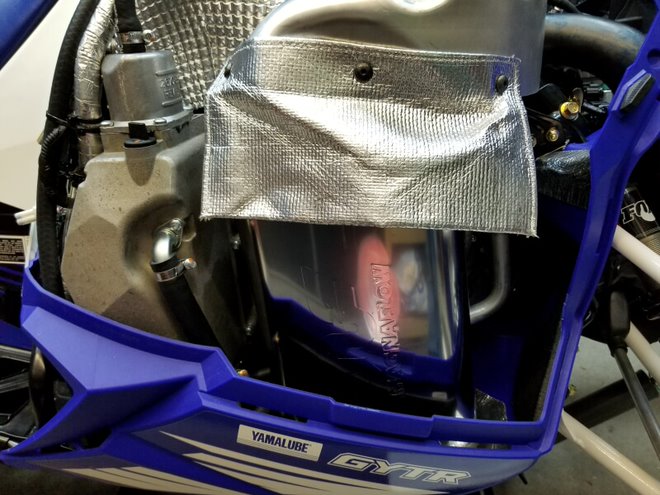
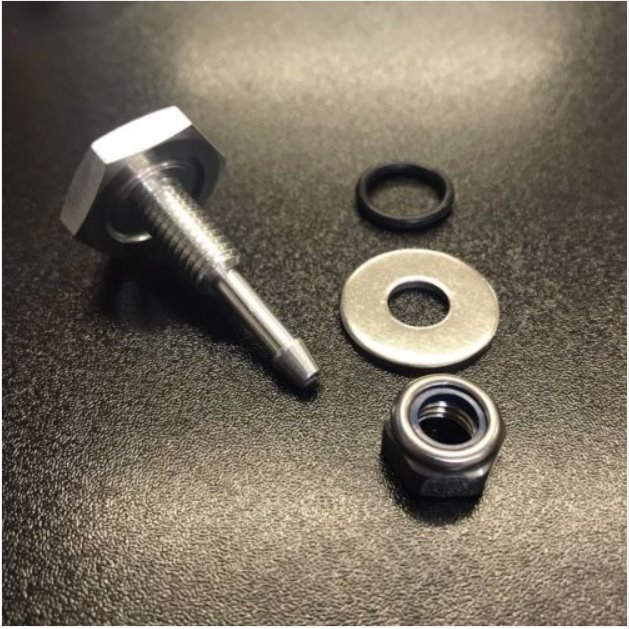
Here you can see both the new exhaust installed and the Rollover valve removal (I used @ROCKERDAN 's thread for the directions on this), hoping to prevent any pressure in the oil tank to hopefully last the season without leaking. Basically removed the hose from the top of the tank to the roll over valve including the valve, I used 1/2" heater hose (I know I need to change this but it's what I had on hand) and looped it up then down to the foot hold. The hose from the air intake tube I used a large bolt with gasket maker and clamp to seal that end.

I knew from the start I wanted to re-isntall the heat shield, 3 bolts can still be re-used the other 2 I didn't want to just leave it empty as that would be ugly and not my style so I got some nuts and just bolted it to the heat shield just for looks.
-Rollover Valve Bypass - Nov 17th, 2018
I looked at all of the aftermarket companies, spoke to a few of them at the Toronto Snowmobile Show and all seemed good. I leaned more towards Turbo Dynamics so I rolled with them
First thing to install is their SuperQuiet Exhaust, I read a lot in threads about the exhaust bolts being very difficult to take out once the sleds been run and suggestions to chase the threads etc. (Thanks @ROCKERDAN )
Stock Exhaust, many have seen this of course:
Since my sled has 0km and 0.3 hours the stock exhaust bolts came out SUPER easy I was very happy. For the 2 that are hard to get to I took a second T50 socket and punched out the Hex T50, used a 5/16th wrench and these 2 bolts came out really easy.
Chased the threads with a M8x1.25 tap, I was surprised to see a decent amount of stuff come out when tapping the holes:
Used some Nickel based Anti Seize as it's the higher temp one I could easily find, I used the stock T50 bolts with the TD supplied lock washers and torqued them down 9ft-lbs then 18ft-lbs as recommended in the manual
Here you can see both the new exhaust installed and the Rollover valve removal (I used @ROCKERDAN 's thread for the directions on this), hoping to prevent any pressure in the oil tank to hopefully last the season without leaking. Basically removed the hose from the top of the tank to the roll over valve including the valve, I used 1/2" heater hose (I know I need to change this but it's what I had on hand) and looped it up then down to the foot hold. The hose from the air intake tube I used a large bolt with gasket maker and clamp to seal that end.
I knew from the start I wanted to re-isntall the heat shield, 3 bolts can still be re-used the other 2 I didn't want to just leave it empty as that would be ugly and not my style so I got some nuts and just bolted it to the heat shield just for looks.
Last edited:
JayM
Expert
- Joined
- Oct 29, 2018
- Messages
- 476
- Reaction score
- 266
- Points
- 488
- Location
- Pickering, ON
- Country
- Canada
- Snowmobile
- 2017 Sidewinder R-TX SE
Nov 18th, 2018
-Turbo Dynamics Multi Map Bundle with Cluster Flash Tune
Moving right along, I had Kevin (from Over The Topp Performance who's a local TD dealer 10min away which is very convenient) come over and flash the ECU with the TD Multi Map Bundle and flash the dash as well. Hard to really show much other than now I can switch between tunes with the top left button of the dash, VERY slick!!!
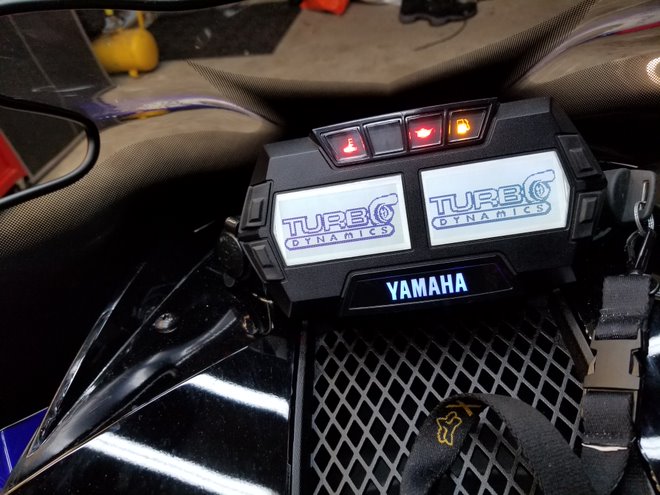
You can see here top left it's running the 280hp tune which I believe is the Max Pump 17. I haven't setup the dash yet with how I want it, will likely put Boost on the top right.

-Turbo Dynamics Multi Map Bundle with Cluster Flash Tune
Moving right along, I had Kevin (from Over The Topp Performance who's a local TD dealer 10min away which is very convenient) come over and flash the ECU with the TD Multi Map Bundle and flash the dash as well. Hard to really show much other than now I can switch between tunes with the top left button of the dash, VERY slick!!!
You can see here top left it's running the 280hp tune which I believe is the Max Pump 17. I haven't setup the dash yet with how I want it, will likely put Boost on the top right.
JayM
Expert
- Joined
- Oct 29, 2018
- Messages
- 476
- Reaction score
- 266
- Points
- 488
- Location
- Pickering, ON
- Country
- Canada
- Snowmobile
- 2017 Sidewinder R-TX SE
Nov 18th, 2018
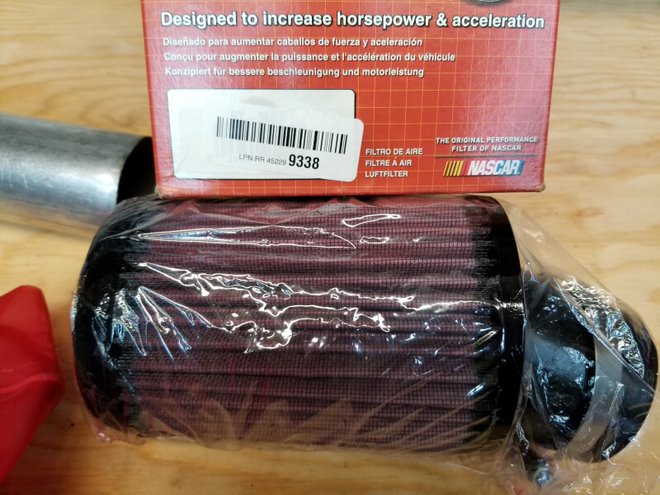
-Custom DIY CAI
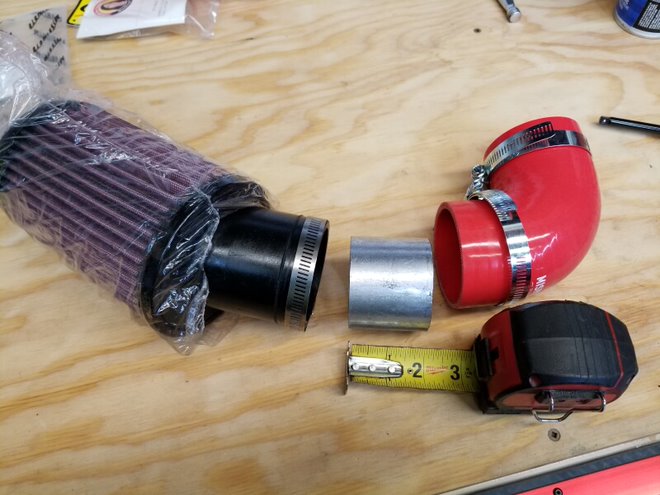
After seeing all of the intake options out there and reading some threads **Cough** @ROCKERDAN **Cough** I decided to make my own.
Here are the parts I ordered (The 2.5" pipe I had here laying around):
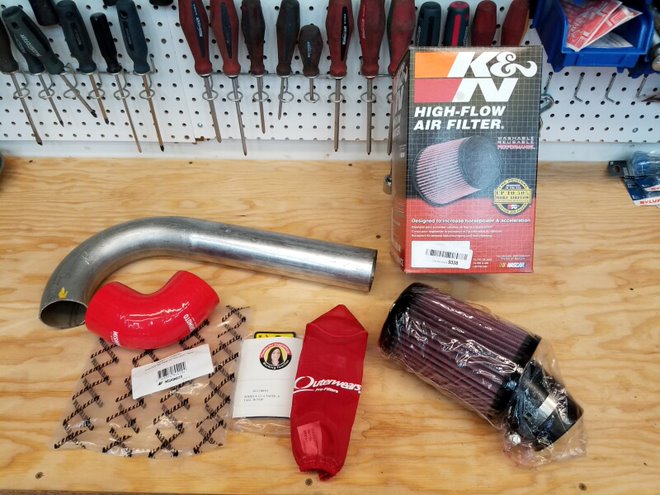
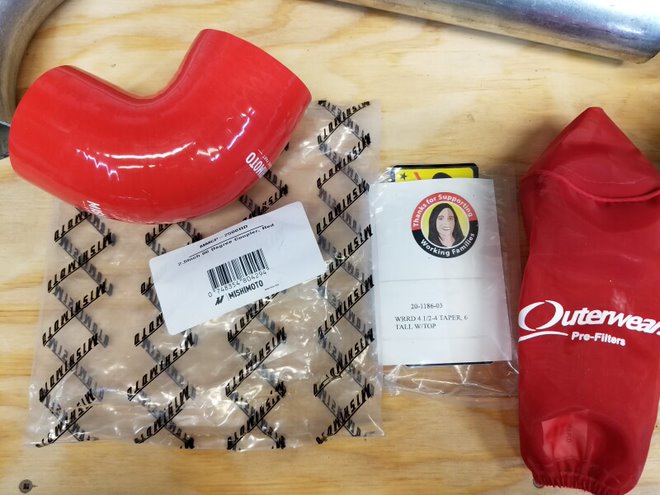
The Part# I ordered was RX-3800 which is what's on the box but it's been covered by the below sticker, perhaps a sku update not too sure but this is a great size filter with an open end.
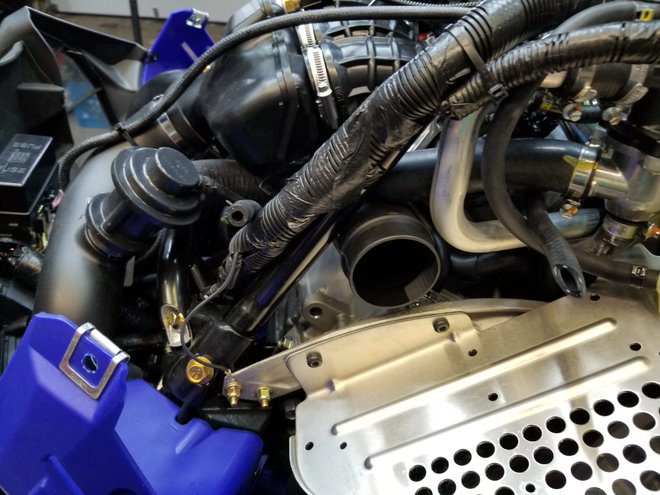
I removed the stock airbox, there's 3 x Torx screws underneath on the belt protector then it just comes off, you need to remove the left/front side vac hose it has a small clamp. The right/rear vac hose actually goes into the airbox so I just greased it a little bit to help and it pulled right out.
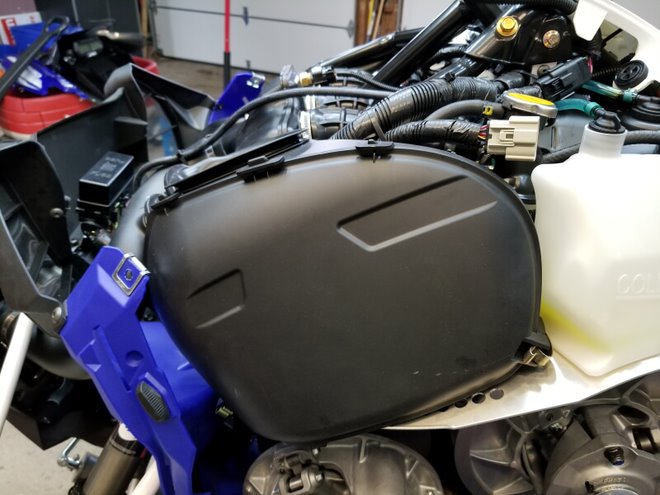
You can see here the 2 x vac hoses
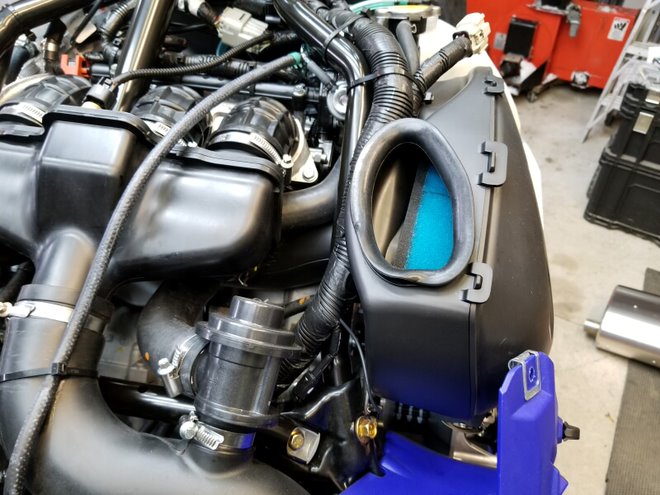
Now was time to mock up the new intake, note that I didn't have smaller clamps so these look silly for now, they will be replaced. I chose red mostly because that's all that was in stock on Amazon but it's also my fav color so I figured I would add some red where you can't see it lol:
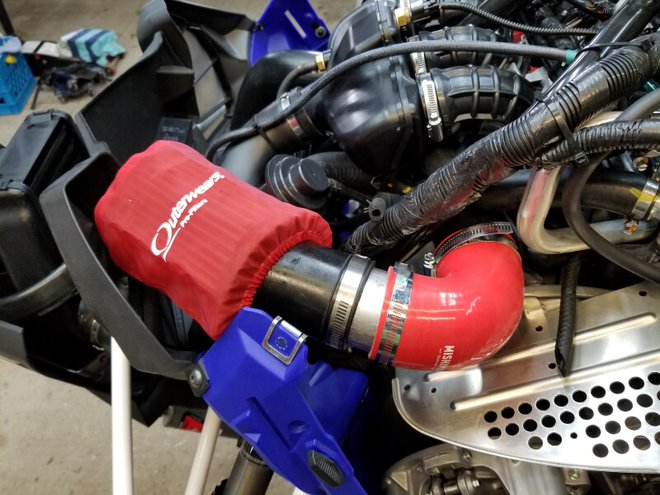
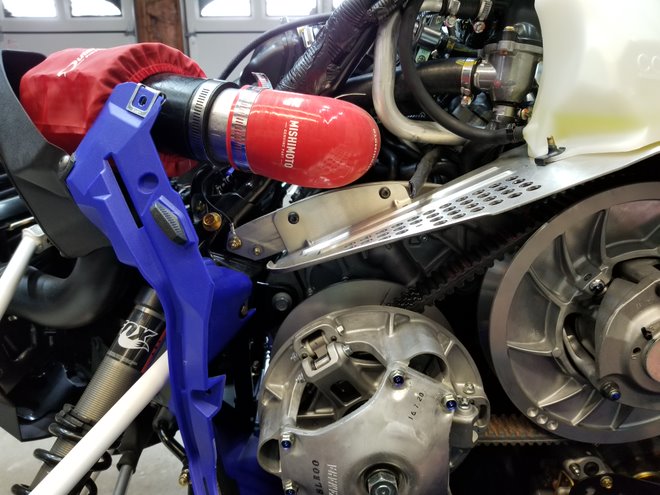
I tried to keep the intake as high as possible as recommended by others, I will be adding a little brace to it as well:
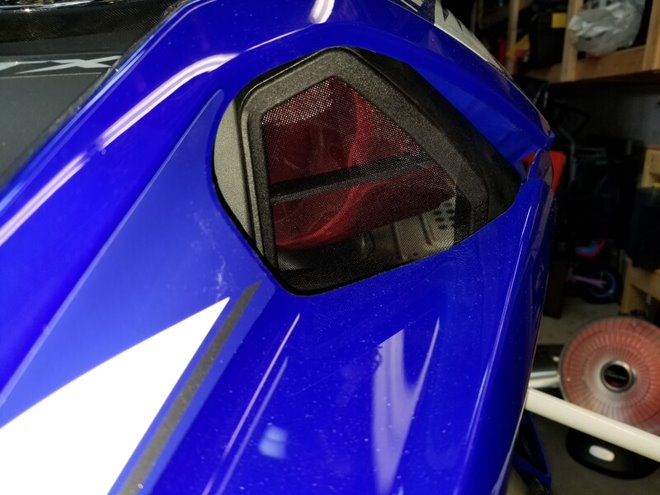
I ordered these guys from China, when/if they make it here I will be adding these to the intake to connect both vac hoses as I don't want to leave them venting to atmosphere, probably not the end of the world but I want it to be right.
-Custom DIY CAI
After seeing all of the intake options out there and reading some threads **Cough** @ROCKERDAN **Cough** I decided to make my own.
Here are the parts I ordered (The 2.5" pipe I had here laying around):
The Part# I ordered was RX-3800 which is what's on the box but it's been covered by the below sticker, perhaps a sku update not too sure but this is a great size filter with an open end.
I removed the stock airbox, there's 3 x Torx screws underneath on the belt protector then it just comes off, you need to remove the left/front side vac hose it has a small clamp. The right/rear vac hose actually goes into the airbox so I just greased it a little bit to help and it pulled right out.
You can see here the 2 x vac hoses
Now was time to mock up the new intake, note that I didn't have smaller clamps so these look silly for now, they will be replaced. I chose red mostly because that's all that was in stock on Amazon but it's also my fav color so I figured I would add some red where you can't see it lol:
I tried to keep the intake as high as possible as recommended by others, I will be adding a little brace to it as well:
I ordered these guys from China, when/if they make it here I will be adding these to the intake to connect both vac hoses as I don't want to leave them venting to atmosphere, probably not the end of the world but I want it to be right.

ROCKERDAN
OCD Sledhead
- Joined
- Oct 8, 2005
- Messages
- 7,496
- Reaction score
- 3,609
- Points
- 2,003
- Location
- Huntsville Ontario & Niagara NY
- Country
- Other
- Snowmobile
- '18 RTX 50th "Winder"
Nice Build thread brother! I love looking through these, looking good!
Dan
Dan
JayM
Expert
- Joined
- Oct 29, 2018
- Messages
- 476
- Reaction score
- 266
- Points
- 488
- Location
- Pickering, ON
- Country
- Canada
- Snowmobile
- 2017 Sidewinder R-TX SE
Basically have to credit you for pretty much all of mods!!!!Nice Build thread brother! I love looking through these, looking good!
Dan
JayM
Expert
- Joined
- Oct 29, 2018
- Messages
- 476
- Reaction score
- 266
- Points
- 488
- Location
- Pickering, ON
- Country
- Canada
- Snowmobile
- 2017 Sidewinder R-TX SE
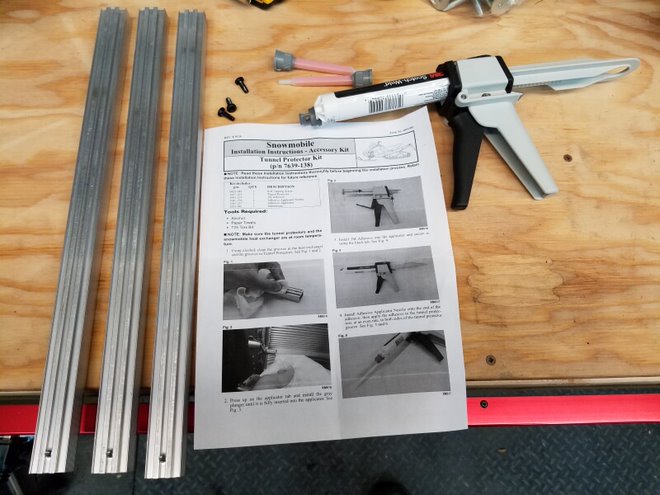
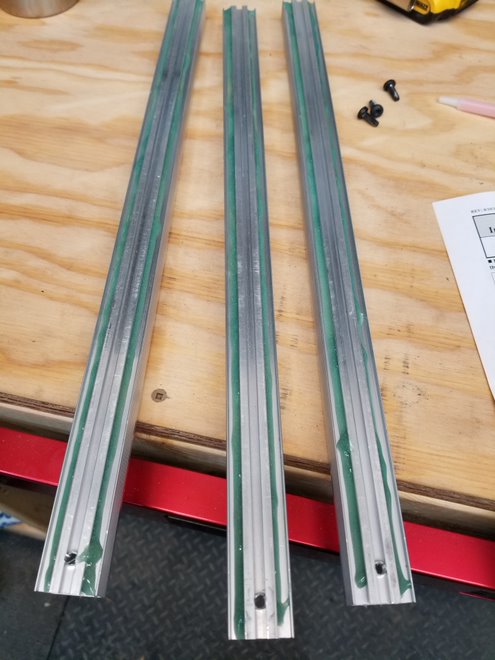
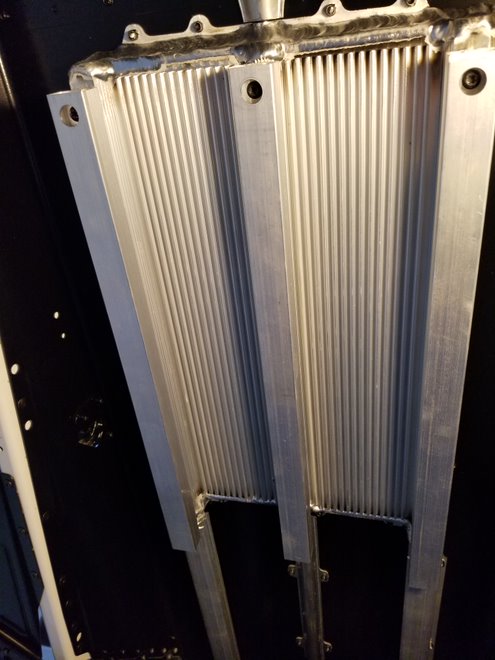
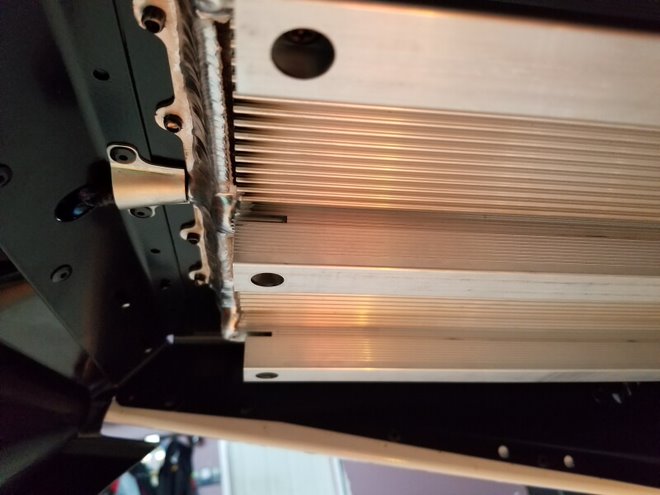
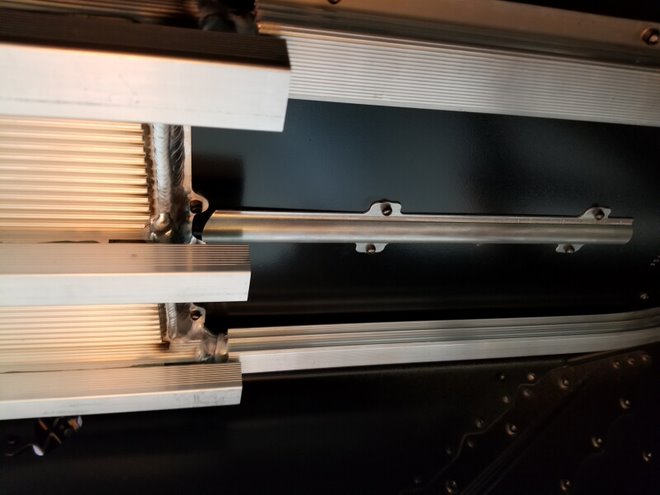
-Yamaha Tunnel Protectors (SMA-8LR24-00-BK) - Nov 19th, 2018
This is fairly easy to do, I followed @ROCKERDAN 's suggestion and drilled out the holes to 11/16th and pre-drilled the T-25 Torx screws with an impact in then took them out. Certainly want to use a Torx Screw Driver for final install as mine dug into the aluminum a little bit, wouldn't want to impact those in I don't think.
One thing to note is I did the tunnel protectors then started on the studding.......that Epoxy is mighty potent I did 12 bars and had to go inside the house lol
JayM
Expert
- Joined
- Oct 29, 2018
- Messages
- 476
- Reaction score
- 266
- Points
- 488
- Location
- Pickering, ON
- Country
- Canada
- Snowmobile
- 2017 Sidewinder R-TX SE
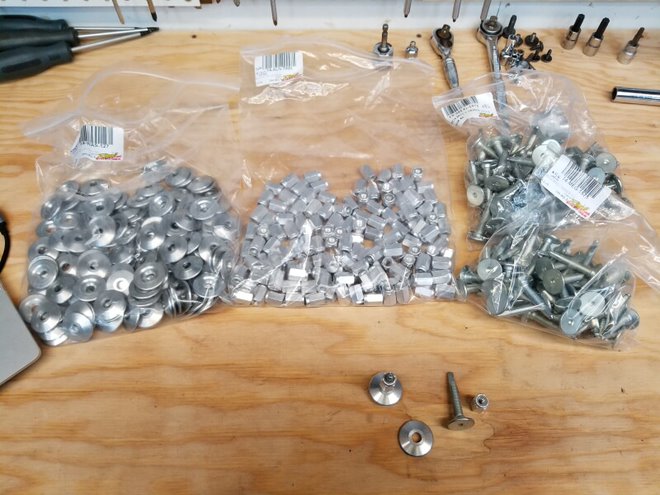
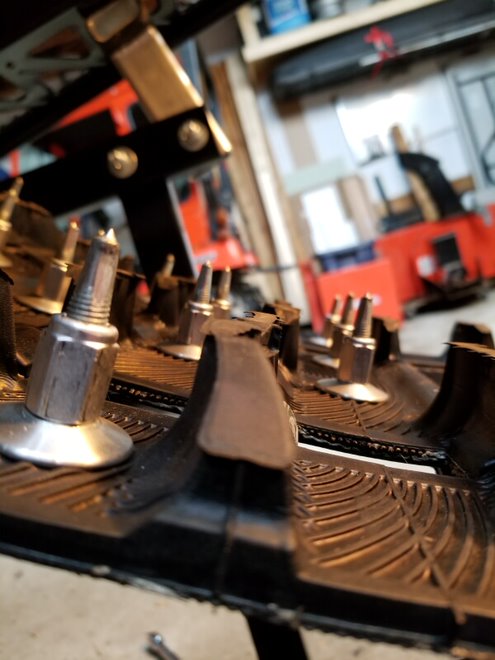
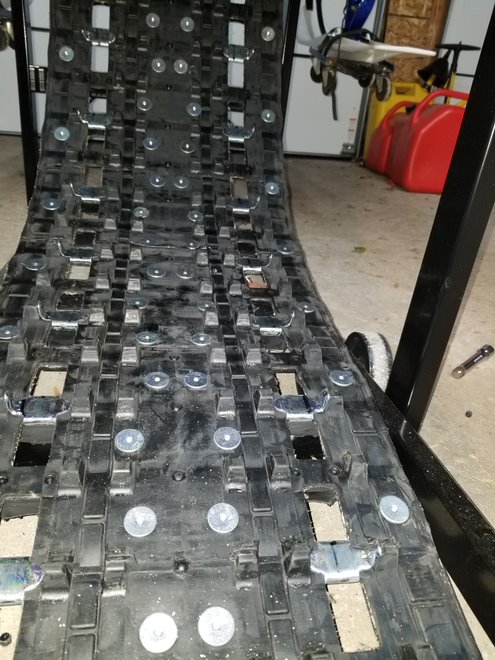
-Woody's Megabite 1.575" studs - November 21st, 2018
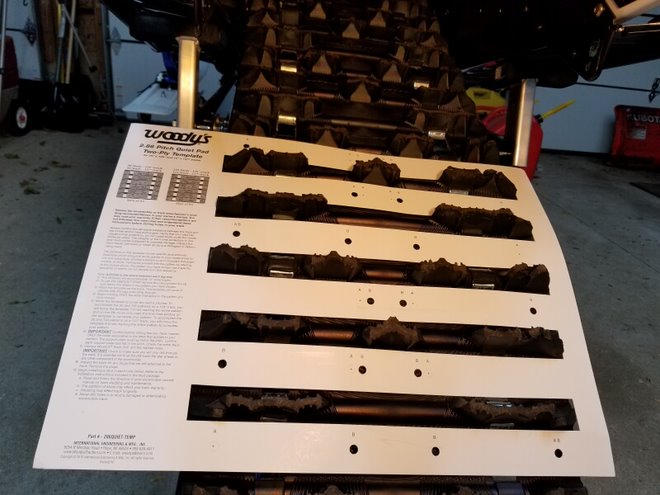
When I got this sled I knew for sure it needed studs, read lots of threads and information, there's so many different theory's on this, some say not to go within 3.5" of the middle, some say more studs the better etc. What I decided to do due to availability of template is use the Woody's Quite-Pad Template which keeps the inside studs within the quite pads. This template is 3 studs per bar for 135 studs today.
I went with the Woody's Megabites in 1.575", seems so long to me as I'm not used to running that long of a stud but might be a good offset for only using 135. If I find this isn't enough studs I can always stud both edges of the track or add a double back on each bar etc. I went with a machined aluminum backer and the Woody's Big Nut.
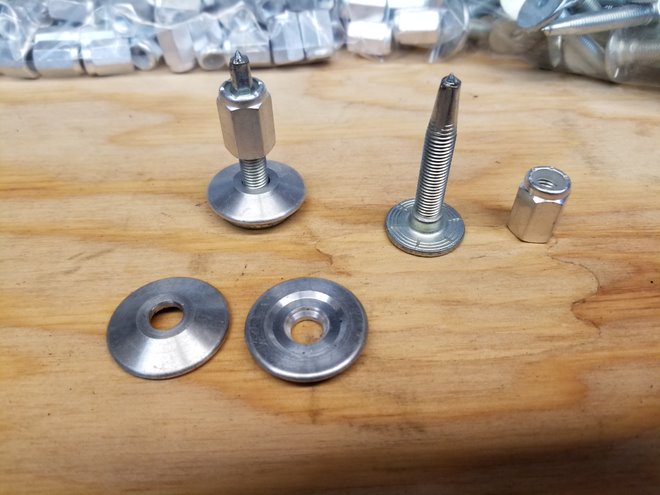
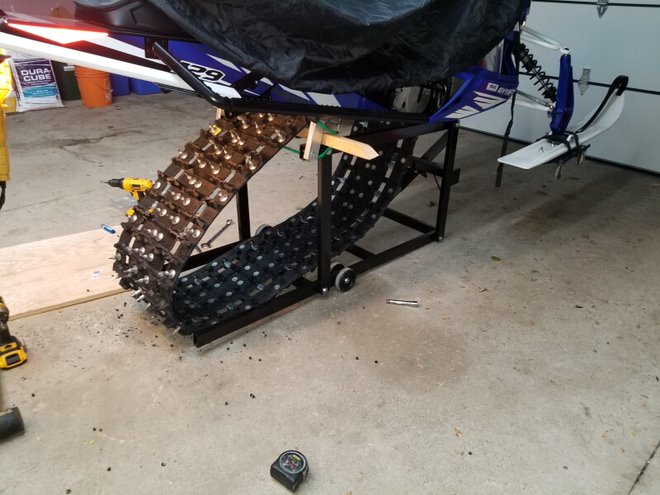
I decided to remove the skid to give me more room and I had to install the 4th wheel kit anyways so made that easier to. (I did not know at the time that while it was easy to get it out, putting it back in caused a lot of cursing!!!!)
Template I used:
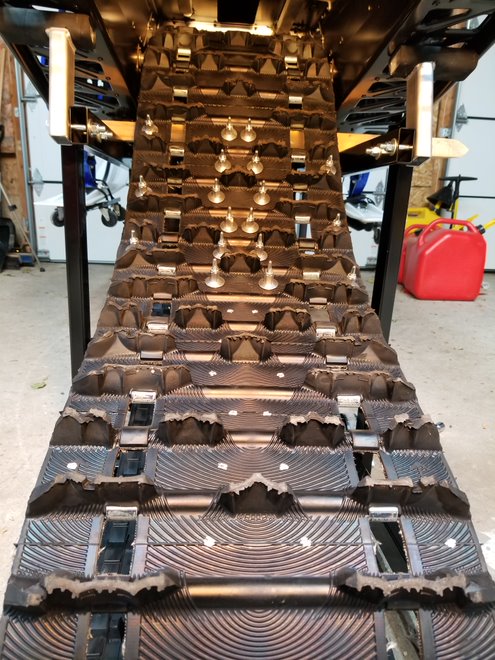
I used an impact to put the nuts on most of the way then I used a torque wrench and torqued them down to 15 ft lbs. It's not the most fun job ever but I did 2-3 templates worth over 3 evenings so that made it easier.
When I got this sled I knew for sure it needed studs, read lots of threads and information, there's so many different theory's on this, some say not to go within 3.5" of the middle, some say more studs the better etc. What I decided to do due to availability of template is use the Woody's Quite-Pad Template which keeps the inside studs within the quite pads. This template is 3 studs per bar for 135 studs today.
I went with the Woody's Megabites in 1.575", seems so long to me as I'm not used to running that long of a stud but might be a good offset for only using 135. If I find this isn't enough studs I can always stud both edges of the track or add a double back on each bar etc. I went with a machined aluminum backer and the Woody's Big Nut.
I decided to remove the skid to give me more room and I had to install the 4th wheel kit anyways so made that easier to. (I did not know at the time that while it was easy to get it out, putting it back in caused a lot of cursing!!!!)
Template I used:
I used an impact to put the nuts on most of the way then I used a torque wrench and torqued them down to 15 ft lbs. It's not the most fun job ever but I did 2-3 templates worth over 3 evenings so that made it easier.
JayM
Expert
- Joined
- Oct 29, 2018
- Messages
- 476
- Reaction score
- 266
- Points
- 488
- Location
- Pickering, ON
- Country
- Canada
- Snowmobile
- 2017 Sidewinder R-TX SE
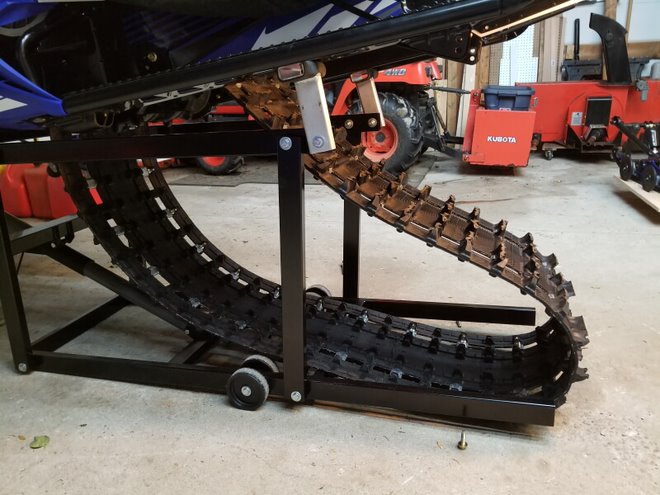
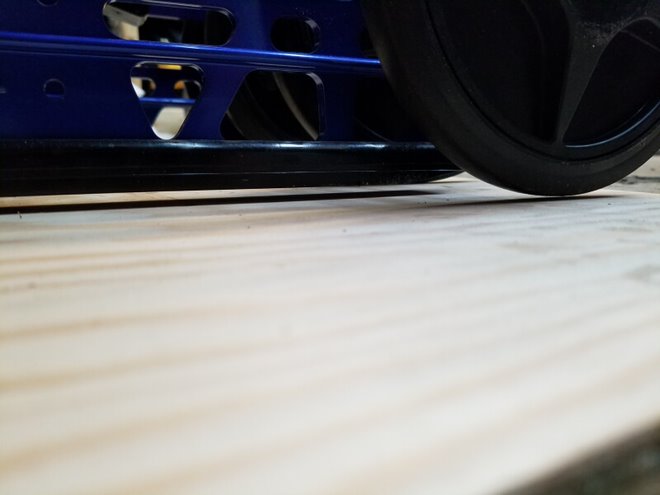
-Turbo Dynamics 4th Wheel full replacement kit - Nov 22nd, 2018
After starting to look up stuff about this sled I knew 4th wheel kit was a must, at first I was just going to order the Yamaha kit with just the 2 extra wheels but then I looked into it more and decided to get the Turbo Dynamics 4th wheel kit. This kit upgrades the stock ~7.1" wheels to 7.5" which means the track at the rear won't be always riding on the sliders compared to stock.
TD Kit:
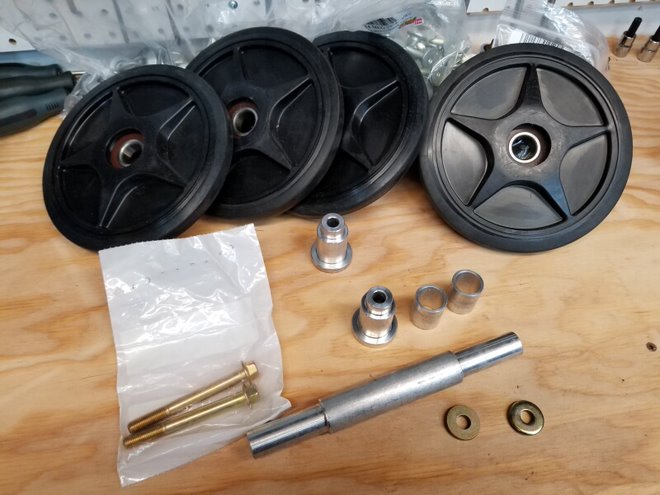
Stock Tri-Hub:
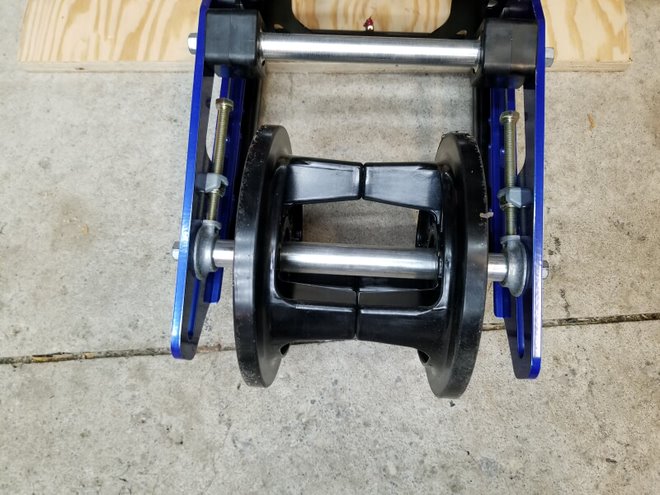
TD Kit on:
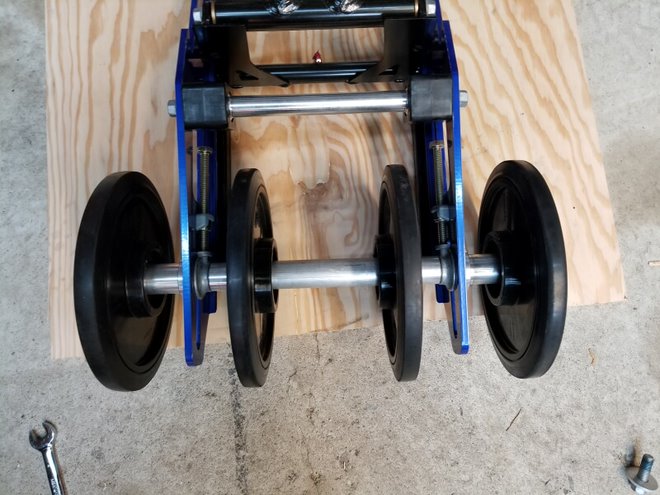
I forgot to take a side pic of the stock wheels but you can see here now the rear sliders don't ride on the flat board anymore they are elevated due to the bigger wheels.
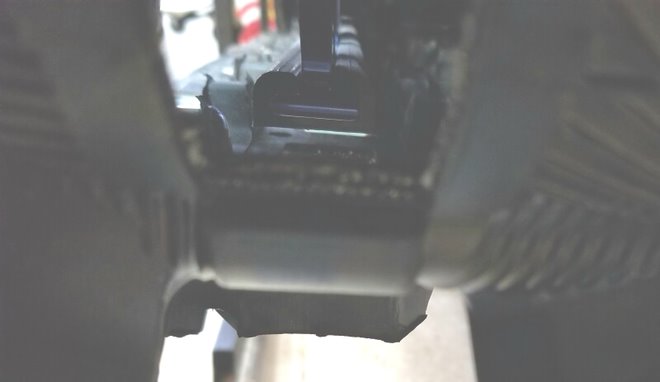
After starting to look up stuff about this sled I knew 4th wheel kit was a must, at first I was just going to order the Yamaha kit with just the 2 extra wheels but then I looked into it more and decided to get the Turbo Dynamics 4th wheel kit. This kit upgrades the stock ~7.1" wheels to 7.5" which means the track at the rear won't be always riding on the sliders compared to stock.
TD Kit:
Stock Tri-Hub:
TD Kit on:
I forgot to take a side pic of the stock wheels but you can see here now the rear sliders don't ride on the flat board anymore they are elevated due to the bigger wheels.
JayM
Expert
- Joined
- Oct 29, 2018
- Messages
- 476
- Reaction score
- 266
- Points
- 488
- Location
- Pickering, ON
- Country
- Canada
- Snowmobile
- 2017 Sidewinder R-TX SE
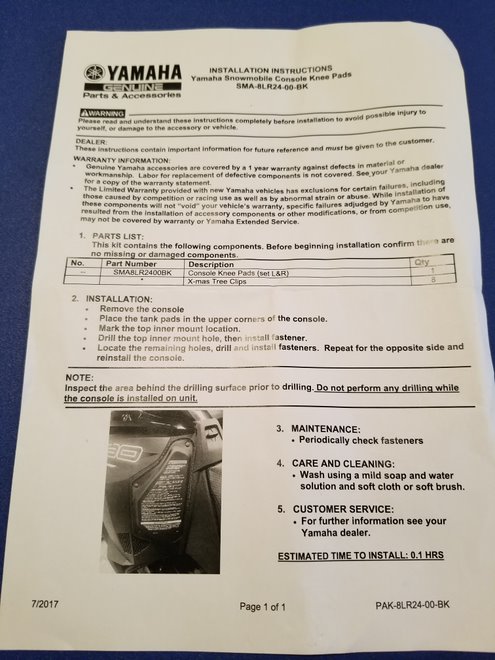
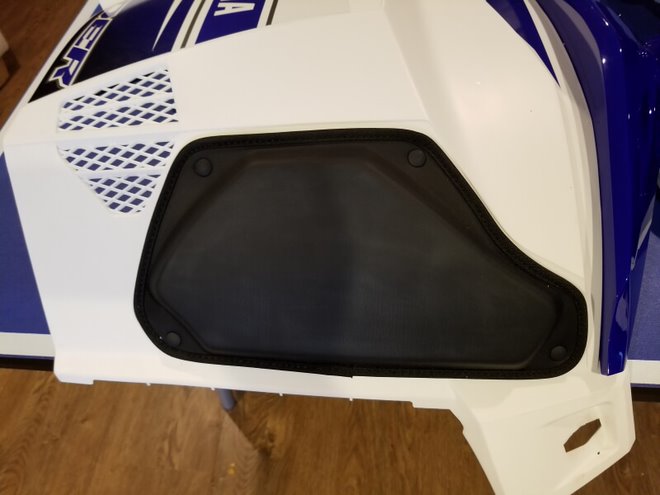
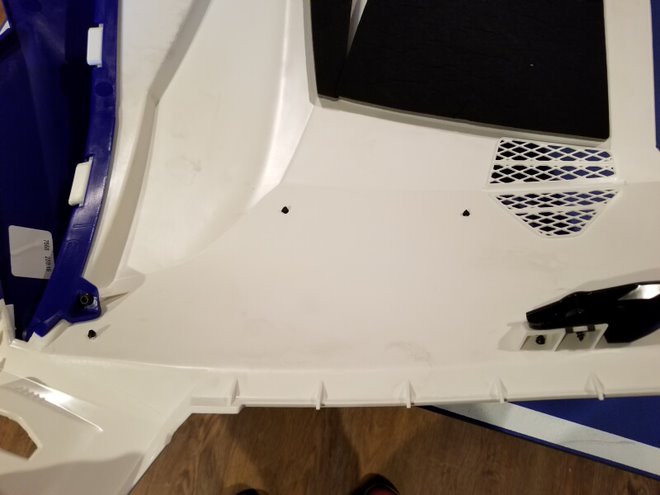
-Yamaha Console Knee Pads (SMA-8LR24-00-BK) - Nov 24th, 2018
I wanted to install some knee pads, especially since my panels are white and I know they will get dirty real quick. I decided on the Yamaha ones, wasn't too sure on drilling into the panels but hey I went with it. I removed the factory warning stickers and I also used Acetone and removed the warning sticker from the actual knee pad. I started slowly as I was worried it would ruin the knee pads but it was fine.
One thing the Yamaha Directions was missing was the drill bit size, I found 11/64 to be the perfect size, I started 4 sizes smaller and went up 1/64th at a time until it worked.
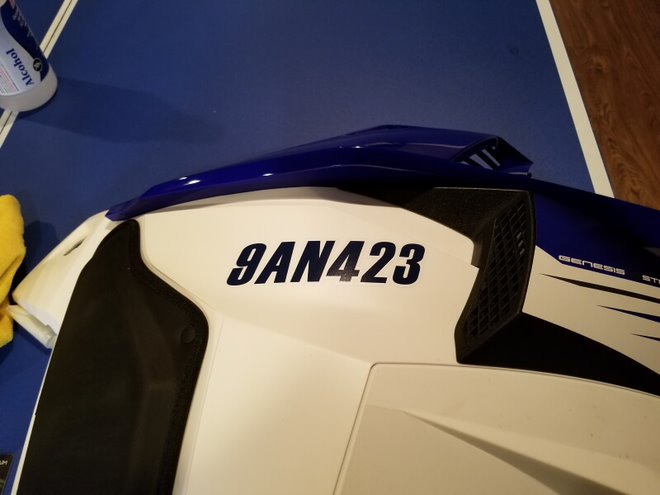
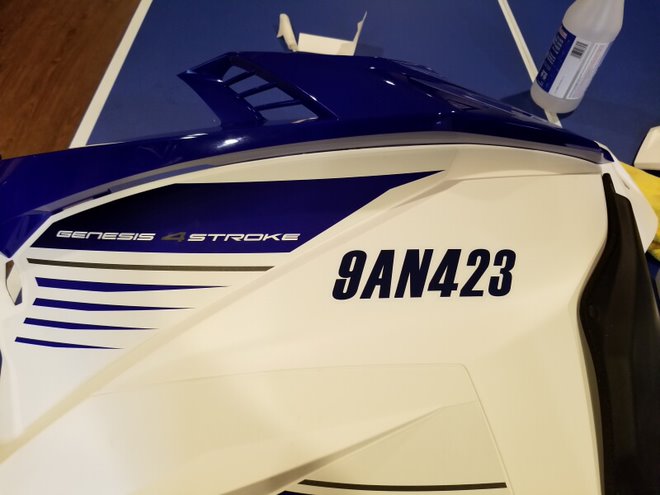
-Custom Registration Numbers - Nov 24th, 2018
I got my custom registration numbers in, the blue is darker then it seemed online so I will probably change it at some point but will be fine for this season.
I wanted to install some knee pads, especially since my panels are white and I know they will get dirty real quick. I decided on the Yamaha ones, wasn't too sure on drilling into the panels but hey I went with it. I removed the factory warning stickers and I also used Acetone and removed the warning sticker from the actual knee pad. I started slowly as I was worried it would ruin the knee pads but it was fine.
One thing the Yamaha Directions was missing was the drill bit size, I found 11/64 to be the perfect size, I started 4 sizes smaller and went up 1/64th at a time until it worked.
-Custom Registration Numbers - Nov 24th, 2018
I got my custom registration numbers in, the blue is darker then it seemed online so I will probably change it at some point but will be fine for this season.
Sevey
TY 4 Stroke God
- Joined
- Feb 15, 2011
- Messages
- 1,787
- Reaction score
- 620
- Points
- 1,228
- Location
- Collingwood, ON
- Website
- www.ty4stroke.com
- Country
- Canada
- Snowmobile
- 2018 Sidewinder RTX
Enjoyed your build
Nice job
Thanks for posting
Ms
Nice job
Thanks for posting
Ms
JayM
Expert
- Joined
- Oct 29, 2018
- Messages
- 476
- Reaction score
- 266
- Points
- 488
- Location
- Pickering, ON
- Country
- Canada
- Snowmobile
- 2017 Sidewinder R-TX SE
Thanks @Sevey only a few things left to do and she's ready for snow. Then we wait for the trails to open!!Enjoyed your build
Nice job
Thanks for posting
Ms
ApexXTX/Viper
Expert
- Joined
- May 5, 2014
- Messages
- 246
- Reaction score
- 57
- Points
- 463
- Location
- Ontario
- Country
- Canada
- Snowmobile
- 2019 SRX, 2018 Viper LTX
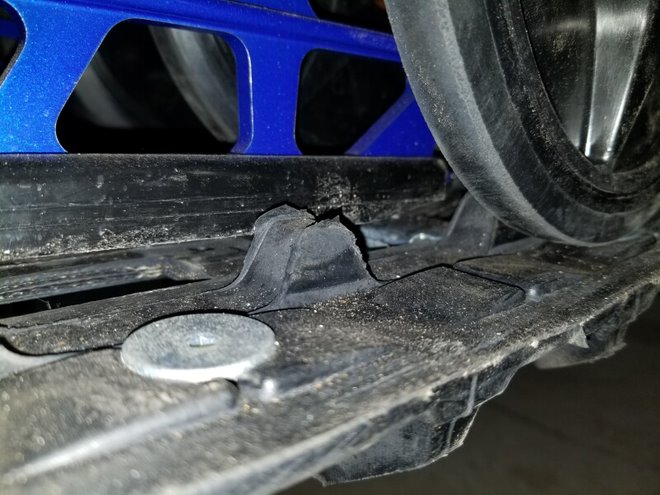
Great thread! You might want to tighten that stud down flush with the Quiet Pad pictured in front of your new rear wheel if you haven't done so already.-Turbo Dynamics 4th Wheel full replacement kit - Nov 22nd, 2018
After starting to look up stuff about this sled I knew 4th wheel kit was a must, at first I was just going to order the Yamaha kit with just the 2 extra wheels but then I looked into it more and decided to get the Turbo Dynamics 4th wheel kit. This kit upgrades the stock ~7.1" wheels to 7.5" which means the track at the rear won't be always riding on the sliders compared to stock.
TD Kit:
Stock Tri-Hub:
TD Kit on:
I forgot to take a side pic of the stock wheels but you can see here now the rear sliders don't ride on the flat board anymore they are elevated due to the bigger wheels.
Similar threads
- Replies
- 45
- Views
- 5K
- Replies
- 623
- Views
- 216K
-
This site uses cookies to help personalise content, tailor your experience and to keep you logged in if you register.
By continuing to use this site, you are consenting to our use of cookies.