

1CrazySledder
Lifetime Member
- Joined
- Aug 11, 2005
- Messages
- 2,006
- Reaction score
- 4
- Points
- 1,068
- Location
- Cartersville, GA.
- Country
- USA
- Snowmobile
- None, looking now!
Very nice work.
Glad that skid is in good shape, that box had me wondering.....lol
That sled is coming along great. Keep up the good work and the photos coming.
Sent ya a PM.....
-1CS
Glad that skid is in good shape, that box had me wondering.....lol
That sled is coming along great. Keep up the good work and the photos coming.
Sent ya a PM.....
-1CS
rxrider
Jan-Ove Pedersen
- Joined
- Apr 25, 2003
- Messages
- 7,355
- Reaction score
- 64
- Points
- 1,753
- Location
- Lakselv - 70N & 25E
- Country
- Norway
- Snowmobile
- 2014 Phazer XTX, 2013 Phazer RTX, 2008 Apex RTX, 2007 Warrior, 2006 Attak
Thanks, talk to you later.
rxrider
rxrider
rxrider
Jan-Ove Pedersen
- Joined
- Apr 25, 2003
- Messages
- 7,355
- Reaction score
- 64
- Points
- 1,753
- Location
- Lakselv - 70N & 25E
- Country
- Norway
- Snowmobile
- 2014 Phazer XTX, 2013 Phazer RTX, 2008 Apex RTX, 2007 Warrior, 2006 Attak
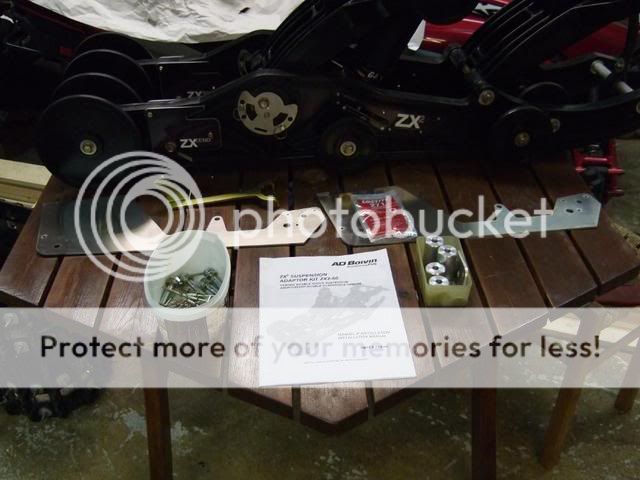
UPDATE - November 24. - Installing the ZX-2 mounting kit into the tunnel.
Yesterday I finished off the install of the ZX-2 skid mounting kit.
The skid mounting kit containes the following parts:
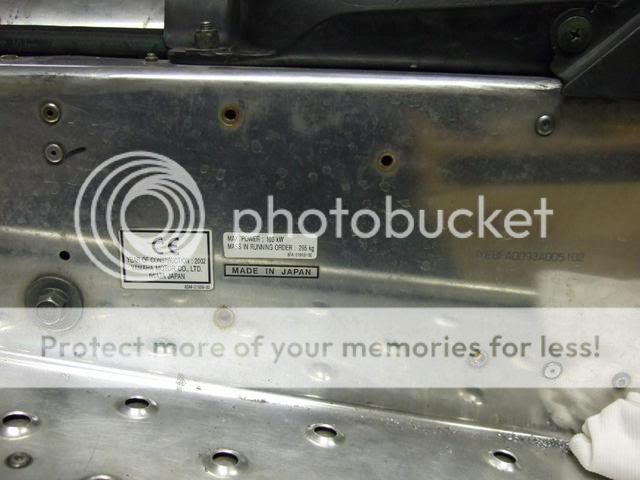
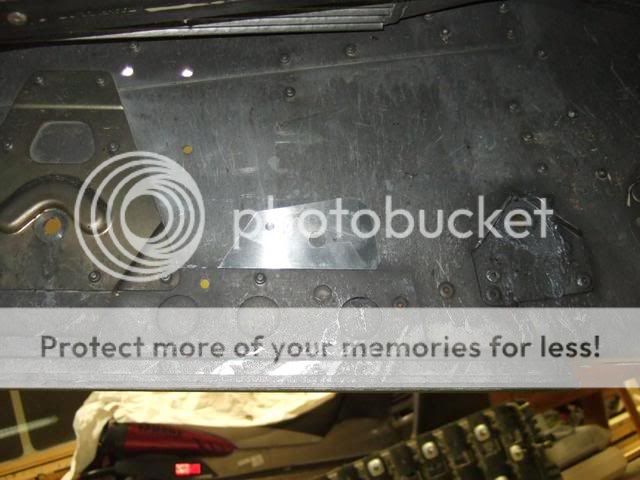
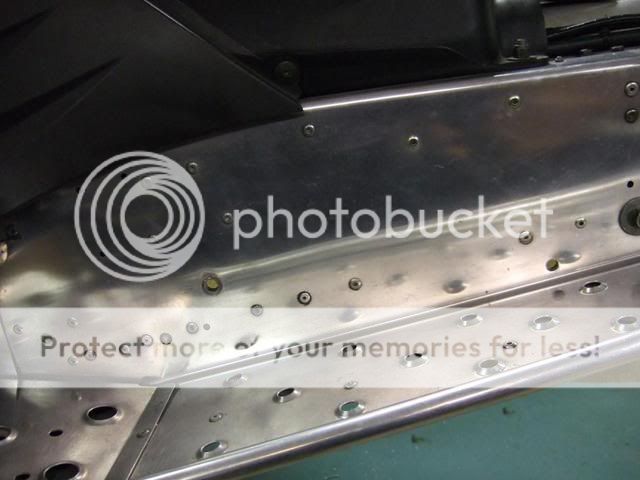
I started by out by punching out the center steel core of the following 4 rivets, makes drilling the rivets way easier. Here's a pic showing the 4 rivets removed from the frame, they're positioned right in front of the front stock rear mount bolt.
First part to install is the small round pieces, they fits inside the "holes" in the heat exchangers. Use some fibre tape or any tape that will hold them in place, they will be drill into at a later stage. They go into the second hole in front of the stock rear mounting bracket as shown in this pic
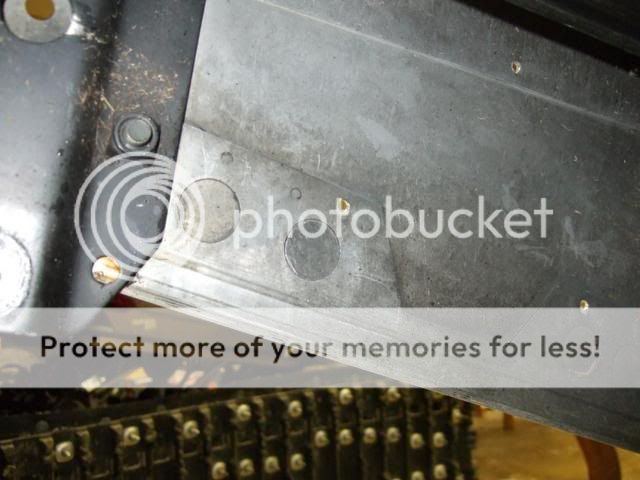
When I first tried to fit the ZX-2 reinforcement plate one rivet was still in the way, it had to be removed (Remember this is on a 2003 RX-1, other model years may be different). Tap and drill the last 2 rivets, it's the rivet right in front of the 4 rivets in a row holding the stock center reinforcement plate in place, it sits just a tad lower in the tunnel than the others, as shown in this pic
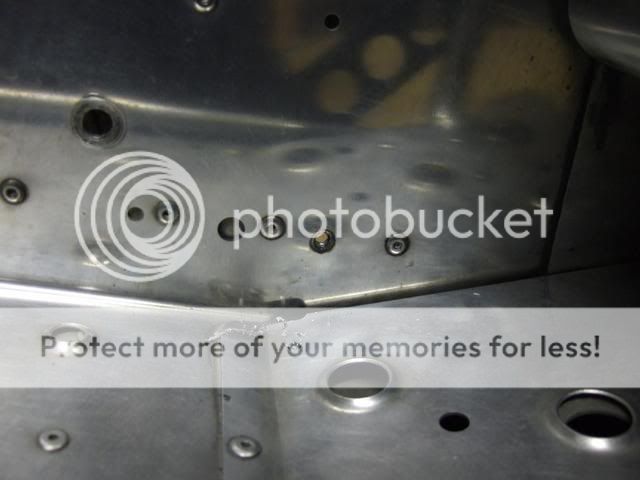
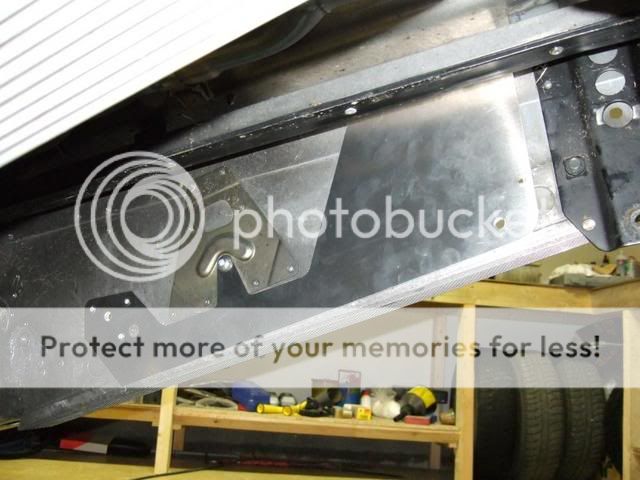
Next was installing of the small reinforcement plates for the ZX-2 front mounting holes, it goes behind the large reinforcement plate to fill in a gap behind the large plate. The following pic shows the position of the small plate.
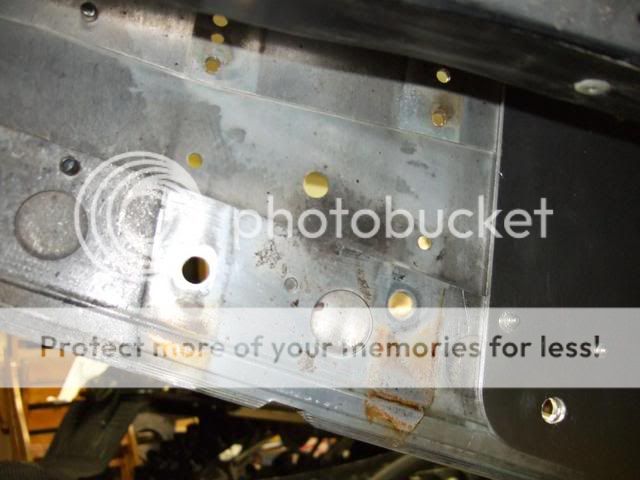
With the last rivet out of the way it's time to fit the large reinforcement plate into the tunnel. It's done by installing the plate into the inside of the tunnel and fasten it with the Allen screws in the stock skid's center mounting hole, as shown in the pic below. Also make sure that the rear end of the plate is correctly in place tight under the tunnel. Also make sure that the small plate in the front is in place and the holes in both plates aligns perfectly. Tighten the Allen bolt and nut. Now is a good time to recheck alignment in the front, and position in the rear end of the plate to ensure that it is still in position. Whit the large reinforcement plate in the correct position, from the inside of the tunnel, drill out the rear and front mounting bolt holes for the ZX-2 using the reinforcement plate as the template.
When done drilling out the rear and front mounting bolt holes it is time to drill out holes for the rivets. To make this task a little easier I installed 13/32 bolts and nuts in holes drilled in the previous step. This will keep the large plate fixed to prevent it from moving around while drilling holes for the rivets. Then go on to drilling out the holes from the inside of the tunnel using the reinforcement plate as a template.
When done drilling from the inside, finish off by drilling out holes from the outside. Drill out holes blocked by the large plate using the holes in the frame as the template. When done drilling remove the plate and clean off any burr left from the drilling from the tunnel, and reinforcement plates, check both side. This is important in order to prevent gaps between the plates while riveting them together.
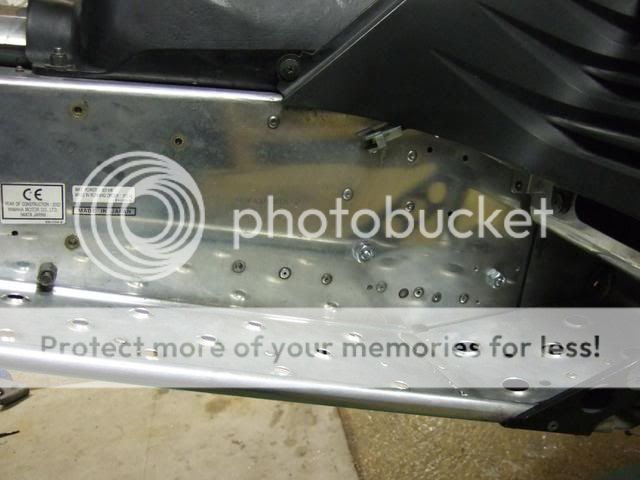
Time to start installing the small and large plates to the frame. Install the large plate to the frame by installing bolts in the center and rear hole to fix the plate into position, align the small plate with the holes in the large plate and install a bolt in the front mounting hole. With the plates in perfect position start riveting it to the frame. The following pic shows the large plate riveted to the frame seen from the inside of the tunnel.
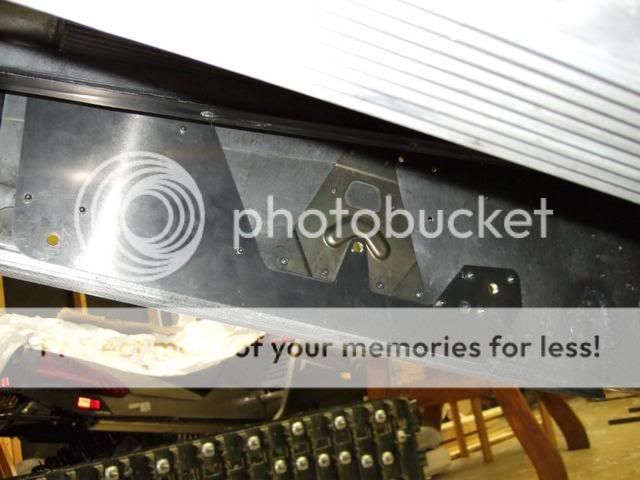
This is what it looks like from the outside.
Last step was to install the Allen bolt and nut used to fixate the position of the reinforcement plate in the stock skid center mounting hole (not shown in the pics). I added blue locktite and tightened it down, figured it would add to the strenght of the reinforcement plate.
Finally I deceided to remove the stock rear mouning brackets from the tunnel, saving another 2.8 lbs or 1.3 kg of worthless mass. Total weight removed from sled now totals to 49 lbs or 22.3 kgs.
When I removed the stock skid rear mounting brackets I found a crack in the left side heat exchanger. It started leaking coolant the moment I removed the bracket. Crack was about 1/2" long or 12-13 millimeters long. I'll have to get a welder home to my garage to fix the crack while my sled is off the ground.
I had a leak last year I couldn't figure the origin to, but I were able to cure the leak with a additive for fixing leaking heat exchangers, don't remember the name of that stuff.
Waiting for the following parts and other stuff to do:
- Front end bushing
- Secondary side jack shaft bearing
- Welding the left side heat exchanger
- Installing new extroverts to the drive axel
- Installing the ZX-2 into the tunnel
Yesterday I finished off the install of the ZX-2 skid mounting kit.
The skid mounting kit containes the following parts:
I started by out by punching out the center steel core of the following 4 rivets, makes drilling the rivets way easier. Here's a pic showing the 4 rivets removed from the frame, they're positioned right in front of the front stock rear mount bolt.
First part to install is the small round pieces, they fits inside the "holes" in the heat exchangers. Use some fibre tape or any tape that will hold them in place, they will be drill into at a later stage. They go into the second hole in front of the stock rear mounting bracket as shown in this pic
When I first tried to fit the ZX-2 reinforcement plate one rivet was still in the way, it had to be removed (Remember this is on a 2003 RX-1, other model years may be different). Tap and drill the last 2 rivets, it's the rivet right in front of the 4 rivets in a row holding the stock center reinforcement plate in place, it sits just a tad lower in the tunnel than the others, as shown in this pic
Next was installing of the small reinforcement plates for the ZX-2 front mounting holes, it goes behind the large reinforcement plate to fill in a gap behind the large plate. The following pic shows the position of the small plate.
With the last rivet out of the way it's time to fit the large reinforcement plate into the tunnel. It's done by installing the plate into the inside of the tunnel and fasten it with the Allen screws in the stock skid's center mounting hole, as shown in the pic below. Also make sure that the rear end of the plate is correctly in place tight under the tunnel. Also make sure that the small plate in the front is in place and the holes in both plates aligns perfectly. Tighten the Allen bolt and nut. Now is a good time to recheck alignment in the front, and position in the rear end of the plate to ensure that it is still in position. Whit the large reinforcement plate in the correct position, from the inside of the tunnel, drill out the rear and front mounting bolt holes for the ZX-2 using the reinforcement plate as the template.
When done drilling out the rear and front mounting bolt holes it is time to drill out holes for the rivets. To make this task a little easier I installed 13/32 bolts and nuts in holes drilled in the previous step. This will keep the large plate fixed to prevent it from moving around while drilling holes for the rivets. Then go on to drilling out the holes from the inside of the tunnel using the reinforcement plate as a template.
When done drilling from the inside, finish off by drilling out holes from the outside. Drill out holes blocked by the large plate using the holes in the frame as the template. When done drilling remove the plate and clean off any burr left from the drilling from the tunnel, and reinforcement plates, check both side. This is important in order to prevent gaps between the plates while riveting them together.
Time to start installing the small and large plates to the frame. Install the large plate to the frame by installing bolts in the center and rear hole to fix the plate into position, align the small plate with the holes in the large plate and install a bolt in the front mounting hole. With the plates in perfect position start riveting it to the frame. The following pic shows the large plate riveted to the frame seen from the inside of the tunnel.
This is what it looks like from the outside.
Last step was to install the Allen bolt and nut used to fixate the position of the reinforcement plate in the stock skid center mounting hole (not shown in the pics). I added blue locktite and tightened it down, figured it would add to the strenght of the reinforcement plate.
Finally I deceided to remove the stock rear mouning brackets from the tunnel, saving another 2.8 lbs or 1.3 kg of worthless mass. Total weight removed from sled now totals to 49 lbs or 22.3 kgs.
When I removed the stock skid rear mounting brackets I found a crack in the left side heat exchanger. It started leaking coolant the moment I removed the bracket. Crack was about 1/2" long or 12-13 millimeters long. I'll have to get a welder home to my garage to fix the crack while my sled is off the ground.
I had a leak last year I couldn't figure the origin to, but I were able to cure the leak with a additive for fixing leaking heat exchangers, don't remember the name of that stuff.
Waiting for the following parts and other stuff to do:
- Front end bushing
- Secondary side jack shaft bearing
- Welding the left side heat exchanger
- Installing new extroverts to the drive axel
- Installing the ZX-2 into the tunnel
rxrider
Jan-Ove Pedersen
- Joined
- Apr 25, 2003
- Messages
- 7,355
- Reaction score
- 64
- Points
- 1,753
- Location
- Lakselv - 70N & 25E
- Country
- Norway
- Snowmobile
- 2014 Phazer XTX, 2013 Phazer RTX, 2008 Apex RTX, 2007 Warrior, 2006 Attak
Last post got double posted, removed 
Rxrider great step by step again. I can't wait to get mine here. It's been snowing for the last 3 days. I hope it's the start to a good snow year.
rxrider
Jan-Ove Pedersen
- Joined
- Apr 25, 2003
- Messages
- 7,355
- Reaction score
- 64
- Points
- 1,753
- Location
- Lakselv - 70N & 25E
- Country
- Norway
- Snowmobile
- 2014 Phazer XTX, 2013 Phazer RTX, 2008 Apex RTX, 2007 Warrior, 2006 Attak
Glad you finally are getting some snow in Ontario.
rxrider
Jan-Ove Pedersen
- Joined
- Apr 25, 2003
- Messages
- 7,355
- Reaction score
- 64
- Points
- 1,753
- Location
- Lakselv - 70N & 25E
- Country
- Norway
- Snowmobile
- 2014 Phazer XTX, 2013 Phazer RTX, 2008 Apex RTX, 2007 Warrior, 2006 Attak
UPDATE - November 28.
Got the Base skid install guide by email from Jeff/ADBoivin the other day, finally got the time to read it thru. It turned out I had the shocks in with the air valves facing forward, bummer. Took off the 2 small idler wheels in the center and removed the shocks from the skid, turned them around so the air valves are facing backwards and reinstalled upper axel and lower axel. When installing the wheels I noticed that the install guide said to apply read loctite and torque the bolts to 68 Nm or 50 lbs/ft and so I did. I also retorqued the front idler wheels to the same specs. Finally I removed the bolts holding the rear idler wheels in place, added some red loctite and tightened them to 68 Nm or 50 lbs/ft. I haven't noticed it before, but on the ZX-2 skid you do not have to loosen the bolts holding the rear axel idler wheels in place in order to adjust track tension, nice.
Got the secondary side jack shaft bearing today") , front end bushing is still on backorder :-(.
, front end bushing is still on backorder :-(.
Talked to a welder today, he may have the time this weekend to weld up my cracked cooler.
Got the Base skid install guide by email from Jeff/ADBoivin the other day, finally got the time to read it thru. It turned out I had the shocks in with the air valves facing forward, bummer. Took off the 2 small idler wheels in the center and removed the shocks from the skid, turned them around so the air valves are facing backwards and reinstalled upper axel and lower axel. When installing the wheels I noticed that the install guide said to apply read loctite and torque the bolts to 68 Nm or 50 lbs/ft and so I did. I also retorqued the front idler wheels to the same specs. Finally I removed the bolts holding the rear idler wheels in place, added some red loctite and tightened them to 68 Nm or 50 lbs/ft. I haven't noticed it before, but on the ZX-2 skid you do not have to loosen the bolts holding the rear axel idler wheels in place in order to adjust track tension, nice.
Got the secondary side jack shaft bearing today
, front end bushing is still on backorder :-(.Talked to a welder today, he may have the time this weekend to weld up my cracked cooler.
Grimm
TY 4 Stroke God
- Joined
- Apr 15, 2005
- Messages
- 4,989
- Reaction score
- 234
- Points
- 1,573
- Location
- Ottawa, Ontario
- Country
- Canada
- Snowmobile
- 2018 MXZ 850
rxrider said:I haven't noticed it before, but on the ZX-2 skid you do not have to loosen the bolts holding the rear axel idler wheels in place in order to adjust track tension, nice.
Holy cow, I didn't notice this either. It would have helped had I noticed this post earlier today. I'm so used to having to do this on my last sleds that I took it for granted that you had to loosen the axle bolts first. That is very cool.
!")
kinger
VIP Member
- Joined
- Jan 17, 2005
- Messages
- 7,425
- Reaction score
- 1,559
- Points
- 1,963
- Location
- Clear Lake, IA
- Website
- www.piergenius.com
Grimm said:rxrider said:I haven't noticed it before, but on the ZX-2 skid you do not have to loosen the bolts holding the rear axel idler wheels in place in order to adjust track tension, nice.
Holy cow, I didn't notice this either. It would have helped had I noticed this post earlier today. I'm so used to having to do this on my last sleds that I took it for granted that you had to loosen the axle bolts first. That is very cool.
I'm a freaking engineer and I cannot figure out how it tightens the track tension, I am just going to install it and start turning and see what happens! LOL All I see is a bolt that pushes against the rear axle that pushes the rear axle forward not backward. Here is a picture for those interested of mine before the rear wheels are installed:
http://www.ty4stroke.com/download.php?id=35414
Glad I do not have to loosen the rear axle nuts I put a crap load of locktite on them!!
Grimm
TY 4 Stroke God
- Joined
- Apr 15, 2005
- Messages
- 4,989
- Reaction score
- 234
- Points
- 1,573
- Location
- Ottawa, Ontario
- Country
- Canada
- Snowmobile
- 2018 MXZ 850
The rear axle does not go through all four rear wheels, just the inner two. The adjuster bolt passes through the adjuster block and presses against a plate, which in turn pulls the block backwards, taking the axle with it.
If you look at your picture, you can actually see bolt going through and pressing up against the plate.
If you look at your picture, you can actually see bolt going through and pressing up against the plate.
kinger
VIP Member
- Joined
- Jan 17, 2005
- Messages
- 7,425
- Reaction score
- 1,559
- Points
- 1,963
- Location
- Clear Lake, IA
- Website
- www.piergenius.com
AHHHHHH yes thank you. I was used to my edge which used the edge of the bolt to 'push' against the axle. I wouldn't think the threads of the bolt would not be durable enough but if it passes on sno cross racing its fine for me LOL!
rxrider
Jan-Ove Pedersen
- Joined
- Apr 25, 2003
- Messages
- 7,355
- Reaction score
- 64
- Points
- 1,753
- Location
- Lakselv - 70N & 25E
- Country
- Norway
- Snowmobile
- 2014 Phazer XTX, 2013 Phazer RTX, 2008 Apex RTX, 2007 Warrior, 2006 Attak
Grimm said:rxrider said:I haven't noticed it before, but on the ZX-2 skid you do not have to loosen the bolts holding the rear axel idler wheels in place in order to adjust track tension, nice.
Holy cow, I didn't notice this either. It would have helped had I noticed this post earlier today. I'm so used to having to do this on my last sleds that I took it for granted that you had to loosen the axle bolts first. That is very cool.
While looking at it, it seemed like a possibility, but after re-reading the Base install guide last night I noticed the guide says to loosen the bolts holding the rear idler wheels to the axel some before adjusting track tension. MY BAD for NOT reading the guide A-Z before making assumptions and comments, sorry.
BTW - I still think it is possible to adjust the track without loosening the bolts. Idler wheels and Axel are connected to the adjuster blocks which are not solid bolted to the rails, the blocks can slide back and forth inside the rail. IMO it can be done by adjusting both adjuster bolts simultanously keeping the rear axel angular at 90 degrees to the rails. Maybe or maybe not, have to do a test to know for sure.
rxrider
Jan-Ove Pedersen
- Joined
- Apr 25, 2003
- Messages
- 7,355
- Reaction score
- 64
- Points
- 1,753
- Location
- Lakselv - 70N & 25E
- Country
- Norway
- Snowmobile
- 2014 Phazer XTX, 2013 Phazer RTX, 2008 Apex RTX, 2007 Warrior, 2006 Attak
UPDATE - November 29. - Fixing up a leaky floor board heat exchanger.
Last night I started the preparation before taking my sled to the welder to weld up my cracked left side heat exchanger.
He told me to unhook the coolant hoses connecting to the heat exchanger and fully empty it of coolant. When the sled is in at the welder he will clean out the exchanger with some water and then completely dry it out by blowing hot air thru the exchanger, this has to be done to reduce the chances of impurities to enter the welding making it weak that may causing leaks at a later time.
I took off the coolant refill cap at the bottle, then I did unhook the hose at the front first.

Then I unhooked the hose at the rear.
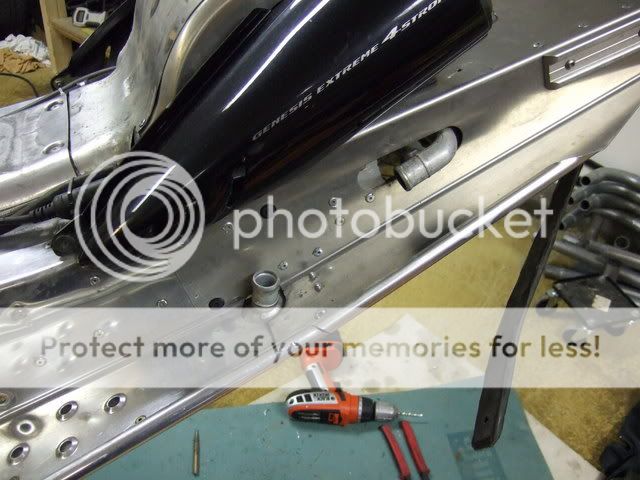
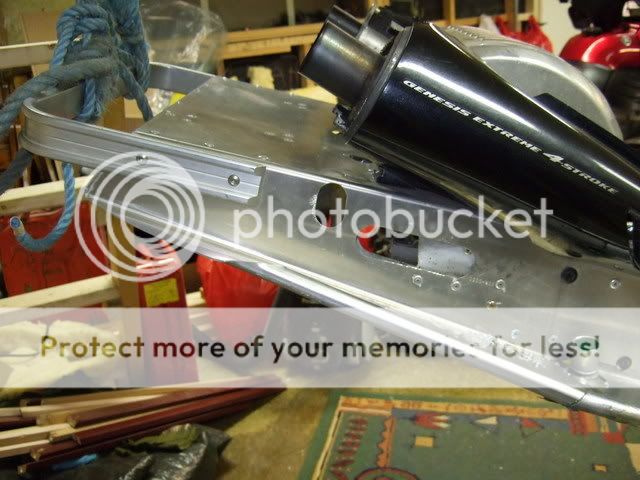
I also removed my rear heat exchanger. I have to move it higher up into the tunnel extention to get it out of the way, studs have been hitting it hard for the last few seasons. Better move it out of harms way before studs wear thru it. I also found that where it was installed it hindered the movement of the skid while landing on the tail. The damage done to the rear heat exchanger has happened even tho I had protectors installed under it. When compressing the skid the paddles on the ripsaw gave way and studs were hitting damaging the exchanger badly as shown in the following picture.
When moving the rear heat exchanger higher up into the tunnel and out of harms way I will not need the protectors I had made up. Removing the protector took out another 3 lbs or 1.4 kgs. I also weighted the stock drive sprockets compared to the new Ski-Doo drivers, a few more ounces saved. Total weight savings is now at 52.3 lbs or 23.8 kgs.
More pics to come when I figure out a way to install the exchanger up into the 136" MPI tunnel extension.
Last night I started the preparation before taking my sled to the welder to weld up my cracked left side heat exchanger.
He told me to unhook the coolant hoses connecting to the heat exchanger and fully empty it of coolant. When the sled is in at the welder he will clean out the exchanger with some water and then completely dry it out by blowing hot air thru the exchanger, this has to be done to reduce the chances of impurities to enter the welding making it weak that may causing leaks at a later time.
I took off the coolant refill cap at the bottle, then I did unhook the hose at the front first.
Then I unhooked the hose at the rear.
I also removed my rear heat exchanger. I have to move it higher up into the tunnel extention to get it out of the way, studs have been hitting it hard for the last few seasons. Better move it out of harms way before studs wear thru it. I also found that where it was installed it hindered the movement of the skid while landing on the tail. The damage done to the rear heat exchanger has happened even tho I had protectors installed under it. When compressing the skid the paddles on the ripsaw gave way and studs were hitting damaging the exchanger badly as shown in the following picture.
When moving the rear heat exchanger higher up into the tunnel and out of harms way I will not need the protectors I had made up. Removing the protector took out another 3 lbs or 1.4 kgs. I also weighted the stock drive sprockets compared to the new Ski-Doo drivers, a few more ounces saved. Total weight savings is now at 52.3 lbs or 23.8 kgs.
More pics to come when I figure out a way to install the exchanger up into the 136" MPI tunnel extension.
rxrider
Jan-Ove Pedersen
- Joined
- Apr 25, 2003
- Messages
- 7,355
- Reaction score
- 64
- Points
- 1,753
- Location
- Lakselv - 70N & 25E
- Country
- Norway
- Snowmobile
- 2014 Phazer XTX, 2013 Phazer RTX, 2008 Apex RTX, 2007 Warrior, 2006 Attak
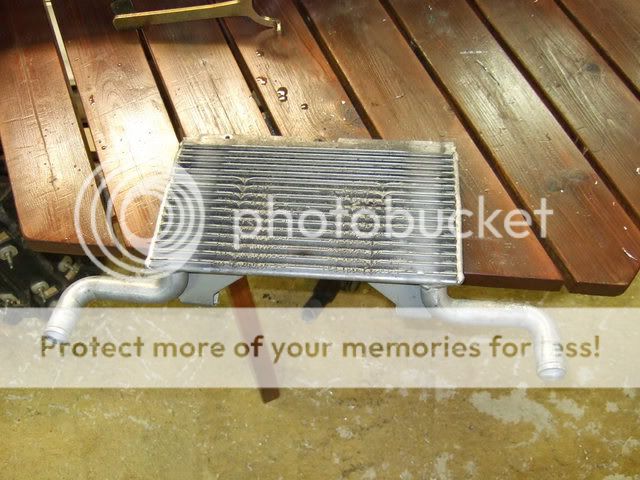
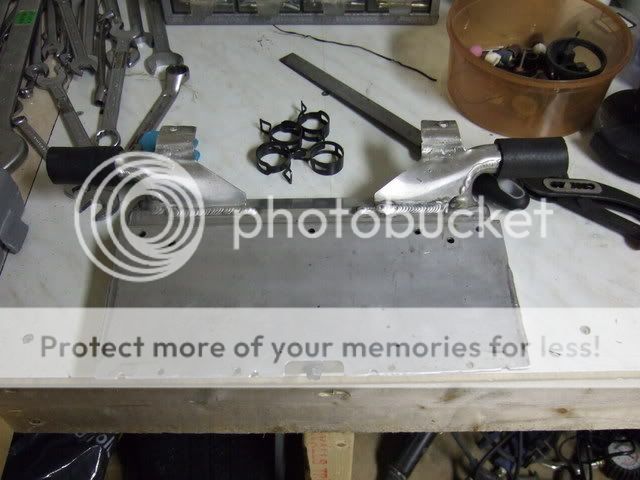
UPDATE - November 30. - Modifying my rear heat exchanger to fit the 136 MPI tunnel extension.
Started the work of fitting the rear heat exchanger into the MPI tunnel extension. First I did cut off the inlet and outlet tubes on the exchanger. I figured it would be a lot easier to get it into the tunnel to make measurements for the rest of the drilling and cutting. To make it fit into the tunnel I also had to cut off 0.4" or 1 cm off the rear of the cooler. No problem that part is for install use only. Now it was easy to make the measurements needed for the rest of the install.
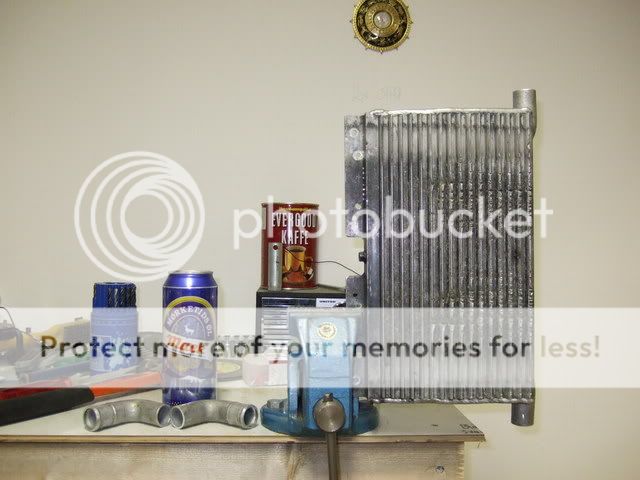
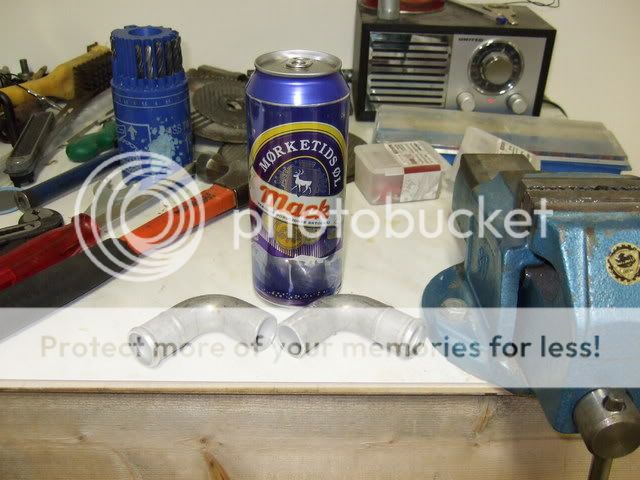
Here's the inlets and outlets cut off from the exchanger. They will be connected to the exchanger by using some short hoses and hose clamps.
I brought beer as well. Mach is the northernmost brewery in the world, it's brewed in the city of Tromsø, Norway, close to 70th northern lattitude. This particular beer is a deep brown draft beer. Only brought 2 cans into the garage, LOL, to be able to work on my sled
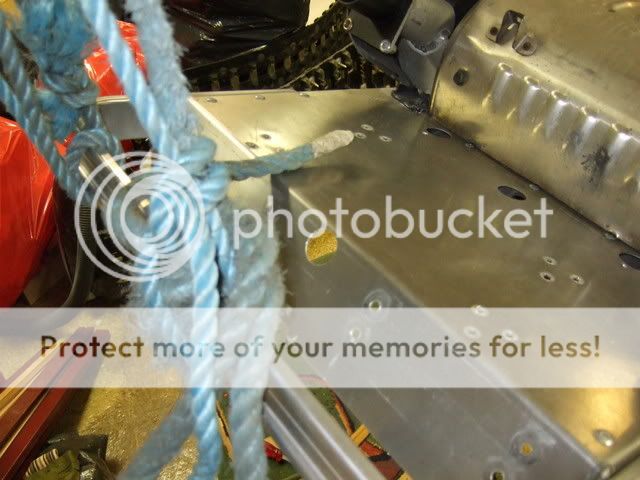
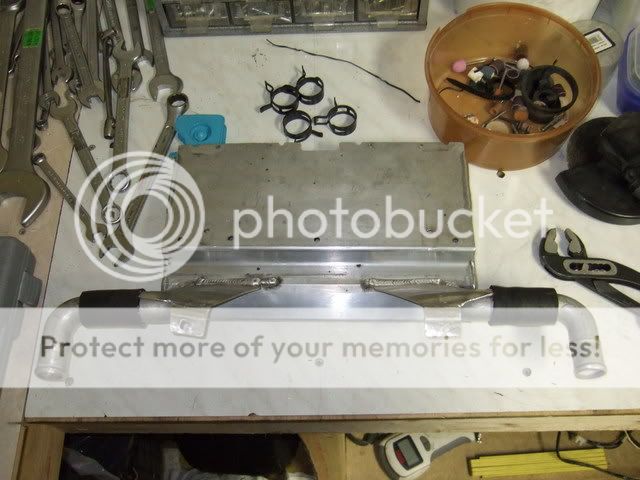
Made new holes in the tunnel extension for the coolant tubing. I need 4 hose clamps and 3 ft of coolant hose to connect the side exchangers to the rear exchanger. Stock hoses were to short and could not be used.
Made a new hole in the tunnel extension to reach the rear heat exchanger bleeding bolt.
Used some gasket remover and cleaned the exchanger, it worked really well. Here's how I've planned to connect the tubing I cut off to the heat exchanger.
My plan is to install the small hoses to the exchanger and tighten it using hose clamps, I made them from the stock hoses. Then I will rivet the exchanger into the tunnel extension. Finally I will connect the alu tubing (I cut off earlier) to the hoses with hose clamps. This is how it would look like. Reason I did it this way was to be able to make the holes in the tunnel as small as possible, treading the tubes I cut off thru the holes in the tunnel. What could be used to close off the old holes int the tunnel?
Tonite I did take a look into one of my boxes with parts and guess what I found ??? I did find a brand new front end bushing still packed in plastic, me lucky SOB. I could finally finish off my front end 
If all goes as planned I'm off to the welder tomorrow to fix the cracke in my left heat exchanger. He also said I could bring the drive axel and Ski-Doo drive sprockets, he would install them as well ASAP. I'm getting closer

Started the work of fitting the rear heat exchanger into the MPI tunnel extension. First I did cut off the inlet and outlet tubes on the exchanger. I figured it would be a lot easier to get it into the tunnel to make measurements for the rest of the drilling and cutting. To make it fit into the tunnel I also had to cut off 0.4" or 1 cm off the rear of the cooler. No problem that part is for install use only. Now it was easy to make the measurements needed for the rest of the install.
Here's the inlets and outlets cut off from the exchanger. They will be connected to the exchanger by using some short hoses and hose clamps.
I brought beer as well. Mach is the northernmost brewery in the world, it's brewed in the city of Tromsø, Norway, close to 70th northern lattitude. This particular beer is a deep brown draft beer. Only brought 2 cans into the garage, LOL, to be able to work on my sled
Made new holes in the tunnel extension for the coolant tubing. I need 4 hose clamps and 3 ft of coolant hose to connect the side exchangers to the rear exchanger. Stock hoses were to short and could not be used.
Made a new hole in the tunnel extension to reach the rear heat exchanger bleeding bolt.
Used some gasket remover and cleaned the exchanger, it worked really well. Here's how I've planned to connect the tubing I cut off to the heat exchanger.
My plan is to install the small hoses to the exchanger and tighten it using hose clamps, I made them from the stock hoses. Then I will rivet the exchanger into the tunnel extension. Finally I will connect the alu tubing (I cut off earlier) to the hoses with hose clamps. This is how it would look like. Reason I did it this way was to be able to make the holes in the tunnel as small as possible, treading the tubes I cut off thru the holes in the tunnel. What could be used to close off the old holes int the tunnel?
Tonite I did take a look into one of my boxes with parts and guess what I found ??? I did find a brand new front end bushing still packed in plastic, me lucky SOB. I could finally finish off my front end
If all goes as planned I'm off to the welder tomorrow to fix the cracke in my left heat exchanger. He also said I could bring the drive axel and Ski-Doo drive sprockets, he would install them as well ASAP. I'm getting closer
1CrazySledder
Lifetime Member
- Joined
- Aug 11, 2005
- Messages
- 2,006
- Reaction score
- 4
- Points
- 1,068
- Location
- Cartersville, GA.
- Country
- USA
- Snowmobile
- None, looking now!
Looking good. Great minds must think alike. This is pretty much how I mounted my old exchanger in my RTX back when. I had a 144 Hartman extension, made the extra holes just as you did. Worked out well.
Seeing how the 'old' holes were covered up by the stock plastic anyway, I just took some Aluminum and riveted them over the holes. No one will ever see these, plus it might add strength to the extension.
Seeing how the 'old' holes were covered up by the stock plastic anyway, I just took some Aluminum and riveted them over the holes. No one will ever see these, plus it might add strength to the extension.
Similar threads
- Replies
- 3
- Views
- 2K
- Replies
- 3
- Views
- 2K
- Replies
- 46
- Views
- 156K
-
This site uses cookies to help personalise content, tailor your experience and to keep you logged in if you register.
By continuing to use this site, you are consenting to our use of cookies.