rxrider
Jan-Ove Pedersen
- Joined
- Apr 25, 2003
- Messages
- 7,355
- Reaction score
- 64
- Points
- 1,753
- Location
- Lakselv - 70N & 25E
- Country
- Norway
- Snowmobile
- 2014 Phazer XTX, 2013 Phazer RTX, 2008 Apex RTX, 2007 Warrior, 2006 Attak
Thanks for you input on covering up the old holes. I do not have the plastics anymore, they went junk a few years back.
rxrider
Jan-Ove Pedersen
- Joined
- Apr 25, 2003
- Messages
- 7,355
- Reaction score
- 64
- Points
- 1,753
- Location
- Lakselv - 70N & 25E
- Country
- Norway
- Snowmobile
- 2014 Phazer XTX, 2013 Phazer RTX, 2008 Apex RTX, 2007 Warrior, 2006 Attak
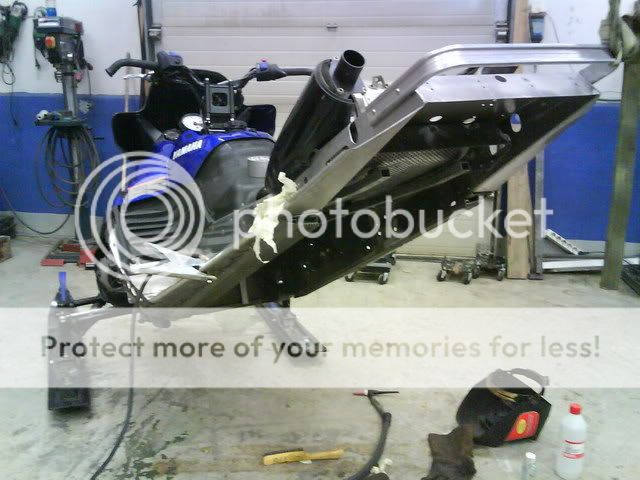
UPDATE - December 1. - Welding up the cracked left side heat exchanger. Installing the modified rear heat exchanger
Went to the welder today. The crack was a lot bigger than the 1/2" I thought, it was about 1" long. Got it welded up, but it was a difficult job welding it with the exchanger on the sled. Welder would have appreceiated me to remove the exchanger from the sled so he could have put it into a acid bath prior to welding. Impurities from the coolant remained in the aluminum making it hard for him come up with a weld that did not leak. He did his very best with what we had and I'm crossing my fingers that it will hold up. Welder doubt it will last, and if it starts leaking again he adviced me to remove the exchanger from the sled and let him do it the right way, or I may buy a new exchanger.
A few pics from the welders garage.
Ready to start welding
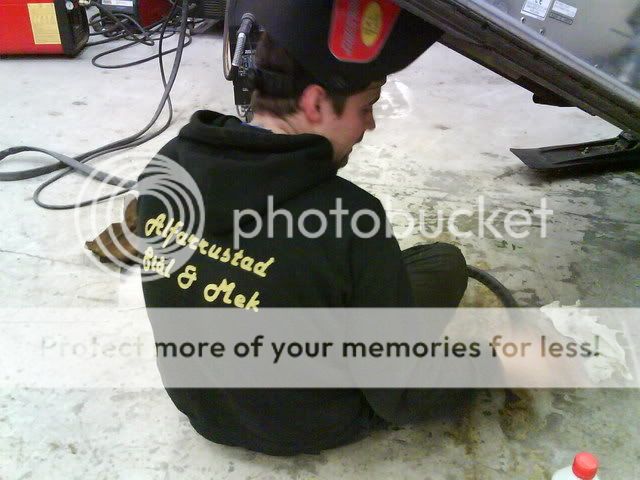
Cleaning the cracked cooler
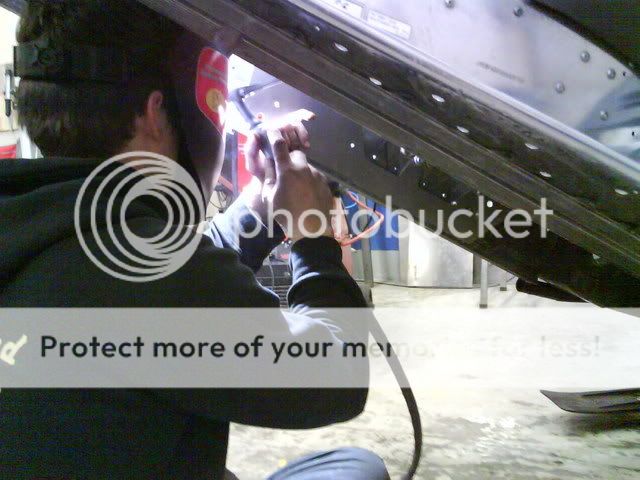
Working on it hard to stop the leak. He's using a TIG welder.
Started the install of the rear heat exchanger.
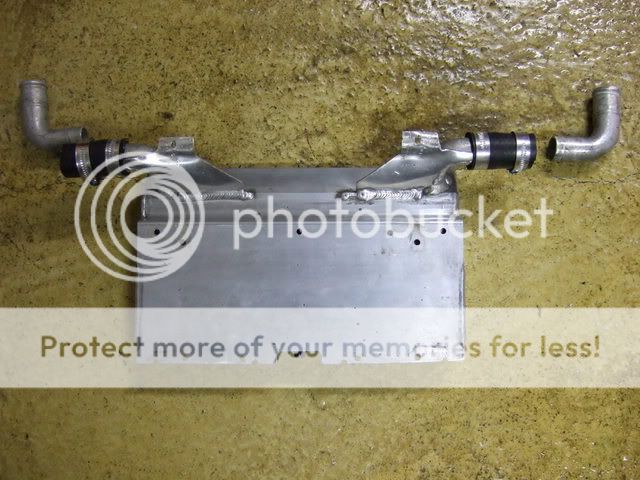
I installed the small hoses to the rear exchanger with hose clamps and riveted the rear exchanger into the MPI tunnel extension.

With the rear exchanger in place I cut a few pieces of a heavy duty hose to install in place of the old hoses, they were too short to be reused. I did cut the hoses to the correct length and installed onto the aluminum tubing I had cut off the exchangers earlier. Then I added the hose clamps and installed the hoses onto the right and left exchangers and finally I tightened down all hose clamps. Coolant system is now ready to be refilled with new coolant, will add premixed coolant good for -36 C or -32 F. I pray for the newly welded exchanger not to leak. :rules
Next part of my maintenance project will be replacing of the secondary side jack shaft bearing, installing seat and stuff in the rear, replacing left hand side drive axel bearing, installing track, drive axel and chaincase. Next week will be busy, I have a slight hope of getting it done by the end of next week. :ORC
:ORC
Went to the welder today. The crack was a lot bigger than the 1/2" I thought, it was about 1" long. Got it welded up, but it was a difficult job welding it with the exchanger on the sled. Welder would have appreceiated me to remove the exchanger from the sled so he could have put it into a acid bath prior to welding. Impurities from the coolant remained in the aluminum making it hard for him come up with a weld that did not leak. He did his very best with what we had and I'm crossing my fingers that it will hold up. Welder doubt it will last, and if it starts leaking again he adviced me to remove the exchanger from the sled and let him do it the right way, or I may buy a new exchanger.
A few pics from the welders garage.
Ready to start welding
Cleaning the cracked cooler
Working on it hard to stop the leak. He's using a TIG welder.
Started the install of the rear heat exchanger.
I installed the small hoses to the rear exchanger with hose clamps and riveted the rear exchanger into the MPI tunnel extension.
With the rear exchanger in place I cut a few pieces of a heavy duty hose to install in place of the old hoses, they were too short to be reused. I did cut the hoses to the correct length and installed onto the aluminum tubing I had cut off the exchangers earlier. Then I added the hose clamps and installed the hoses onto the right and left exchangers and finally I tightened down all hose clamps. Coolant system is now ready to be refilled with new coolant, will add premixed coolant good for -36 C or -32 F. I pray for the newly welded exchanger not to leak. :rules
Next part of my maintenance project will be replacing of the secondary side jack shaft bearing, installing seat and stuff in the rear, replacing left hand side drive axel bearing, installing track, drive axel and chaincase. Next week will be busy, I have a slight hope of getting it done by the end of next week.
:ORCrxrider
Jan-Ove Pedersen
- Joined
- Apr 25, 2003
- Messages
- 7,355
- Reaction score
- 64
- Points
- 1,753
- Location
- Lakselv - 70N & 25E
- Country
- Norway
- Snowmobile
- 2014 Phazer XTX, 2013 Phazer RTX, 2008 Apex RTX, 2007 Warrior, 2006 Attak
UPDATE - December 2. - Checked the turbo and piping. Reinstalled the seat and finished off the rear end.
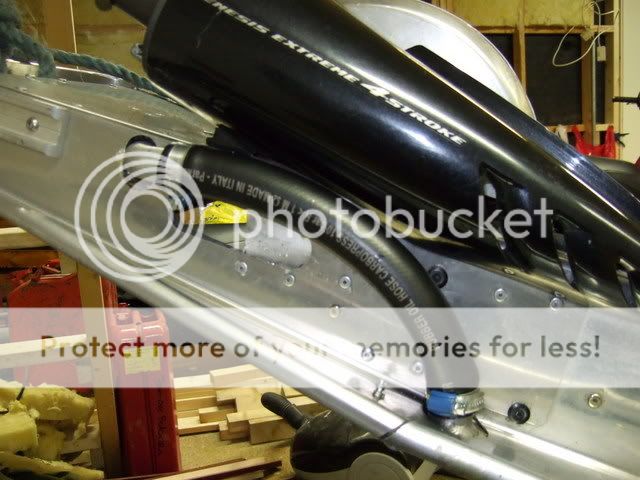
Tonight I finished up everything inside the tunnel. Looked over exhaust and tightened bolts, checked the charge tube and tightened hose clamps, checked tunnel protectors, had to change out a few rivets on the protectors. Will have to extend the 121" protectors to 136" to cover the rear exchanger.
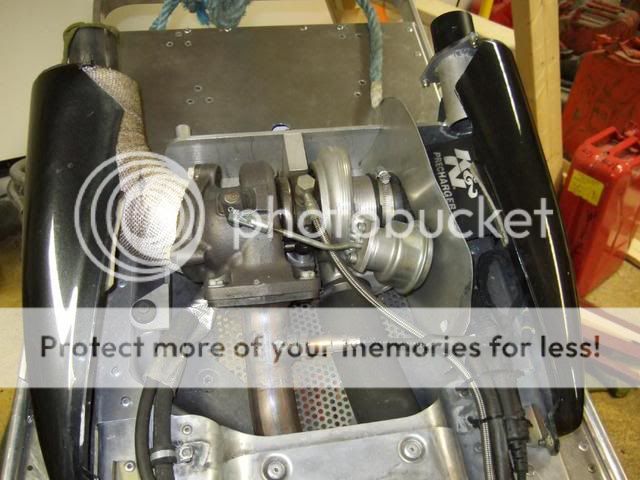
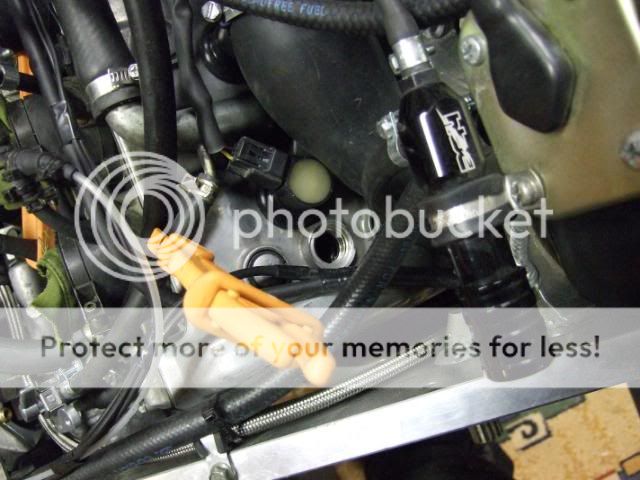
When done inspecting the tunnel I took off the heat shield in the back to inspect turbo and piping. Checked all hose clamps, checked air filer and prefilter. While having the air filter off I rotated the compressor shaft, at first the compressor shaft felt very tight, but after a few rotations it loosened up and became very easy to turn. Guess it has dried up over the summer and rotating lubed the shaft with oil.
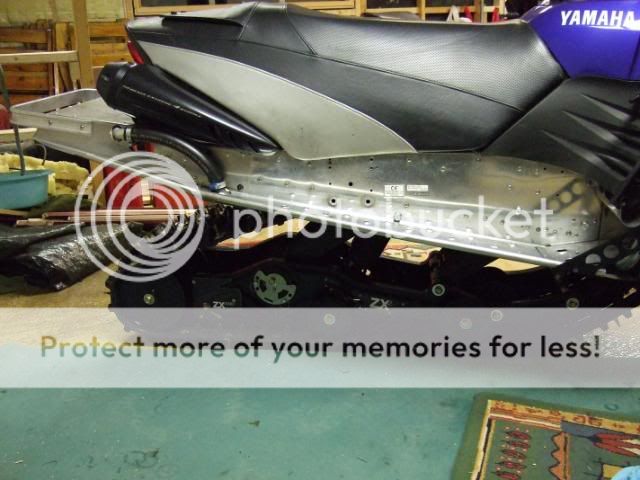
I installed the heat shield and put the seat back on.
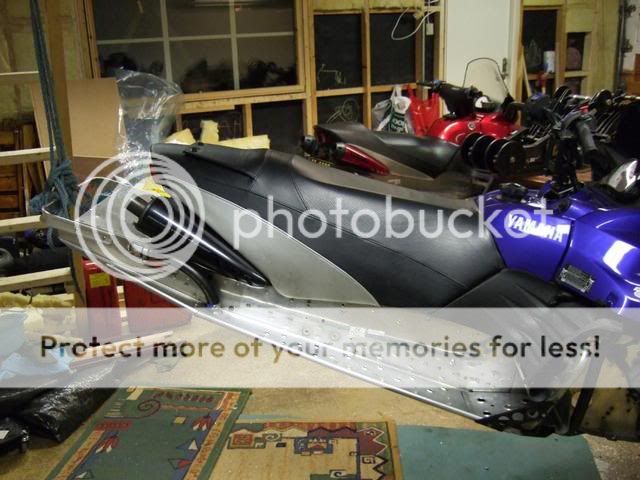
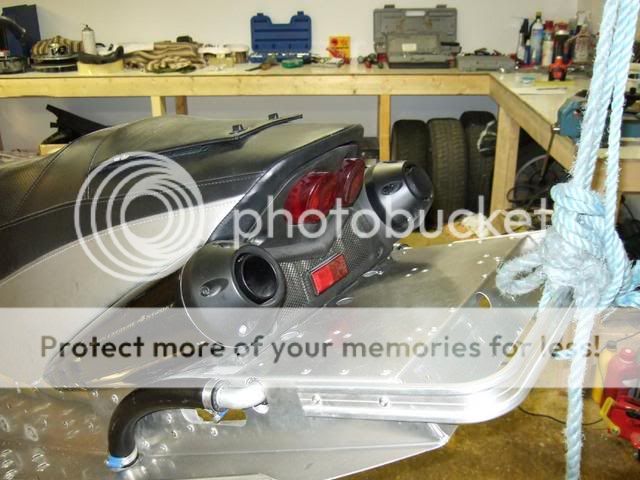
Last thing done today was to install the rear cover and exhaust caps.
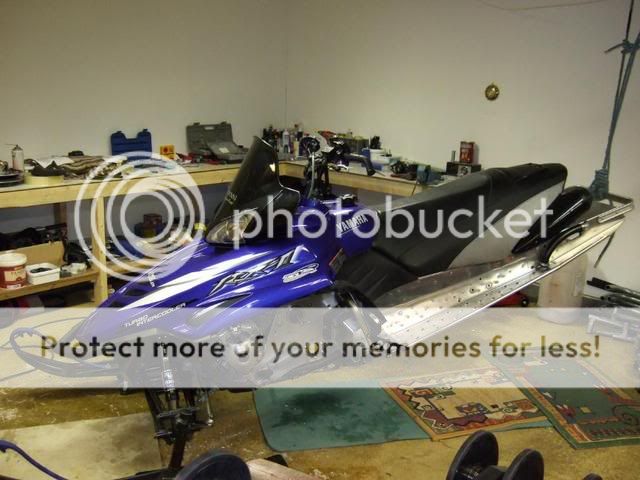
She's coming together
Tonight I finished up everything inside the tunnel. Looked over exhaust and tightened bolts, checked the charge tube and tightened hose clamps, checked tunnel protectors, had to change out a few rivets on the protectors. Will have to extend the 121" protectors to 136" to cover the rear exchanger.
When done inspecting the tunnel I took off the heat shield in the back to inspect turbo and piping. Checked all hose clamps, checked air filer and prefilter. While having the air filter off I rotated the compressor shaft, at first the compressor shaft felt very tight, but after a few rotations it loosened up and became very easy to turn. Guess it has dried up over the summer and rotating lubed the shaft with oil.
I installed the heat shield and put the seat back on.
Last thing done today was to install the rear cover and exhaust caps.
She's coming together
rxrider
Jan-Ove Pedersen
- Joined
- Apr 25, 2003
- Messages
- 7,355
- Reaction score
- 64
- Points
- 1,753
- Location
- Lakselv - 70N & 25E
- Country
- Norway
- Snowmobile
- 2014 Phazer XTX, 2013 Phazer RTX, 2008 Apex RTX, 2007 Warrior, 2006 Attak
UPDATE - December 3. - Track inspection and stud maintenance.
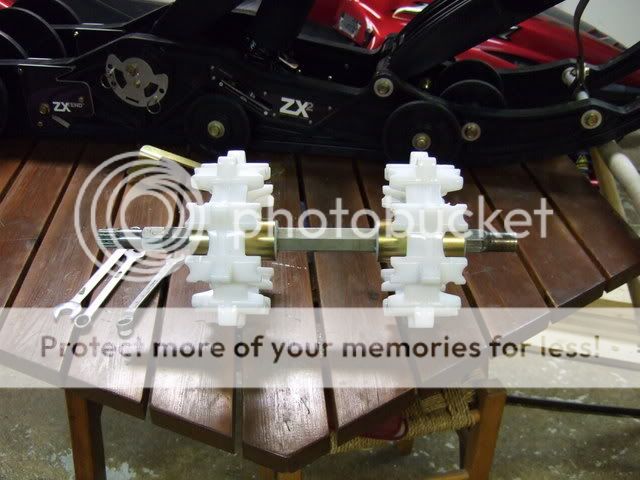
Went to the welder today to pic up some aluminum profiles 0.78x1.00 inches or 20x25 millimeters. I let them do the install of my new Ski-Doo extroverts to the drive axel. When I arrived they were working on the extrovert drive sprocket install. I had the time to wait until they were done so now I have the drive axel ready to install.
They have a 20 ton press and they have a lathe to check the drive axel and sprockets for runout and such. The Ski-Doo drivers were close to perfect, the guy on the lathe didn't bother do anything with it cause the runout was pretty much non-existant. Another guy was in with his WhalBros extroverts, MAN they had some seriouse runout in all directions.
 . They had to run it on the lathe taking off a lot of plastic to make it run true.
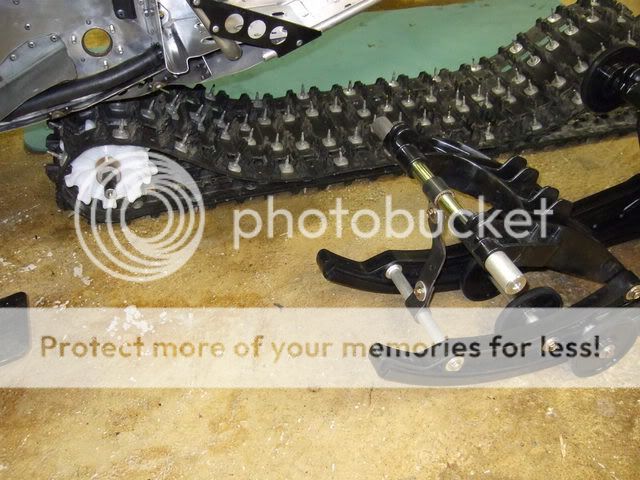
Here's a pic of the Ski-Doo drivers installed
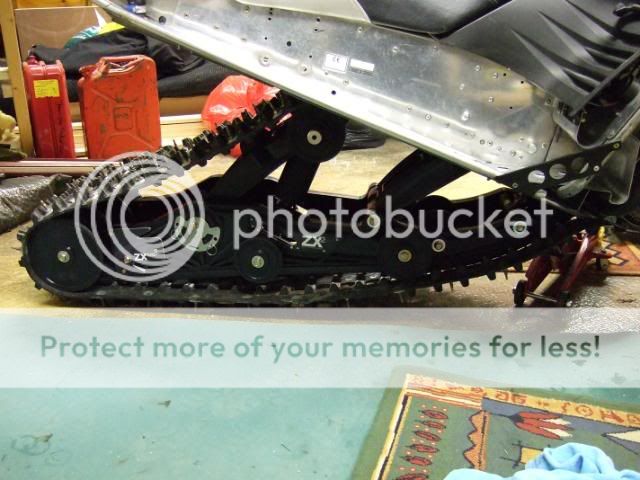
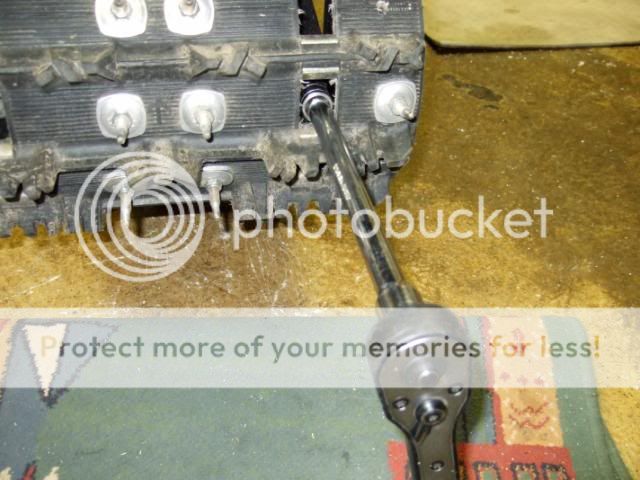
Today I figured it would be a good time to give the track and studs a work over. I checked every single stud, retightened studs, changed bent and broken studs wherever necessary.
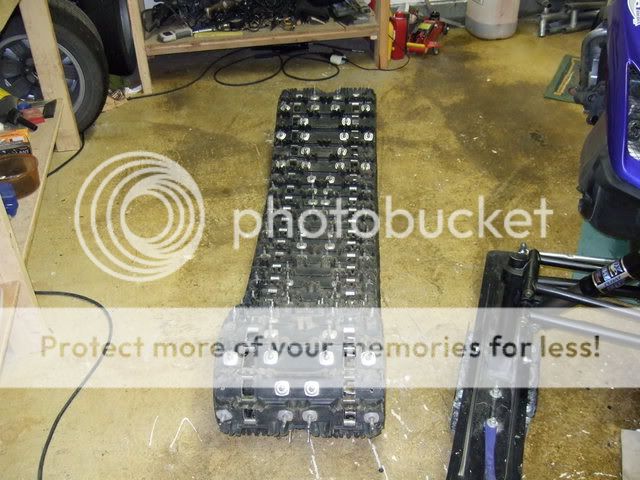
I run the StudBoy Powerpoints 1.375" studs in my 136x15x1.25 RipSaw track, 162 on them are installed in a 2-4-2-4-2 pattern.
Replacing a broken stud in this pic.
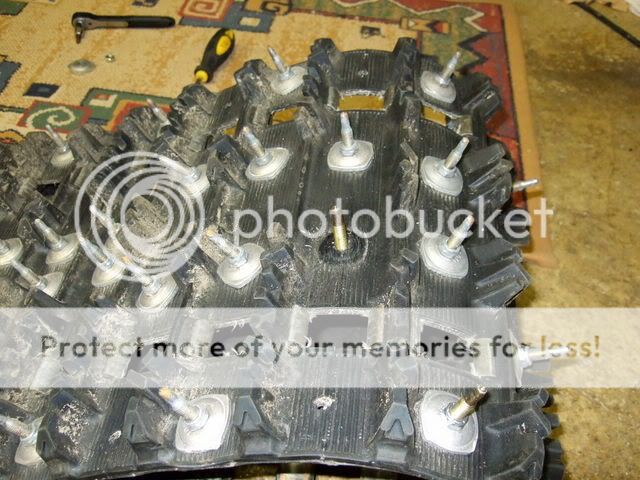
When done checking the track and studs I found;
- 0 studs pulled thru the track
- 1 stud broken off just above the nut.
- 7 studs badly bent and needed replacement
- Minor damage to the outside of the track. A small piece was ripped loose on top of the crossbar just under the track clip. I did cut it off with a Stanley knife to prevent it from making any further damage.
- A few small wear spots caused by rear shock rubbing the center inside of the track, nothing to worry about.
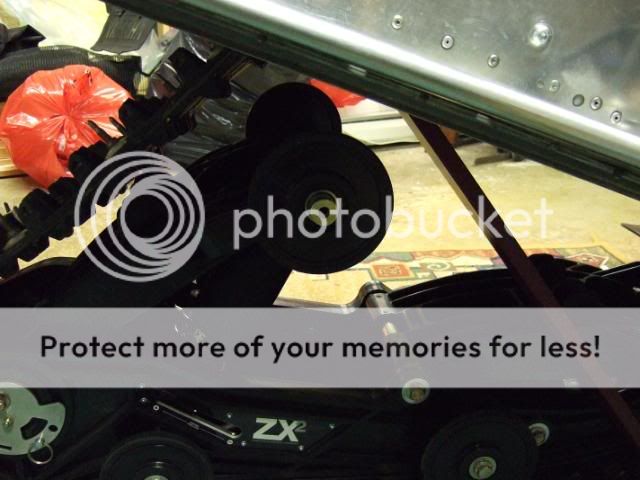
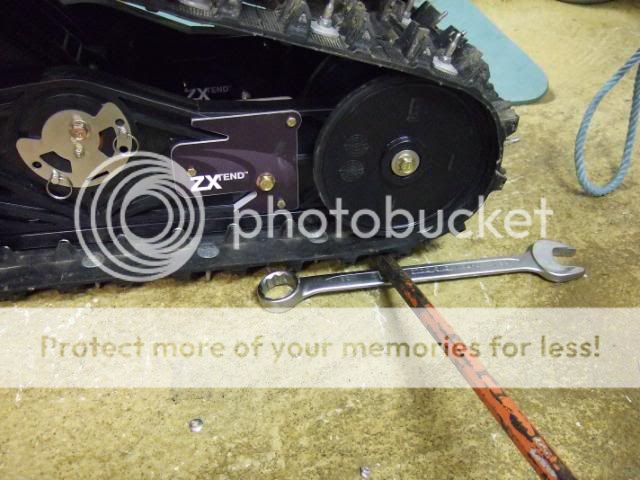
When track was done I lined up the track under the tunnel, placed the drive axel into the track, and lined up the ZX-2 making it ready for the install.
Before installing the ZX-2 I have to replace the left side drive axel bearing, install the drive axel, and reassemble the chaincase.
I also have to make extensions to the tunnel protection to cover the rear heat exchanger. Got some aluminum profiles, not the 0.78x1.00 inches or 20x25 millimeters profiles I wanted, but I got some 0.78x0.78 inches or 20x20 millimeter profiles that will have to do the job.
Went to the welder today to pic up some aluminum profiles 0.78x1.00 inches or 20x25 millimeters. I let them do the install of my new Ski-Doo extroverts to the drive axel. When I arrived they were working on the extrovert drive sprocket install. I had the time to wait until they were done so now I have the drive axel ready to install.
They have a 20 ton press and they have a lathe to check the drive axel and sprockets for runout and such. The Ski-Doo drivers were close to perfect, the guy on the lathe didn't bother do anything with it cause the runout was pretty much non-existant. Another guy was in with his WhalBros extroverts, MAN they had some seriouse runout in all directions.
. They had to run it on the lathe taking off a lot of plastic to make it run true. Here's a pic of the Ski-Doo drivers installed
Today I figured it would be a good time to give the track and studs a work over. I checked every single stud, retightened studs, changed bent and broken studs wherever necessary.
I run the StudBoy Powerpoints 1.375" studs in my 136x15x1.25 RipSaw track, 162 on them are installed in a 2-4-2-4-2 pattern.
Replacing a broken stud in this pic.
When done checking the track and studs I found;
- 0 studs pulled thru the track
- 1 stud broken off just above the nut.
- 7 studs badly bent and needed replacement
- Minor damage to the outside of the track. A small piece was ripped loose on top of the crossbar just under the track clip. I did cut it off with a Stanley knife to prevent it from making any further damage.
- A few small wear spots caused by rear shock rubbing the center inside of the track, nothing to worry about.
When track was done I lined up the track under the tunnel, placed the drive axel into the track, and lined up the ZX-2 making it ready for the install.
Before installing the ZX-2 I have to replace the left side drive axel bearing, install the drive axel, and reassemble the chaincase.
I also have to make extensions to the tunnel protection to cover the rear heat exchanger. Got some aluminum profiles, not the 0.78x1.00 inches or 20x25 millimeters profiles I wanted, but I got some 0.78x0.78 inches or 20x20 millimeter profiles that will have to do the job.

kinger
VIP Member
- Joined
- Jan 17, 2005
- Messages
- 7,414
- Reaction score
- 1,553
- Points
- 1,963
- Location
- Clear Lake, IA
- Website
- www.piergenius.com
Great progress!!
Can you take some pictures and help me through the install of the driveshaft, Ulmer has my driveshaft now installing the same drivers and I cannot remember how the clutch side drive shaft bearing goes in place, hoping it will all come abck after I get working on it again! LOL
Also the chain case came apart way to fast and I can't rememeber which washer went where!
I didn't know the ski doo drivers are both extro drive and intro drive, that is cool, no way that thing will ratchet, can't wait to get mine together! I'm jealous of you!
rxrider
Jan-Ove Pedersen
- Joined
- Apr 25, 2003
- Messages
- 7,355
- Reaction score
- 64
- Points
- 1,753
- Location
- Lakselv - 70N & 25E
- Country
- Norway
- Snowmobile
- 2014 Phazer XTX, 2013 Phazer RTX, 2008 Apex RTX, 2007 Warrior, 2006 Attak
kinger - I'm going out to install the drive shaft and chaincase this evening. I will take pics of my progress and post them asap.
Go to https://www.yamaha-motor.com/sport/parts/home.aspx?sb=2
Step 1: Snowmobiles
Step 2: 2003
Step 3: RX10H RX-1 (If you have reverse look up RX10RH RX-1 ER
To get a view of the drive shaft assembly, to get an idea on how to install the left side drive shaft bearing, open
TRACK DRIVE 1
To get a view of the chaincase assembly take a look in
TRACK DRIVE 2
I'll try to take step by step pics of my progress this evening, as long as I don't get too dirty fingers LOL don't wanna ruin my camera")
I'll do my best to get pics of every step of the install.
Go to https://www.yamaha-motor.com/sport/parts/home.aspx?sb=2
Step 1: Snowmobiles
Step 2: 2003
Step 3: RX10H RX-1 (If you have reverse look up RX10RH RX-1 ER
To get a view of the drive shaft assembly, to get an idea on how to install the left side drive shaft bearing, open
TRACK DRIVE 1
To get a view of the chaincase assembly take a look in
TRACK DRIVE 2
I'll try to take step by step pics of my progress this evening, as long as I don't get too dirty fingers LOL don't wanna ruin my camera
I'll do my best to get pics of every step of the install.
Jeff\ADBoivin
Extreme
- Joined
- Apr 27, 2007
- Messages
- 95
- Reaction score
- 1
- Points
- 286
- Location
- Lévis,Québec,Canada
- Website
- adboivin.com
Grimm said:rxrider said:I haven't noticed it before, but on the ZX-2 skid you do not have to loosen the bolts holding the rear axel idler wheels in place in order to adjust track tension, nice.
Holy cow, I didn't notice this either. It would have helped had I noticed this post earlier today. I'm so used to having to do this on my last sleds that I took it for granted that you had to loosen the axle bolts first. That is very cool.!")
guys, you have to loose the Rear wheels to adjust the track tension, if you don't, you will groove the Plastic Rail And make later adjustement harder. Make sure you torque the rear wheels to the spec specified in the manual: 50 foot pounds.
if you can adjust the rear wheels, this tell me the torque is not right for the rear wheels bolts.
rxrider
Jan-Ove Pedersen
- Joined
- Apr 25, 2003
- Messages
- 7,355
- Reaction score
- 64
- Points
- 1,753
- Location
- Lakselv - 70N & 25E
- Country
- Norway
- Snowmobile
- 2014 Phazer XTX, 2013 Phazer RTX, 2008 Apex RTX, 2007 Warrior, 2006 Attak
Thanks Jeff for the clarification. We were just thinking out loud, I have not tried to adjust without loosening the rear idler wheel bolts. When you're telling me not to do this, I will not. Thanks for giving me the heads up on the track adjustment procedure.
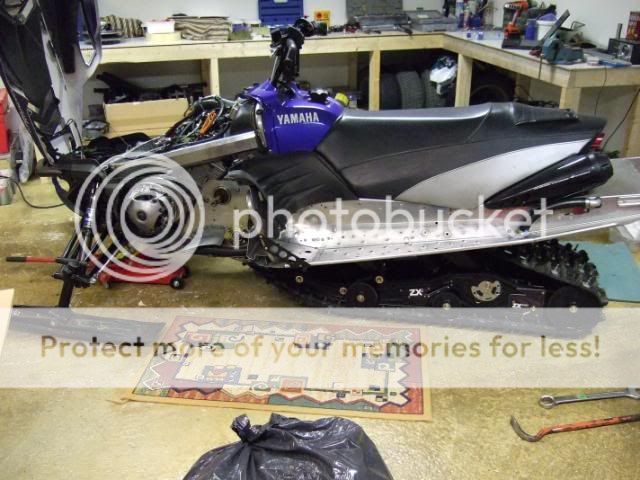
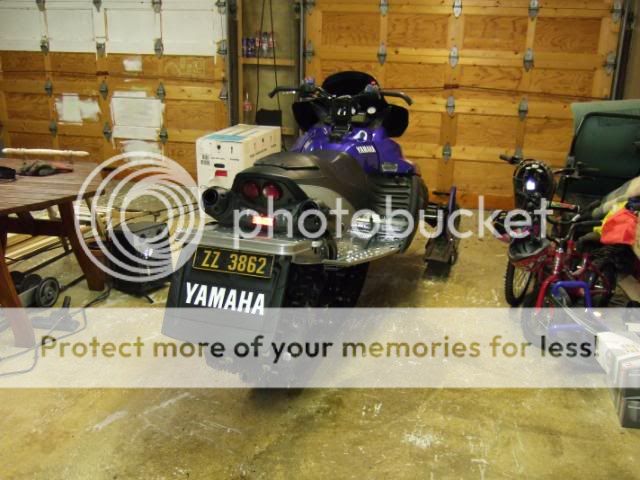
BTW - I just finished the install of my ZX-2. MAN I'm a happy camper. I still have some work left on my sled before I can take it out for a ride, but it's getting close now. I hope to be able to ride it this weekend.
I'm uploading 38 pics of my progress today. Will do the write up asap tomorrow, need to sleep, it's 2:15 am in Norway.
rxrider
Jan-Ove Pedersen
- Joined
- Apr 25, 2003
- Messages
- 7,355
- Reaction score
- 64
- Points
- 1,753
- Location
- Lakselv - 70N & 25E
- Country
- Norway
- Snowmobile
- 2014 Phazer XTX, 2013 Phazer RTX, 2008 Apex RTX, 2007 Warrior, 2006 Attak
UPDATE - December 4. - Installing the drive shaft and chaincase.
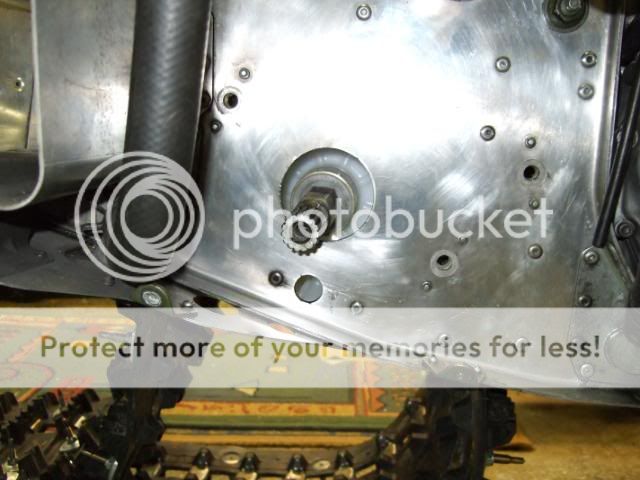
This evening I started working on installing the drive shaft and chaincase. Before installing the drive shaft into the tunnel, make sure that the collar with the oil ring on the inside is installed on the chain case side of the drive shaft.

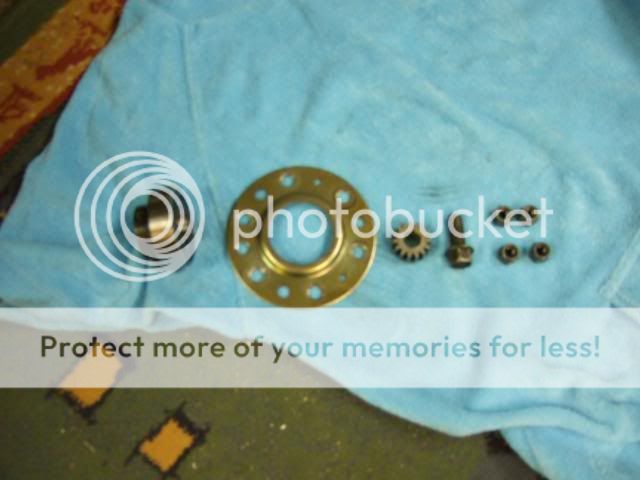
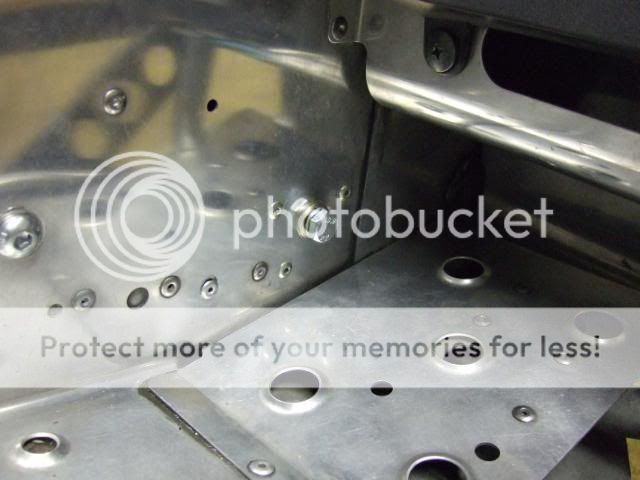
Here's a pic of the parts to be installed on the left hand side of the drive shaft, they are placed in the order they go into the sled.
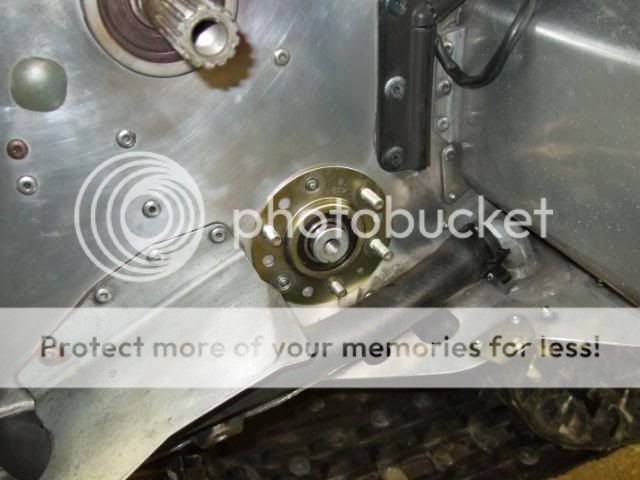
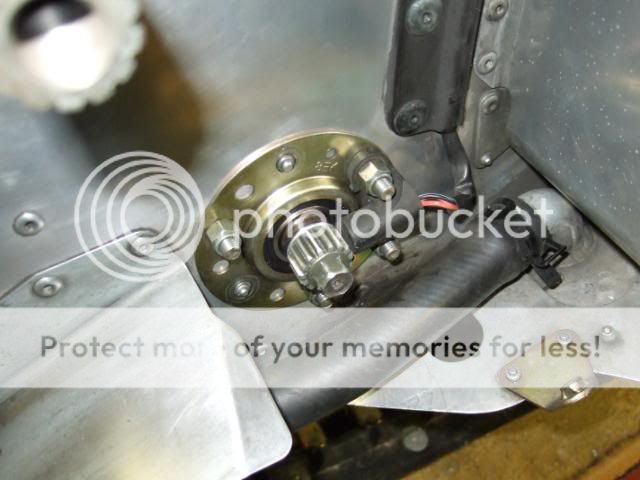
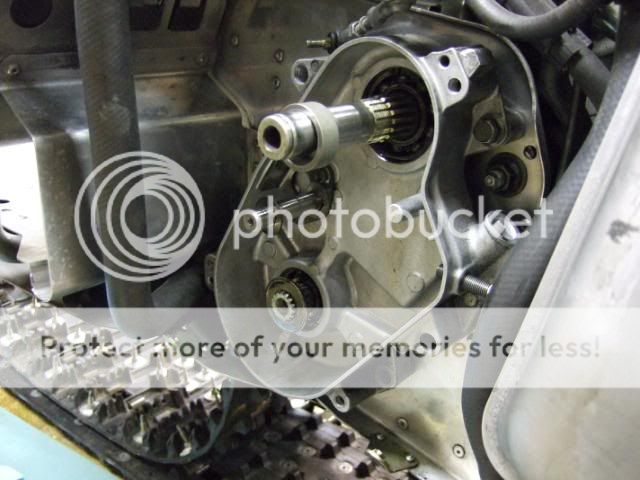
With the drive shaft in place it's time to install the bearing. The bearing is placed into the end of the drive shaft with the set screw portion of the bearing going into the shaft first. Press the bearing into the shaft until it is snugg with cup in the frame wall like in this pic

Then install the bearing holder plate over the bearing.
Install speedo picup like shown in this pic
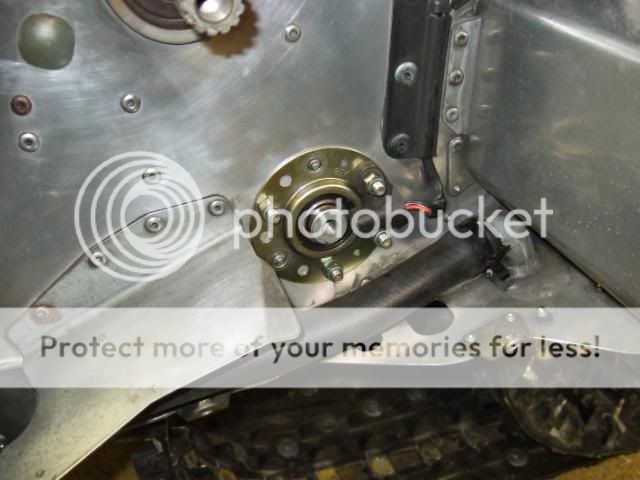
Add the nuts and tighten up the bearing holder plate to spec. Left hand side of the drive shaft is done.
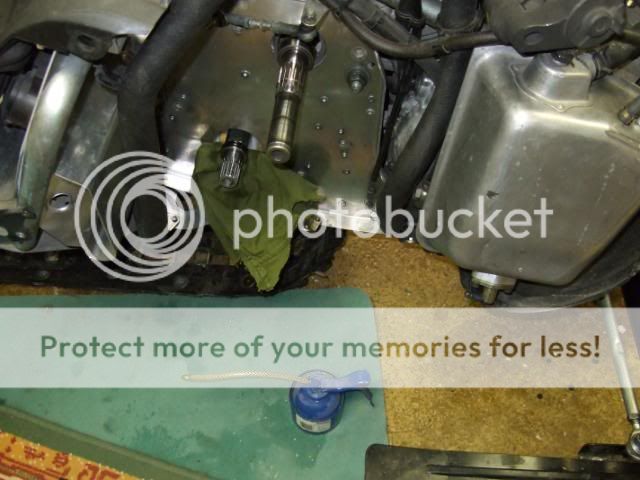
Now on to the chaincase side of the drive shaft. When placing the drive shaft into place I put a cloting in the frame hole to prevent damaging the suface of the shaft that will be in contact with the oil seal. Before proceeding with the install I cleaned off drive shaft and jack shaft surfaces to make sure there are no dirt on the shafts that can damage the oil rings.
Before installing the chaincase into the frame I recommend oiling the oil seals well to prevent damage to them while installing the chaincase, and also to keep them lubed. Not a good thing to run a dry oil seal against a dry drive shaft, they will wear out and start to leak in no time. Also remember to install the chain tensioner before installing the chain case into the frame, there is no way to get the chain tensioner installed with the chaincase installed in the frame.
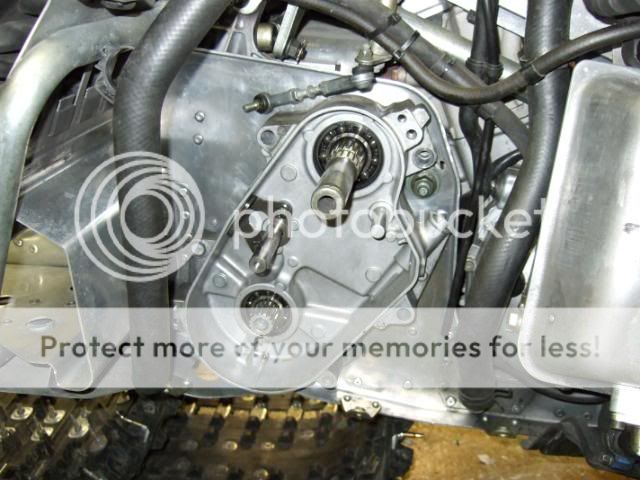
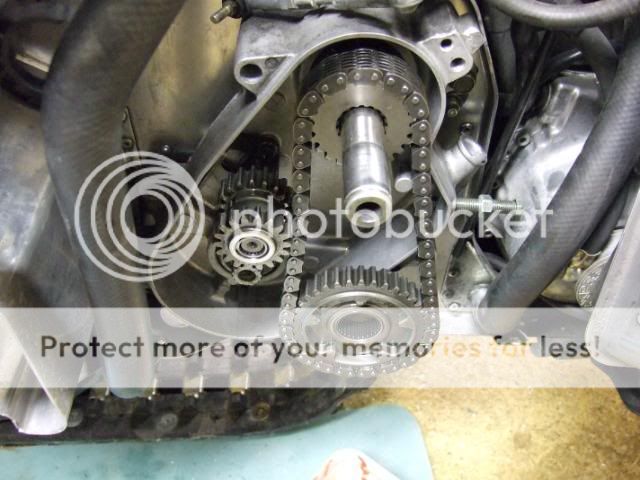
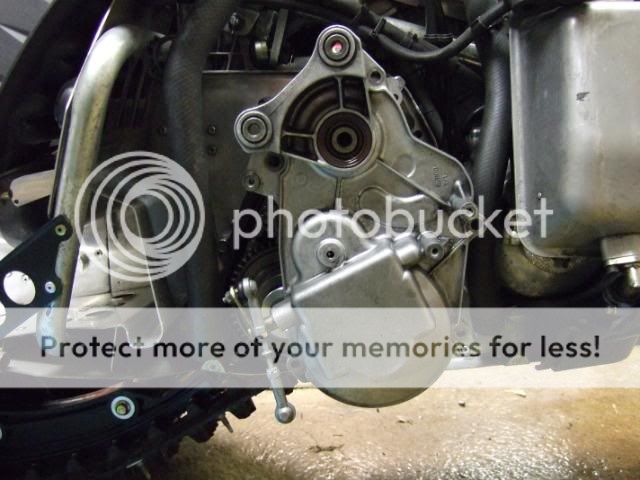
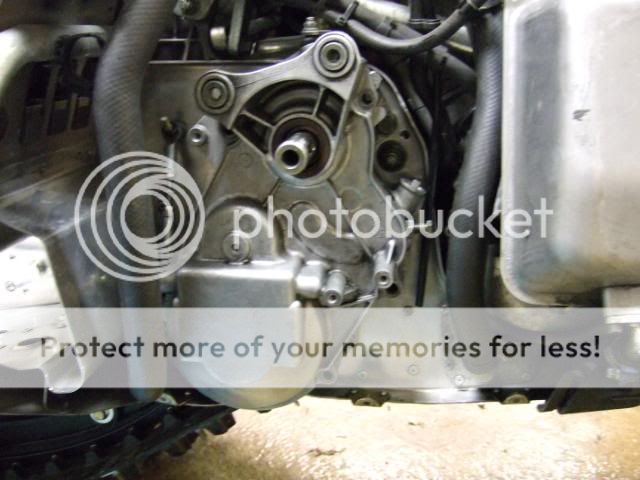
Chaincase in place on the shafts.
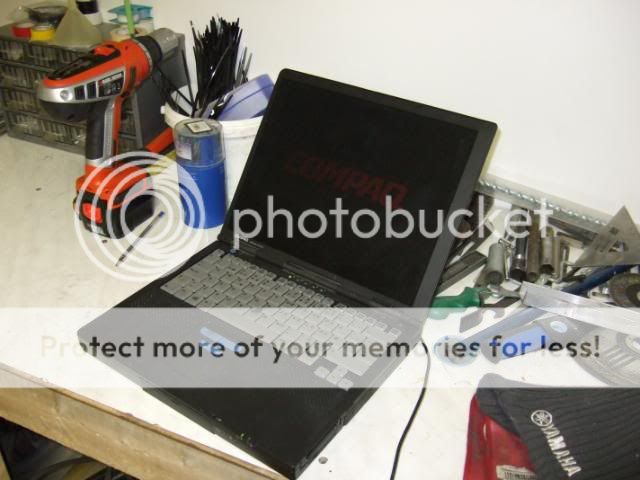
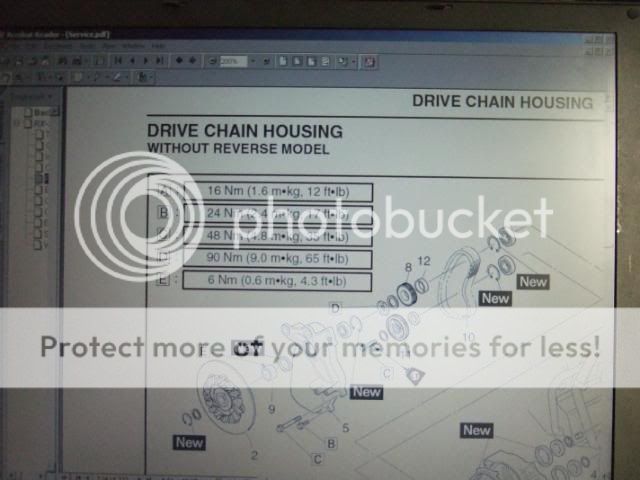
What is the torque spec on the 3 large bolts? Nice having a garage laptop
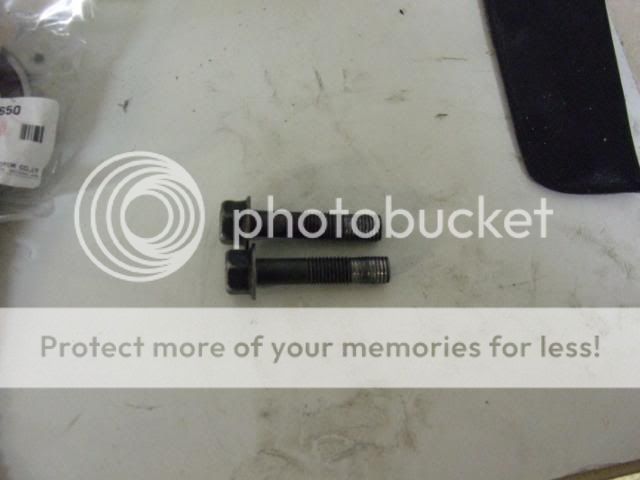
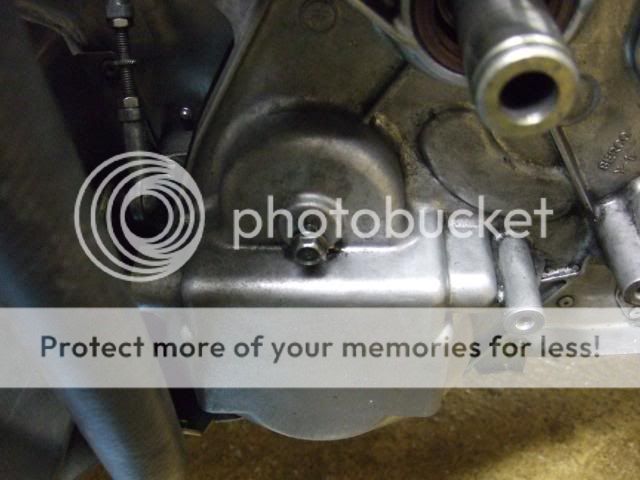
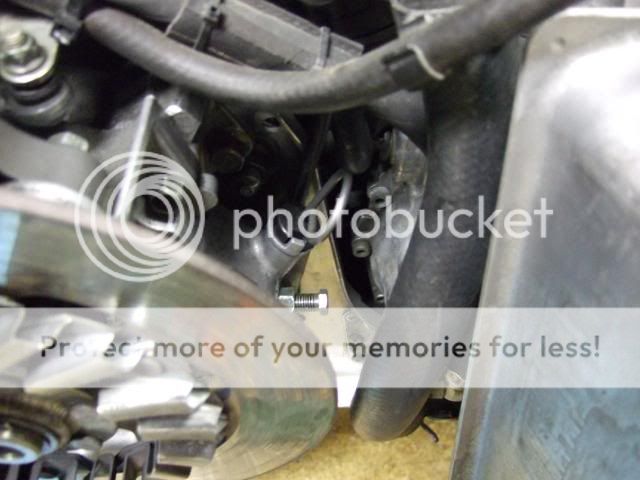
While torking down the bolts something nasty happend
Two of the bolts lost their treads, now I need 2 new bolts to tighten down the chaincase. As a cause of this mishap I were not able to finish off the chaincase install, but I did as much as possible. The bolts had a little rust on them so I cleaned them with 5-45 multi purpose spray (lube, water remover, rust remover, dirt dissolver), it was probably not a good thing to lube the threads prior to torking the bolts down. Threads got too slippery so it got overtightened before reaching final tork of 48 Nm or 35 ft-lbs.
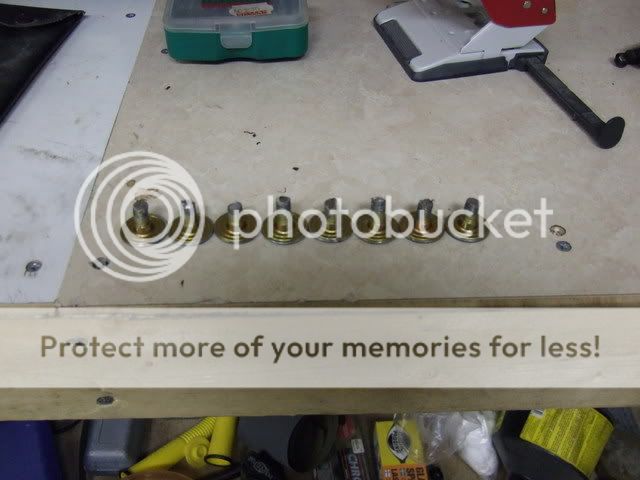
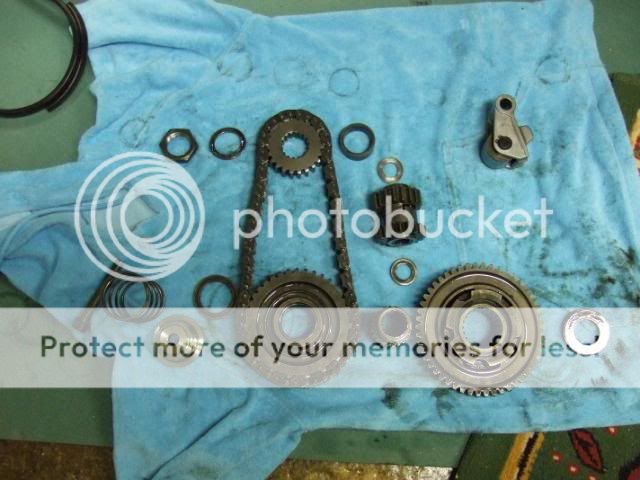
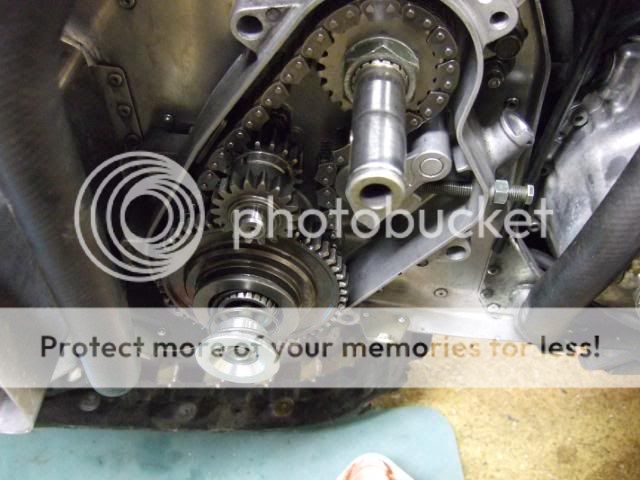
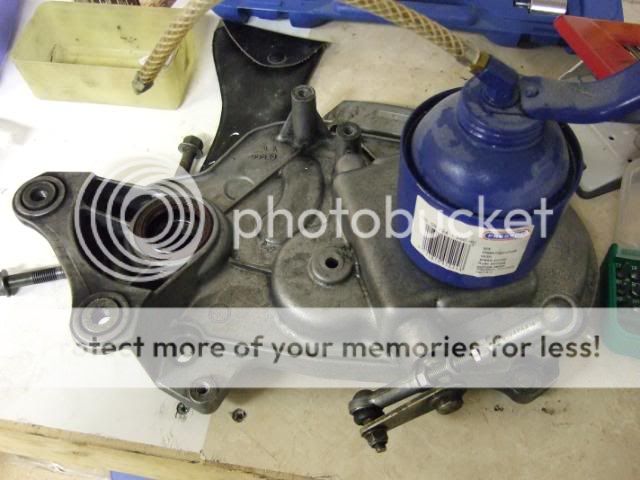
Here's a pic of the parts going into the inside of the chaincase.
Started the assembly by adding washers to the jack shaft, reverse shaft and drive shaft.
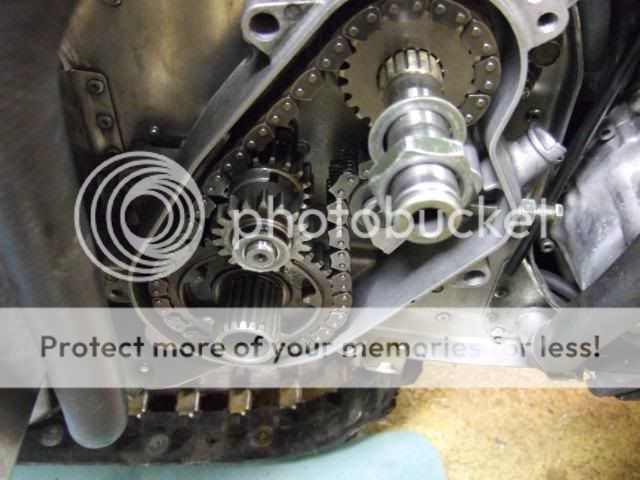
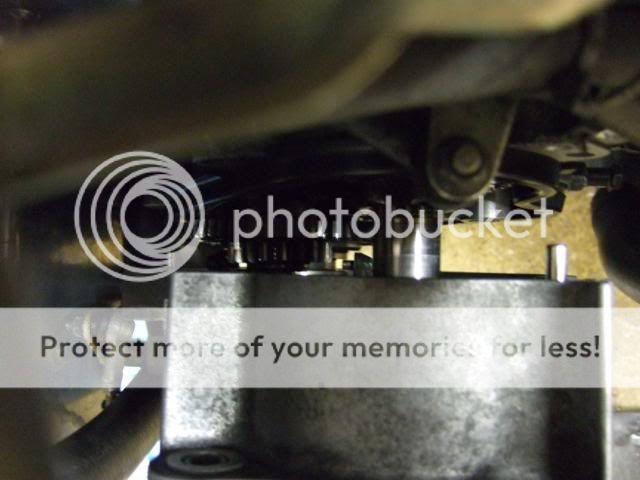
Next is installing the reverse sprockets onto the reverse shaft, the sprocket with the wider teeths goes in first, remember that tiny spring going in between the inner and outer reverse sprockets. Then install the upper drive sprocket and lower driven sprocket into the chain like shown in this pic.
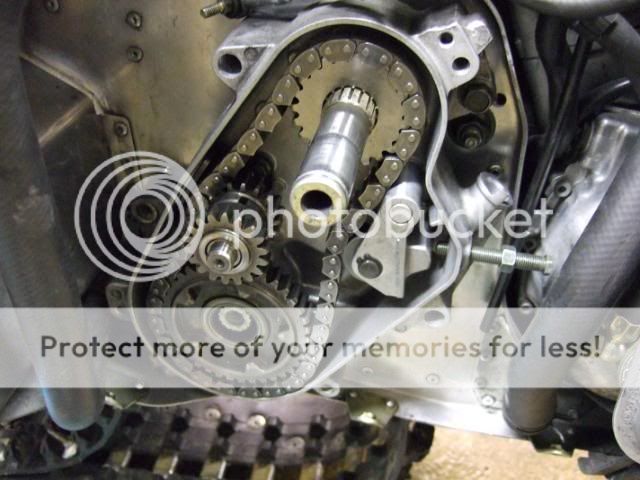
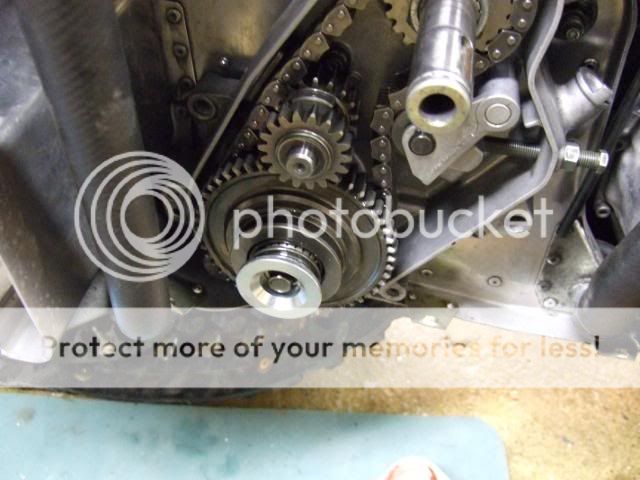
Now it's time to place the chain on the left side of the reverse sprockets while aligning the upper and lower sprockets with the splines on the shafts, then slide all sprockets into the shafts in one take. This procedure can be a little tricky.
Then install the chain tensioner roller on its shaft.
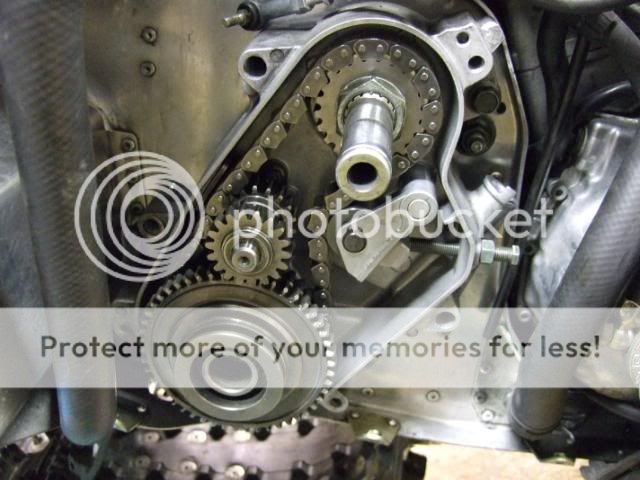
With the sprockets in place, install washer and nut on the jack shaft. Install washer on the reverse shaft. Install washer and the splined journal into the driven sprocket.
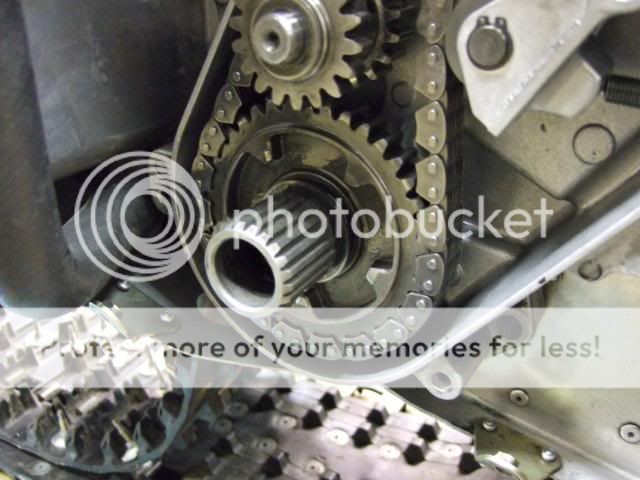
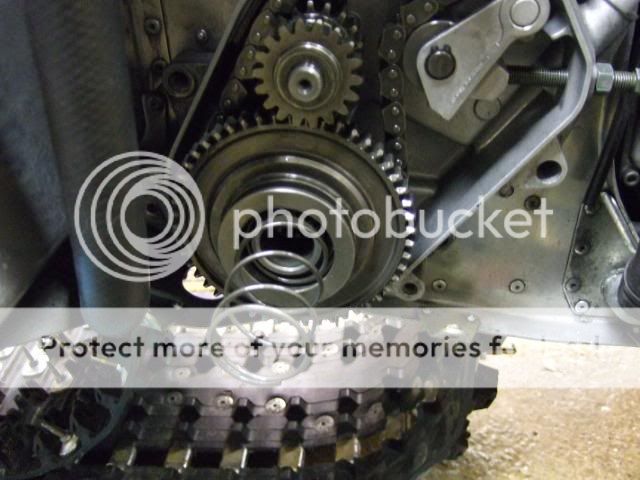
Now it's time to install the reverse gear into splined journal.
Next is the spring.
Apply some blue locktite on the bolt.
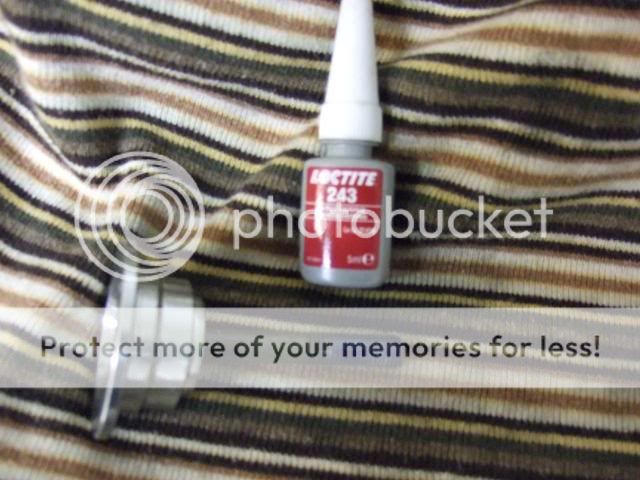
Then install the bolt and collar.
Adjust the chain tensioner finger tight and tinghten the chain tensioner lock nut.
Last step on the drive shaft install is to install the 2 set screws on the left hand side drive shaft bearing and tighten them down. The reason to do this as the last step is that when everything is installed and tightened down in the chain case, you can be sure that the drive shaft is in the correct position.
To be able to tighten the drive sprocket nut and driven sprocket bolt I had to install the skid first to help holding back when tightening the bolt and nut. Remember to tighten down both according to spec.
I will have to get hold of 3 new chain case bolts tomorrow to replace the damaged ones. I hope that the threads in the frame did not suffer any damage. I checked with the good bolt and it treaded fine into all 3 holes.
I will take more pics as I finish off the chain case install, and I will write the update on the ZX-2 skid install asap. Time to go to bed, time is now 3:30 am.
Got hold of new fresh bolts and finished off install of the chaincase to the frame. With the new bolts it did bolt down to spec like it should without treads giving away. With the turbo there is a lot of stress on all chaincase parts. There were forming rust on the old bolts, this tells me that the bolts have been under a lot of pressure, and that may caused the threads to weaken, the bolt that did not loose its thread had no rust on it, just a thought.
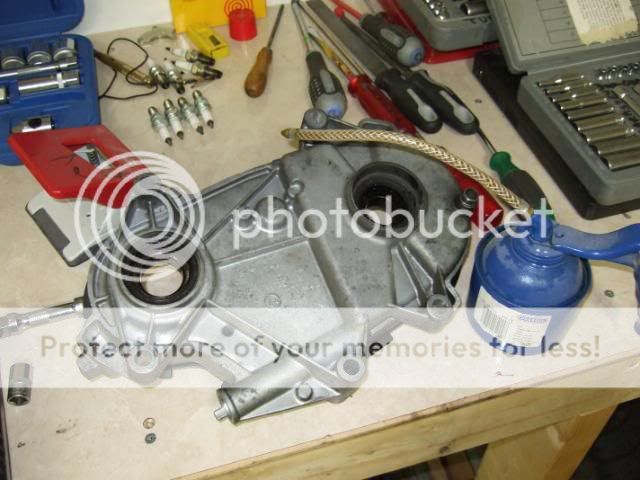
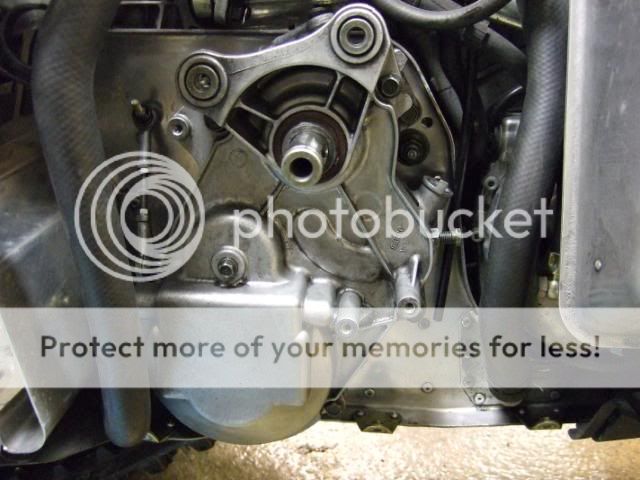
OK - with all the internal parts and the chaincase bolted onto the frame, now lets proceed with the install of the chaincase lid. Before installing the lid, oil the oil seal for the jack shaft.
Install the chaincase rubber gasket.

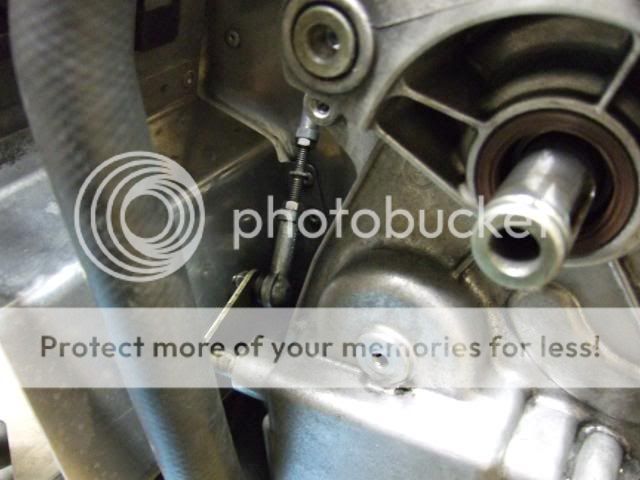
Make sure that the jackshaft is clean, apply some oil to the shaft to prevent damage of the oil seal. Slide the chaincase lid onto the jackshaft. The coolant hoses can be a pain, first part of the process keep the chaincase positioned like in the pic below, when clear of the hose slide the lower part of the chaincase to the left to align it with the bolt holes.
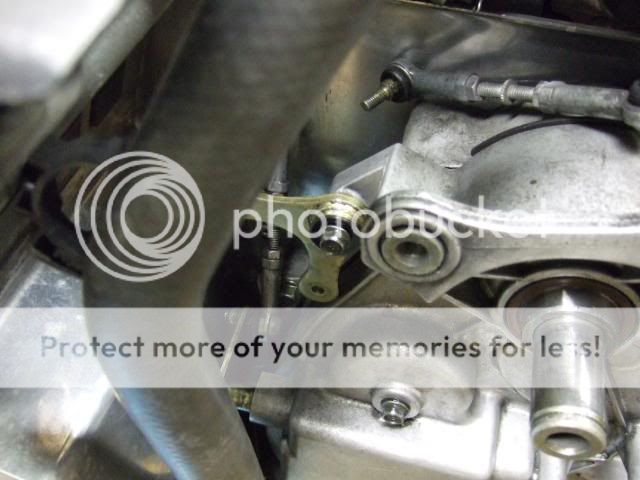
Now comes the tricky part for those who have a reverse installed, almost everybody that is I guess Now you have to make sure that the shift fork enters the groove in the reverse gear wheel shown in the following pics.

With the shift fork in correct installed into the groove in the reverse gear wheel, slide the chaincase lid further in to align it with the 2 positioning pins on the chaincase.
Here's a pic of the parts left that goes on the outside of the chaincase.
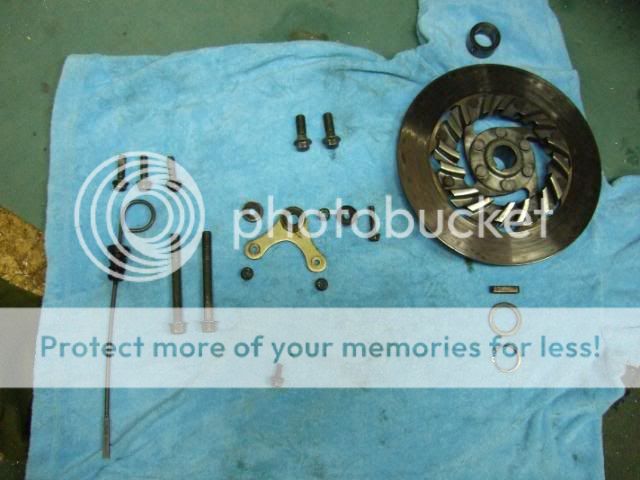
Place the reverse gear shaft like in this pic.
Before installing the remaining bolts holding the chaincase in place, thread the small bolt for the reverse shaft, for now only tighten it down finger tight.
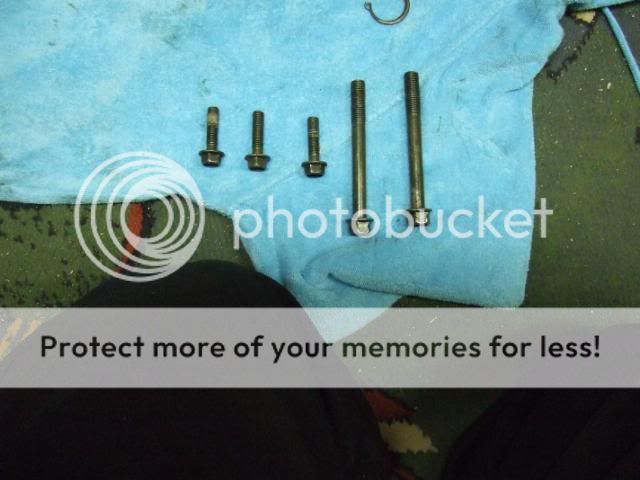
Here's the remaining bolts that holds the chaincase and lid in place. The 2 long bolt are also holding the chaincase to the frame.
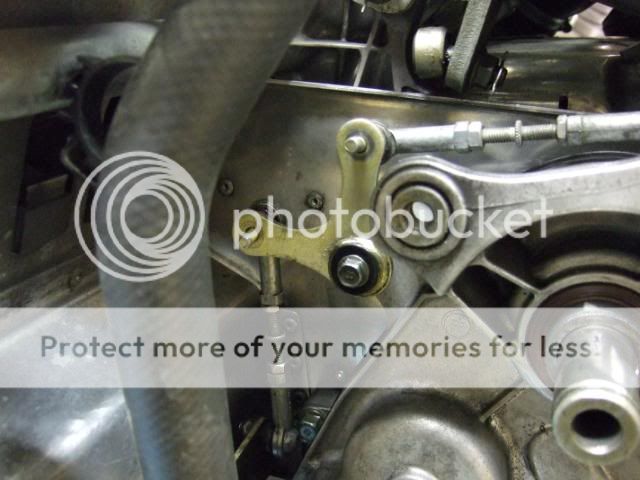
Install the remaining bolts and tighten them to spec. Now tighten down the small bolt going into the reverse shaft, the reason I do it this way is to make sure that everything is aligned before torking down the reverse shaft bolt. Next is to clean the collar with the o-ring well and apply some oil both on the inside and outside of the collar to prevent damage to the o-ring and oil seal in the chaincase. Install the collar with the o-ring onto the jackshaft and make sure the set screw are facing outwards. Tighten down the set screw.
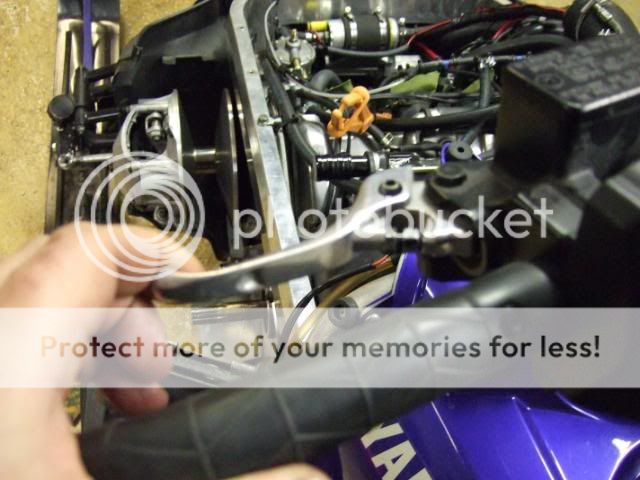
Install the reverse lever. There are 2 washers, 1 spacer and 1 bolt. Place a spacer on the flat side of the reverse lever - this side shall face towards the chaincase, insert the spacer, insert the second spacer on the outside, insert the bolt and install it like shown in this pic.
Before connecting the joints to the lever make sure your shift lever knob is placed in the forward position.
Attach the joints to the lever, install the nuts and tighten.
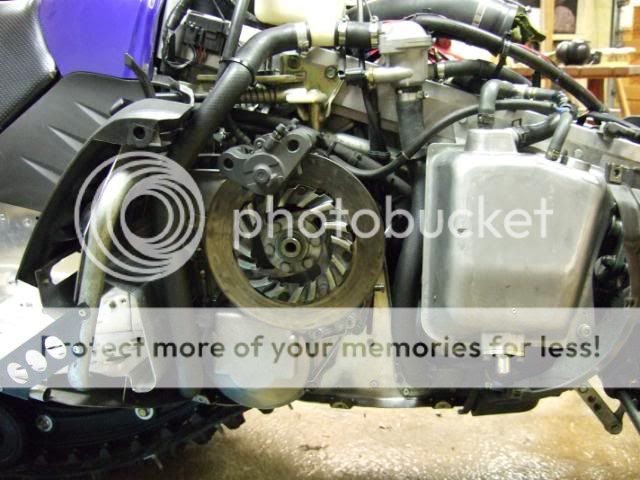
Now it's time to install the brake assembly. First install the sliding key into the groove in the jackshaft.

Align the groove in the brake disk with the sliding key on the jackshaft and slide the brake disk onto the jackshaft.
Install the washer onto the jackshaft.
Install the circlip.
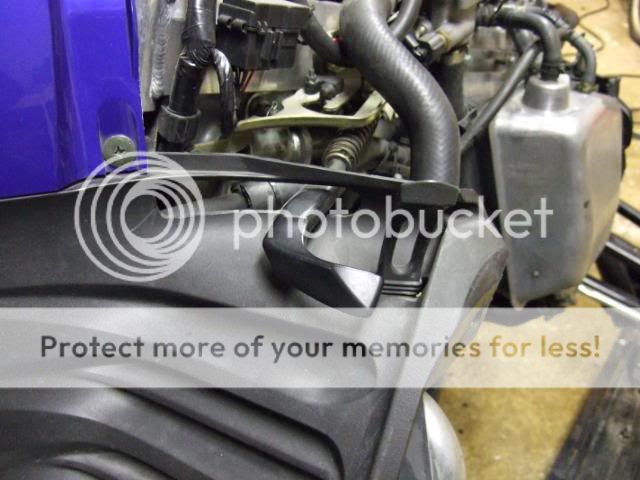
It's time to install the brake caliper. someone have touched the brake lever, if I only could get my hands on that moron ooops I did it myself . LOL - don't do that, the brake pads collapse into each other 
To release them from each other use a large flat screwdriver, the wider the better, and carefully press the screwdriver in between the brake pads like shown in this pic. Make the space needed to fit into the brake disk.
Slide the brake caliper into place.
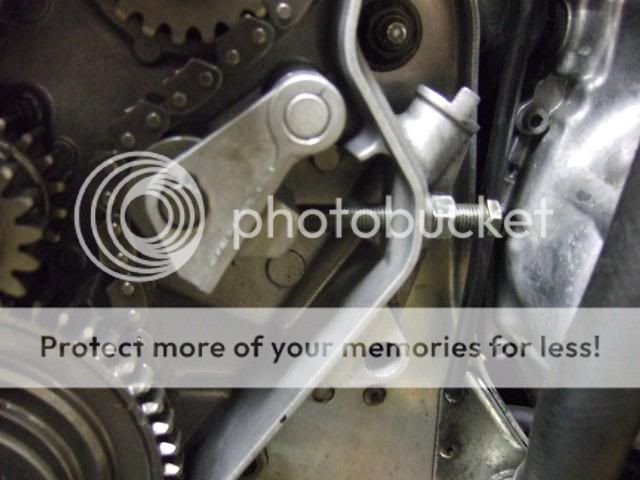
The bolts holding the brake caliper in place goes from the inside and out and attach to the chaincase. It can be a little tricky to get the bolts tightened up. This is were this type of wrenches comes in handy.

Tilt the brake caliper up in the front to make the install of the rear bolt easier, install the rear bolt first and tighten it loose.
Tilt the front of the brake caliper back down and install the front bolt. Tighten down both bolts to spec.
Remember to pump up the pressure in the brake system before taking off onto the trails. Pump the brake lever until it reach full breaking power, the lever is very loose at first. WARNING - Failing to do so before riding the sled may be hazardous.
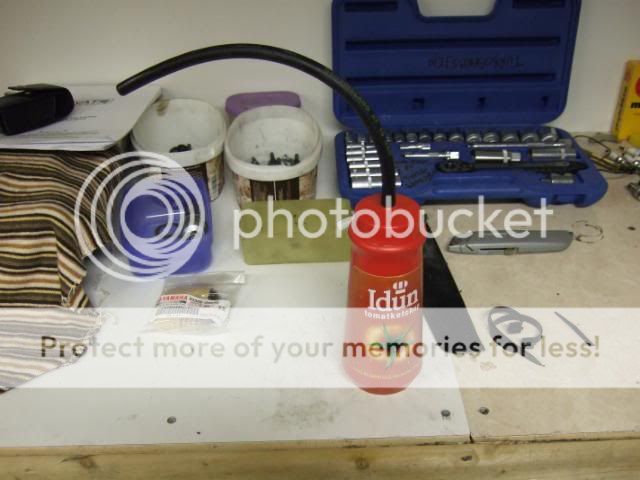
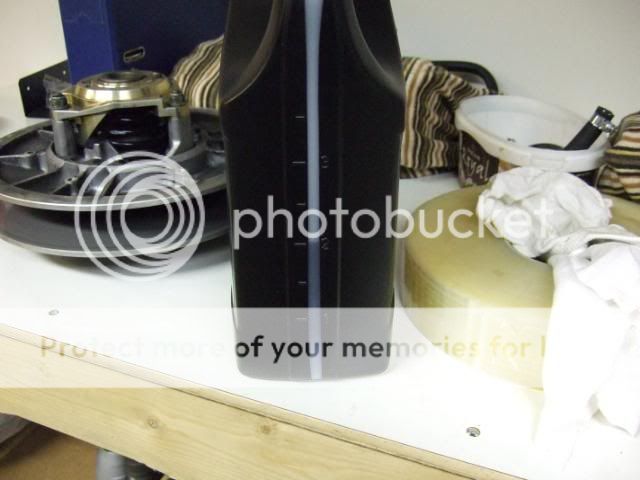
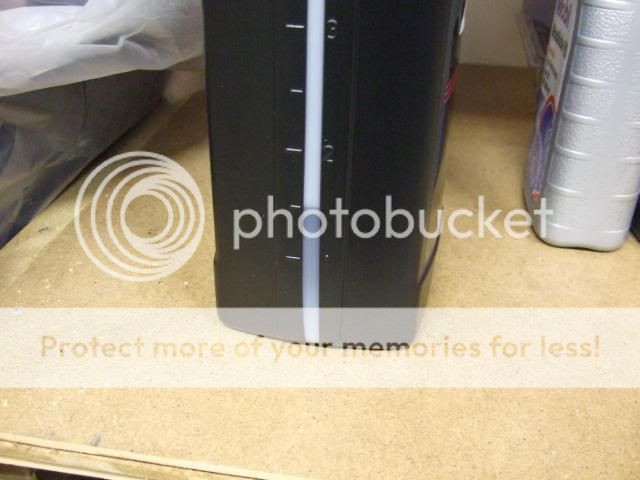
With the assembly of the chaincase and breaking done, it's time to fill up the chaincase with some lube. If you are using the gear oil recommended in the service manual, fill up the amount stated in the service manual, or fill up until you reach the full mark on your dipstick. Observe that the dipstic have two different scales, one to be used on sleds with reverse and one for those without revers. If you use engine oil like I do, you need to add 350 ml or a little less than 1/3 of a quart. To make the adding of oil to the chaincase a little easier and to avoid making a mess I have come up with the Ketchup solution. Clean a bottle of ketchup, add the required amount of oil, add a suitable hose, put the hose end down into the dipstick hole and squeeze the ketchup bottle. It's slow but you will not spill a drop of oil.
Install the dipstick lever and be done with it.
Last step is to check for leaks form the chaincase, now leaks spotted, I'm done with it.


This evening I started working on installing the drive shaft and chaincase. Before installing the drive shaft into the tunnel, make sure that the collar with the oil ring on the inside is installed on the chain case side of the drive shaft.
Here's a pic of the parts to be installed on the left hand side of the drive shaft, they are placed in the order they go into the sled.
With the drive shaft in place it's time to install the bearing. The bearing is placed into the end of the drive shaft with the set screw portion of the bearing going into the shaft first. Press the bearing into the shaft until it is snugg with cup in the frame wall like in this pic
Then install the bearing holder plate over the bearing.
Install speedo picup like shown in this pic
Add the nuts and tighten up the bearing holder plate to spec. Left hand side of the drive shaft is done.
Now on to the chaincase side of the drive shaft. When placing the drive shaft into place I put a cloting in the frame hole to prevent damaging the suface of the shaft that will be in contact with the oil seal. Before proceeding with the install I cleaned off drive shaft and jack shaft surfaces to make sure there are no dirt on the shafts that can damage the oil rings.
Before installing the chaincase into the frame I recommend oiling the oil seals well to prevent damage to them while installing the chaincase, and also to keep them lubed. Not a good thing to run a dry oil seal against a dry drive shaft, they will wear out and start to leak in no time. Also remember to install the chain tensioner before installing the chain case into the frame, there is no way to get the chain tensioner installed with the chaincase installed in the frame.
Chaincase in place on the shafts.
What is the torque spec on the 3 large bolts? Nice having a garage laptop
While torking down the bolts something nasty happend
Two of the bolts lost their treads, now I need 2 new bolts to tighten down the chaincase. As a cause of this mishap I were not able to finish off the chaincase install, but I did as much as possible. The bolts had a little rust on them so I cleaned them with 5-45 multi purpose spray (lube, water remover, rust remover, dirt dissolver), it was probably not a good thing to lube the threads prior to torking the bolts down. Threads got too slippery so it got overtightened before reaching final tork of 48 Nm or 35 ft-lbs.
Here's a pic of the parts going into the inside of the chaincase.
Started the assembly by adding washers to the jack shaft, reverse shaft and drive shaft.
Next is installing the reverse sprockets onto the reverse shaft, the sprocket with the wider teeths goes in first, remember that tiny spring going in between the inner and outer reverse sprockets. Then install the upper drive sprocket and lower driven sprocket into the chain like shown in this pic.
Now it's time to place the chain on the left side of the reverse sprockets while aligning the upper and lower sprockets with the splines on the shafts, then slide all sprockets into the shafts in one take. This procedure can be a little tricky.
Then install the chain tensioner roller on its shaft.
With the sprockets in place, install washer and nut on the jack shaft. Install washer on the reverse shaft. Install washer and the splined journal into the driven sprocket.
Now it's time to install the reverse gear into splined journal.
Next is the spring.
Apply some blue locktite on the bolt.
Then install the bolt and collar.
Adjust the chain tensioner finger tight and tinghten the chain tensioner lock nut.
Last step on the drive shaft install is to install the 2 set screws on the left hand side drive shaft bearing and tighten them down. The reason to do this as the last step is that when everything is installed and tightened down in the chain case, you can be sure that the drive shaft is in the correct position.
To be able to tighten the drive sprocket nut and driven sprocket bolt I had to install the skid first to help holding back when tightening the bolt and nut. Remember to tighten down both according to spec.
I will have to get hold of 3 new chain case bolts tomorrow to replace the damaged ones.
I hope that the threads in the frame did not suffer any damage. I checked with the good bolt and it treaded fine into all 3 holes. I will take more pics as I finish off the chain case install, and I will write the update on the ZX-2 skid install asap. Time to go to bed, time is now 3:30 am.
Got hold of new fresh bolts and finished off install of the chaincase to the frame. With the new bolts it did bolt down to spec like it should without treads giving away. With the turbo there is a lot of stress on all chaincase parts. There were forming rust on the old bolts, this tells me that the bolts have been under a lot of pressure, and that may caused the threads to weaken, the bolt that did not loose its thread had no rust on it, just a thought.
OK - with all the internal parts and the chaincase bolted onto the frame, now lets proceed with the install of the chaincase lid. Before installing the lid, oil the oil seal for the jack shaft.
Install the chaincase rubber gasket.
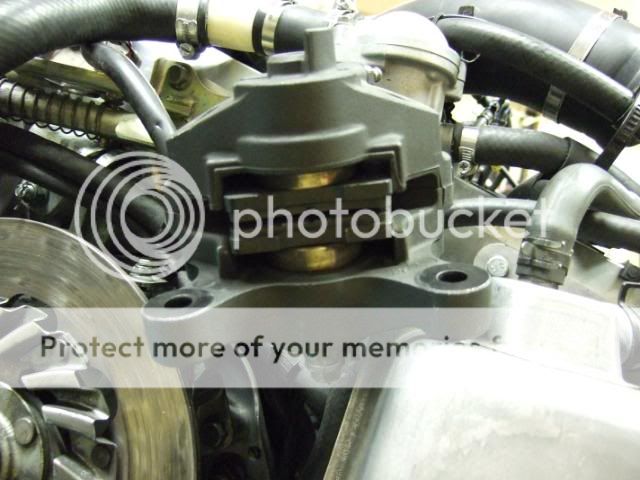
Make sure that the jackshaft is clean, apply some oil to the shaft to prevent damage of the oil seal. Slide the chaincase lid onto the jackshaft. The coolant hoses can be a pain, first part of the process keep the chaincase positioned like in the pic below, when clear of the hose slide the lower part of the chaincase to the left to align it with the bolt holes.
Now comes the tricky part for those who have a reverse installed, almost everybody that is I guess
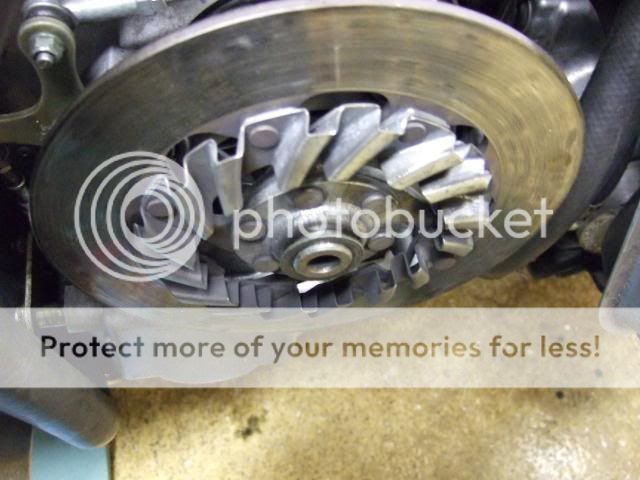
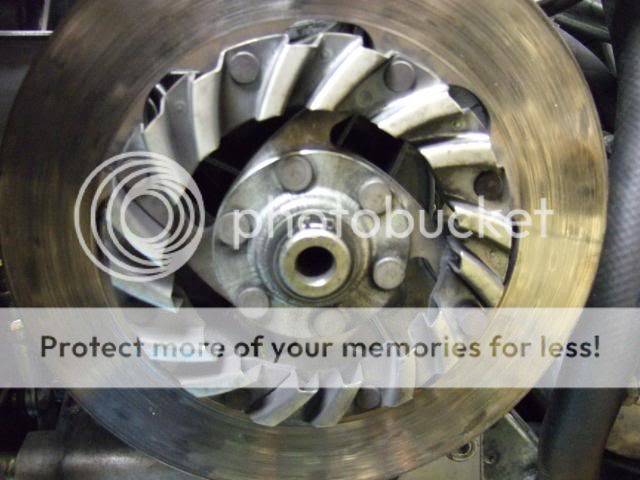
Now you have to make sure that the shift fork enters the groove in the reverse gear wheel shown in the following pics.
With the shift fork in correct installed into the groove in the reverse gear wheel, slide the chaincase lid further in to align it with the 2 positioning pins on the chaincase.
Here's a pic of the parts left that goes on the outside of the chaincase.
Place the reverse gear shaft like in this pic.
Before installing the remaining bolts holding the chaincase in place, thread the small bolt for the reverse shaft, for now only tighten it down finger tight.
Here's the remaining bolts that holds the chaincase and lid in place. The 2 long bolt are also holding the chaincase to the frame.
Install the remaining bolts and tighten them to spec. Now tighten down the small bolt going into the reverse shaft, the reason I do it this way is to make sure that everything is aligned before torking down the reverse shaft bolt. Next is to clean the collar with the o-ring well and apply some oil both on the inside and outside of the collar to prevent damage to the o-ring and oil seal in the chaincase. Install the collar with the o-ring onto the jackshaft and make sure the set screw are facing outwards. Tighten down the set screw.
Install the reverse lever. There are 2 washers, 1 spacer and 1 bolt. Place a spacer on the flat side of the reverse lever - this side shall face towards the chaincase, insert the spacer, insert the second spacer on the outside, insert the bolt and install it like shown in this pic.
Before connecting the joints to the lever make sure your shift lever knob is placed in the forward position.
Attach the joints to the lever, install the nuts and tighten.
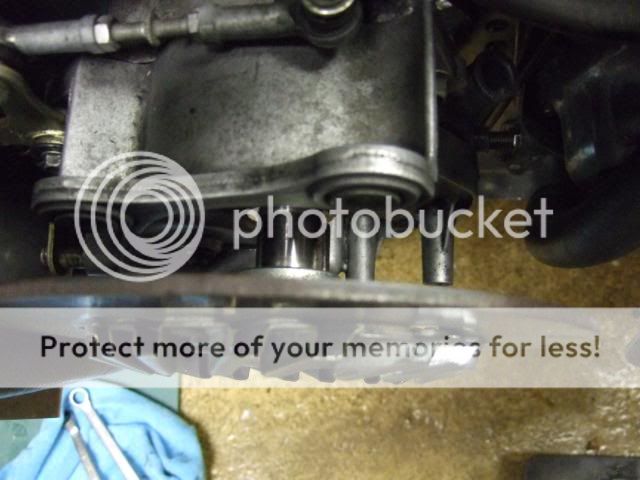
Now it's time to install the brake assembly. First install the sliding key into the groove in the jackshaft.
Align the groove in the brake disk with the sliding key on the jackshaft and slide the brake disk onto the jackshaft.
Install the washer onto the jackshaft.
Install the circlip.
It's time to install the brake caliper.
someone have touched the brake lever, if I only could get my hands on that moron ooops I did it myself . LOL - don't do that, the brake pads collapse into each other
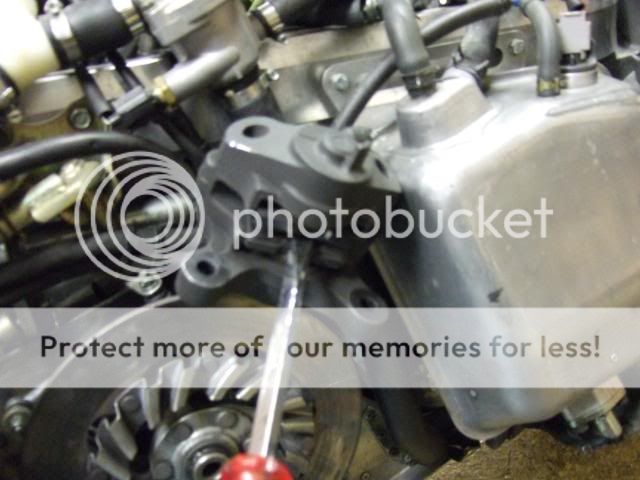
To release them from each other use a large flat screwdriver, the wider the better, and carefully press the screwdriver in between the brake pads like shown in this pic. Make the space needed to fit into the brake disk.
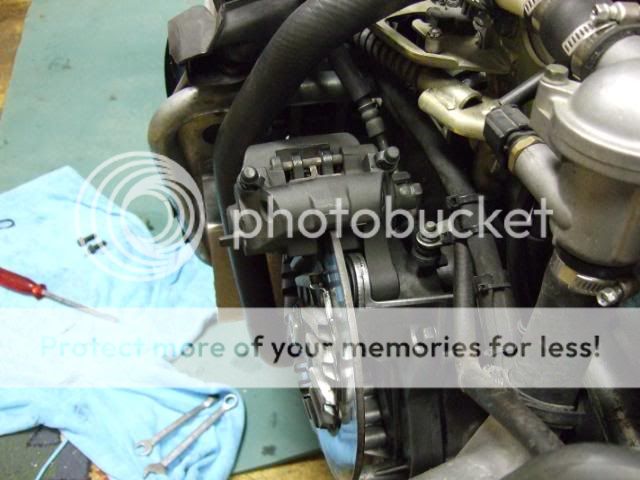
Slide the brake caliper into place.
The bolts holding the brake caliper in place goes from the inside and out and attach to the chaincase. It can be a little tricky to get the bolts tightened up. This is were this type of wrenches comes in handy.
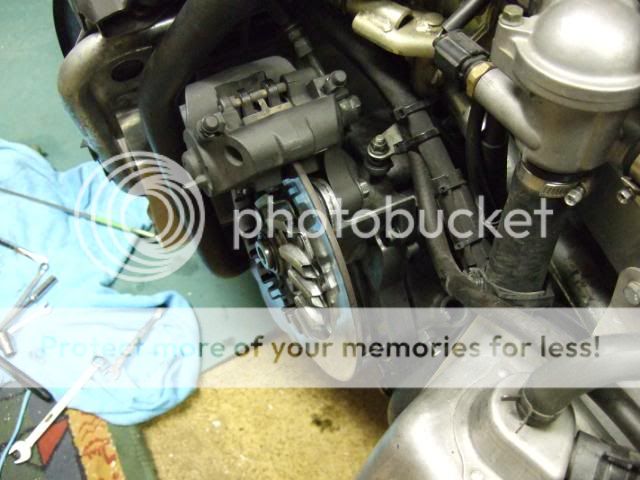
Tilt the brake caliper up in the front to make the install of the rear bolt easier, install the rear bolt first and tighten it loose.
Tilt the front of the brake caliper back down and install the front bolt. Tighten down both bolts to spec.
Remember to pump up the pressure in the brake system before taking off onto the trails. Pump the brake lever until it reach full breaking power, the lever is very loose at first. WARNING - Failing to do so before riding the sled may be hazardous.
With the assembly of the chaincase and breaking done, it's time to fill up the chaincase with some lube. If you are using the gear oil recommended in the service manual, fill up the amount stated in the service manual, or fill up until you reach the full mark on your dipstick. Observe that the dipstic have two different scales, one to be used on sleds with reverse and one for those without revers. If you use engine oil like I do, you need to add 350 ml or a little less than 1/3 of a quart. To make the adding of oil to the chaincase a little easier and to avoid making a mess I have come up with the Ketchup solution. Clean a bottle of ketchup, add the required amount of oil, add a suitable hose, put the hose end down into the dipstick hole and squeeze the ketchup bottle. It's slow but you will not spill a drop of oil.
Install the dipstick lever and be done with it.
Last step is to check for leaks form the chaincase, now leaks spotted, I'm done with it.
kinger
VIP Member
- Joined
- Jan 17, 2005
- Messages
- 7,414
- Reaction score
- 1,553
- Points
- 1,963
- Location
- Clear Lake, IA
- Website
- www.piergenius.com
You are awesome that jogs my memory perfectly!! Thanks and get some rest!
rxrider
Jan-Ove Pedersen
- Joined
- Apr 25, 2003
- Messages
- 7,355
- Reaction score
- 64
- Points
- 1,753
- Location
- Lakselv - 70N & 25E
- Country
- Norway
- Snowmobile
- 2014 Phazer XTX, 2013 Phazer RTX, 2008 Apex RTX, 2007 Warrior, 2006 Attak
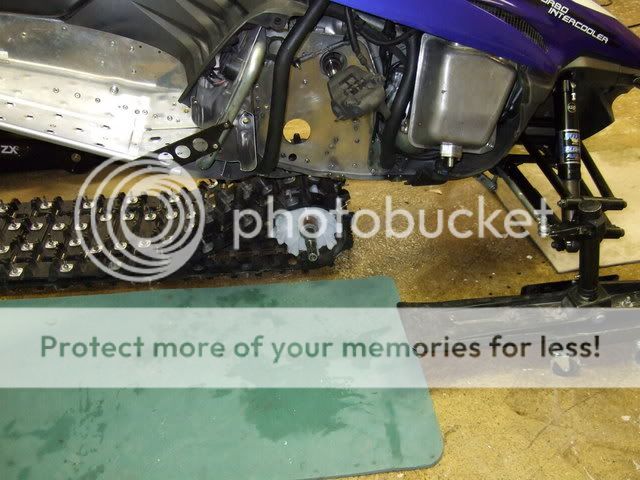
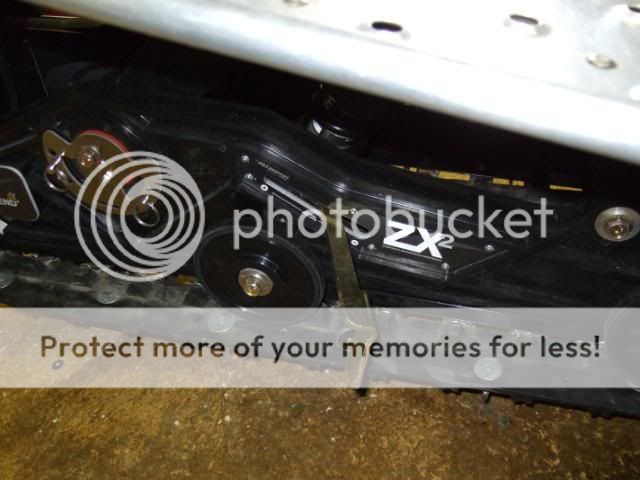
UPDATE - December 5. - Installing the ZX-2
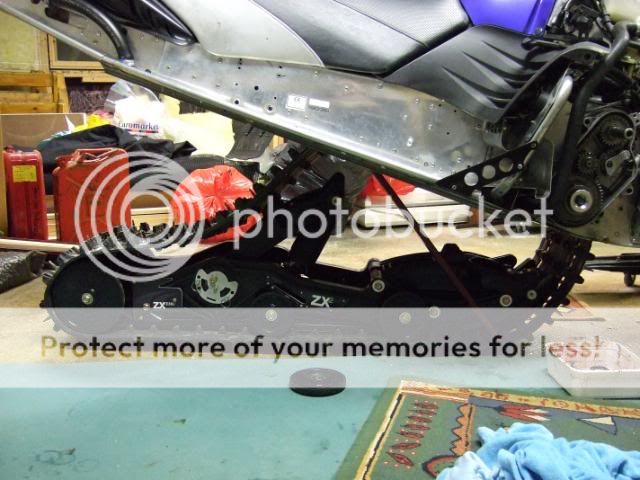
Started the install of the ZX-2 at 1:00 am tonight. I had the rear of the sled lifted 3-4 ft off the ground. I removed the upper idler wheels prior to installing the skid into the track, remember to loosen the track tensioner fully before installing the skid. To make it easier to do the install alone I found a 2 ft piece of wood to help holding the track up into the tunnel, then I rolled the skid into the track with the rear idler wheels going in first. With the rear idlers into the back of the track I started lifting the front of the ZX-2 into the track, this is where the 2 ft piece of wood came in handy, it was rather easy to place the ZX-2 into the track.
With the skid inside the track I installed the upper idler wheels and washers onto the rear cross shaft and removed the piece of wood.
Next was to install the front shaft aluminum spacers on the shaft. To be able to align the front cross shaft with the bolt holes I placed a jack underneat the front of the skid and jacked the whole suspension into the tunnel, doing it this way it was easy to get the bolt holes and shaft aligned. I added some red locktite on the bolts and treaded them into the shaft, I did not tighten them up at this point.
With the front shaft mounted into the tunnel I went on with aligning the rear shaft to the bolt holes. First I installed the rear shaft aluminum spacers onto the shaft ends. I had to lower the rear end of the sled to get the shaft into the tunnel.
With the rear shaft into the tunnel I placed the jack under the belly and jacked the front end of the sled up until the skis barely touched the floor.
There is no need to remove the revolver pins, my solution is as follows: With the shaft into the tunnel it sits too far to the rear to reach the bolt holes in the frame, the solution is to jack up the front of the sled until the skis barely touches the ground. This will cause the skid to move forward making it easier to align the shaft with the mounting holes in the frame. Now adjust the height of the rear of the sled so that the rear shaft is as close to the mounting holes as possible, then use any tool you have available to jack the the rear of the skid up a little and then the holes and shaft aligns perfectly, like shown in these pics.
Add red locktite to the bolts and install them into the rear shaft.
Remove the jack from the front of the sled.
Tighten all 4 bolts to spec, 68 Nm or 50 ft-lbs. Install is done.
I left the ZX-2 in it's factory settings. I will ride it for 100 miles at the factory settings to let it set in. And then adjust the suspension to my riding style and weight and tune the coupling and transfer to my likings. It was nice not having to remove the revolver pins at all to install the skid, cause there really is no need for it as long as you have a jack to raise the front of the skid off the ground. The ZX-2 install is done, I found the ZX-2 way easier to install than both the Proaction and Monoshock skids, even when this was my first attempt at installing the ZX-2. Nice.
Now I'm really looking forward to ride my new front and rear suspension. I hope to have the time of my life when it comes to ride quality, a good quality suspension have everything to say when riding rough ungroomed trails all winter. Let's hit the trails and see what she's can do with the lower weight and new front and rear suspensions in place
A :ORC has to be done any day soon.
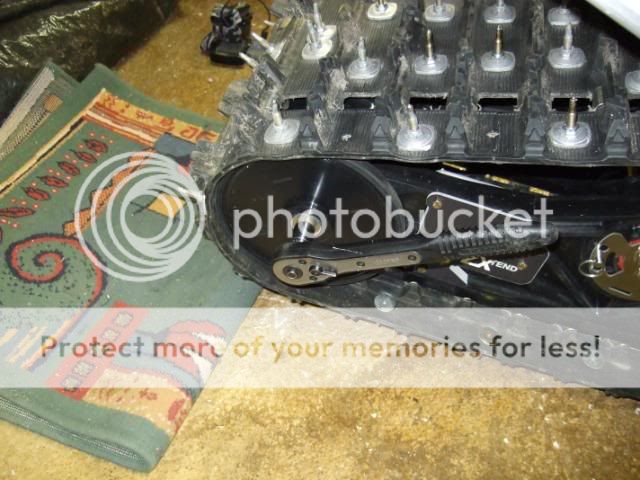
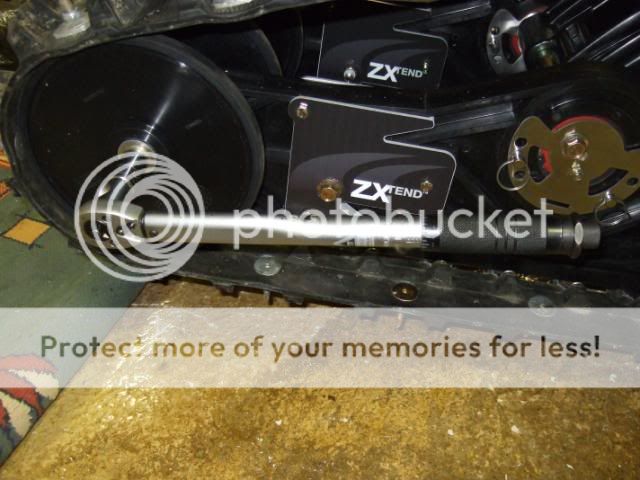
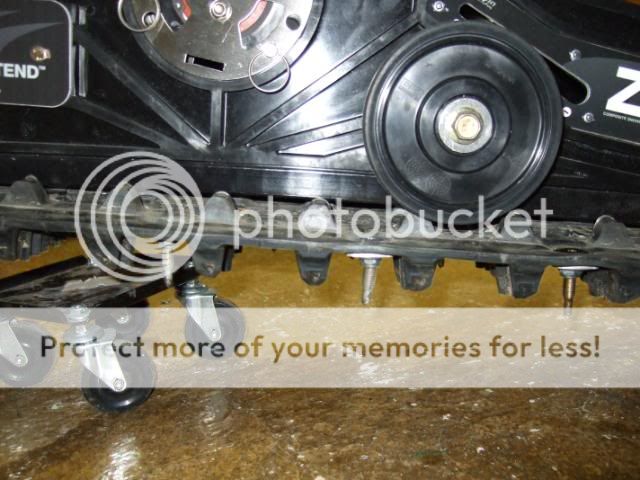
Track adjustment ZX-2.
Loosen rear idler wheel fixation bolts. Mine were loose already.

Tighten the adjuster bolts (17 millimeter socket wrench) a few turns to get the track a little closer to the sliders, on my sled the track was fairly loose. Then tighten the adjuster bolt needed to get the track run straight. When the track is correctly aligned, tighten the adjuster bolts the same amount of turns until the correct track tension is achieved. Re-check track alignment, re-check track tension.
Tighten the rear idler wheel fixation bolts some.
You may have to hold the opposite bolt with a wrench to keep the rear shaft from spinning.
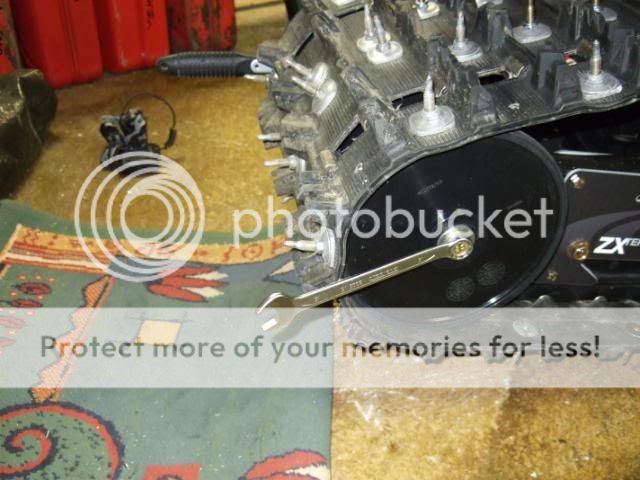
Tighten the rear idler wheel fixation bolts to spec, 68 NM or 50 Ft-Lbs.
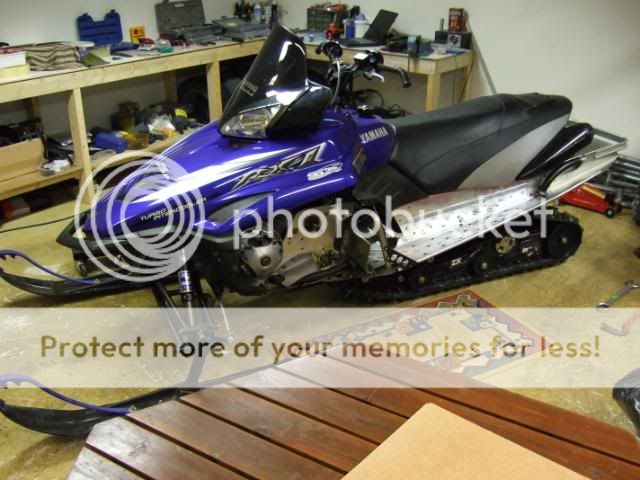
The ZX-2 is done. Let's
I did not put on the heat in my garage today. I wanted to check how track tension was when temps were below freeze. I measured the track hang out between the rear idler wheels and the middle idle wheels to be 15 millimeter or 19/32". I'll leave it that way for now. If it's too loose I'll tighten up some more.
Adjusting the shock spring preload for my weight and riding style. After reading a post on the Aftermarket Suspension Forum where Jeff/ADBoivin said not to run the ZX-2 with too little spring preload. He said that riding the ZX-2 with too little spring preload would cause the shocks to ride out of the plush part of the shock making the ride a lot stiffer then nessecary. He also said that too little spring preload would put a lot more load on the shock causing the oil to go bad prematurely, and that a rebuild of the shocks would have to be at a much earlier stage than normal. I left the revolver at the stock settings for now.
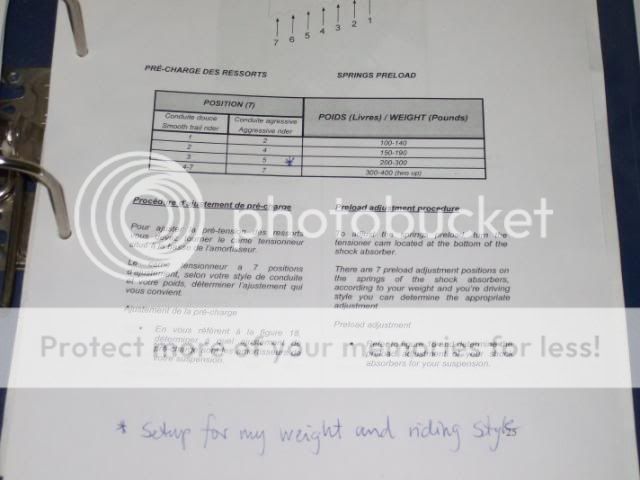
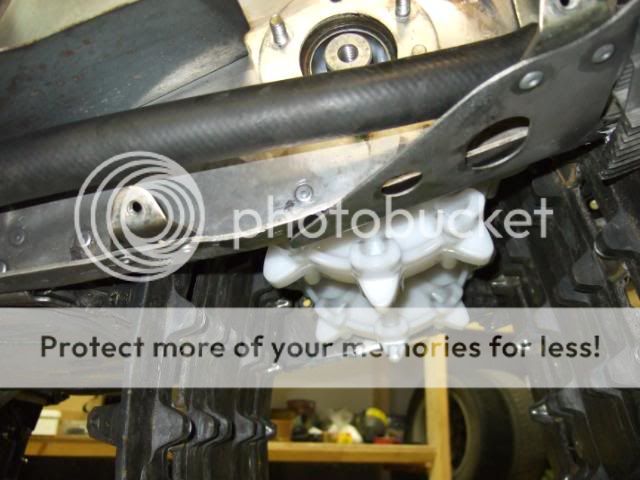
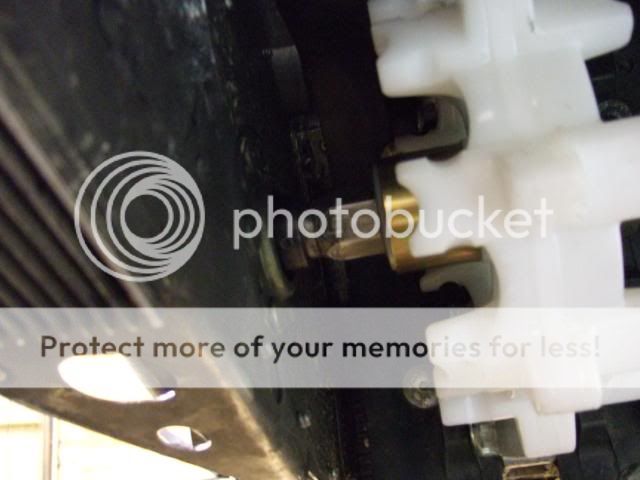
Insert the ZX-2 adjustment tool into the opening on the side of the rails close to the shocks like shown in this picture.

Adjust it by turning the adjustment tool clockwise. Do not attempt to turn the adjustment tool counterclockwise. If you turn it too far just keep turning it until it jumps down from the 7th positon and back to the 1st position. I followed ADBoivins recommendations for my weight and riding style and set the spring preload to 5 on both shocks.
WARNING - do never adjust the spring preload at unequal settings, damage to the skid may occure caused by forces applied unequally to the skid.
Done. I'm ready to ride.
Going out for the initial test ride tomorrow. Won't go far, it's just a test to check all systems for proper operation. If all is working well I will start the carburetor syncronization process.
Happy trails to all, and specially you ZX-2 riders.
Started the install of the ZX-2 at 1:00 am tonight. I had the rear of the sled lifted 3-4 ft off the ground. I removed the upper idler wheels prior to installing the skid into the track, remember to loosen the track tensioner fully before installing the skid. To make it easier to do the install alone I found a 2 ft piece of wood to help holding the track up into the tunnel, then I rolled the skid into the track with the rear idler wheels going in first. With the rear idlers into the back of the track I started lifting the front of the ZX-2 into the track, this is where the 2 ft piece of wood came in handy, it was rather easy to place the ZX-2 into the track.
With the skid inside the track I installed the upper idler wheels and washers onto the rear cross shaft and removed the piece of wood.
Next was to install the front shaft aluminum spacers on the shaft. To be able to align the front cross shaft with the bolt holes I placed a jack underneat the front of the skid and jacked the whole suspension into the tunnel, doing it this way it was easy to get the bolt holes and shaft aligned. I added some red locktite on the bolts and treaded them into the shaft, I did not tighten them up at this point.
With the front shaft mounted into the tunnel I went on with aligning the rear shaft to the bolt holes. First I installed the rear shaft aluminum spacers onto the shaft ends. I had to lower the rear end of the sled to get the shaft into the tunnel.
With the rear shaft into the tunnel I placed the jack under the belly and jacked the front end of the sled up until the skis barely touched the floor.
There is no need to remove the revolver pins, my solution is as follows: With the shaft into the tunnel it sits too far to the rear to reach the bolt holes in the frame, the solution is to jack up the front of the sled until the skis barely touches the ground. This will cause the skid to move forward making it easier to align the shaft with the mounting holes in the frame. Now adjust the height of the rear of the sled so that the rear shaft is as close to the mounting holes as possible, then use any tool you have available to jack the the rear of the skid up a little and then the holes and shaft aligns perfectly, like shown in these pics.
Add red locktite to the bolts and install them into the rear shaft.
Remove the jack from the front of the sled.
Tighten all 4 bolts to spec, 68 Nm or 50 ft-lbs. Install is done.
I left the ZX-2 in it's factory settings. I will ride it for 100 miles at the factory settings to let it set in. And then adjust the suspension to my riding style and weight and tune the coupling and transfer to my likings. It was nice not having to remove the revolver pins at all to install the skid, cause there really is no need for it as long as you have a jack to raise the front of the skid off the ground. The ZX-2 install is done, I found the ZX-2 way easier to install than both the Proaction and Monoshock skids, even when this was my first attempt at installing the ZX-2. Nice.
Now I'm really looking forward to ride my new front and rear suspension. I hope to have the time of my life when it comes to ride quality, a good quality suspension have everything to say when riding rough ungroomed trails all winter. Let's hit the trails and see what she's can do with the lower weight and new front and rear suspensions in place
A :ORC has to be done any day soon.
Track adjustment ZX-2.
Loosen rear idler wheel fixation bolts. Mine were loose already.
Tighten the adjuster bolts (17 millimeter socket wrench) a few turns to get the track a little closer to the sliders, on my sled the track was fairly loose. Then tighten the adjuster bolt needed to get the track run straight. When the track is correctly aligned, tighten the adjuster bolts the same amount of turns until the correct track tension is achieved. Re-check track alignment, re-check track tension.
Tighten the rear idler wheel fixation bolts some.
You may have to hold the opposite bolt with a wrench to keep the rear shaft from spinning.
Tighten the rear idler wheel fixation bolts to spec, 68 NM or 50 Ft-Lbs.
The ZX-2 is done.
Let's I did not put on the heat in my garage today. I wanted to check how track tension was when temps were below freeze. I measured the track hang out between the rear idler wheels and the middle idle wheels to be 15 millimeter or 19/32". I'll leave it that way for now. If it's too loose I'll tighten up some more.
Adjusting the shock spring preload for my weight and riding style. After reading a post on the Aftermarket Suspension Forum where Jeff/ADBoivin said not to run the ZX-2 with too little spring preload. He said that riding the ZX-2 with too little spring preload would cause the shocks to ride out of the plush part of the shock making the ride a lot stiffer then nessecary. He also said that too little spring preload would put a lot more load on the shock causing the oil to go bad prematurely, and that a rebuild of the shocks would have to be at a much earlier stage than normal. I left the revolver at the stock settings for now.
Insert the ZX-2 adjustment tool into the opening on the side of the rails close to the shocks like shown in this picture.
Adjust it by turning the adjustment tool clockwise. Do not attempt to turn the adjustment tool counterclockwise. If you turn it too far just keep turning it until it jumps down from the 7th positon and back to the 1st position. I followed ADBoivins recommendations for my weight and riding style and set the spring preload to 5 on both shocks.
WARNING - do never adjust the spring preload at unequal settings, damage to the skid may occure caused by forces applied unequally to the skid.
Done. I'm ready to ride.
Going out for the initial test ride tomorrow. Won't go far, it's just a test to check all systems for proper operation. If all is working well I will start the carburetor syncronization process.
Happy trails to all, and specially you ZX-2 riders.
kinger
VIP Member
- Joined
- Jan 17, 2005
- Messages
- 7,414
- Reaction score
- 1,553
- Points
- 1,963
- Location
- Clear Lake, IA
- Website
- www.piergenius.com
I like the industrial black look of the zx. I cant wait to get mine done and ride this beyatch this winter, so many changes all for the good I am just itching with excitment!
Looks great. I can't wait to get my skid. I know I'll be revisting this thread when it finally gets here for help on the install.
rxrider
Jan-Ove Pedersen
- Joined
- Apr 25, 2003
- Messages
- 7,355
- Reaction score
- 64
- Points
- 1,753
- Location
- Lakselv - 70N & 25E
- Country
- Norway
- Snowmobile
- 2014 Phazer XTX, 2013 Phazer RTX, 2008 Apex RTX, 2007 Warrior, 2006 Attak
UPDATE - December 6. - Changing the engine oil and oil filter.
The work on finshing off the chaincase install is covered in UPDATE - December 4.
Changing the engine oil. Take off the cap in the cylinder head cover.
Remove the dip stick, place a bucket or similar under the oil tank and unscrew the oil tank drain bolt.
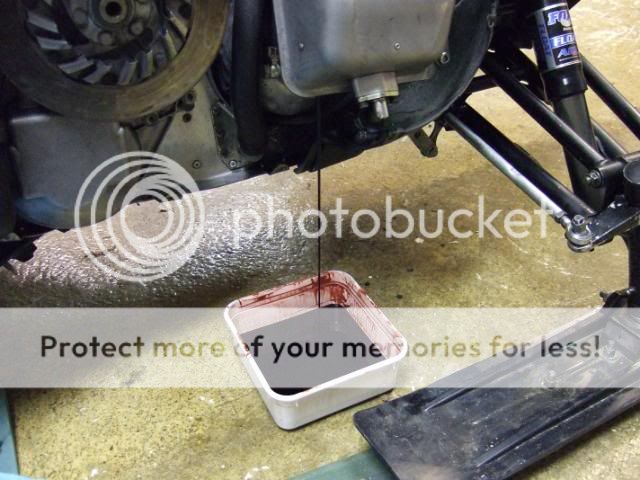
Place a bucket or similar under the belly and unscrew the oil drain bolt from underneat the engine. I have made a hole thru both my belly pan and the inspection plate to avoid the hassel of removing a bunch of rivets every time I'm doing an oil change. Those who have access to the inspection plate will have to remove it to get to the engine oil drain bolt.
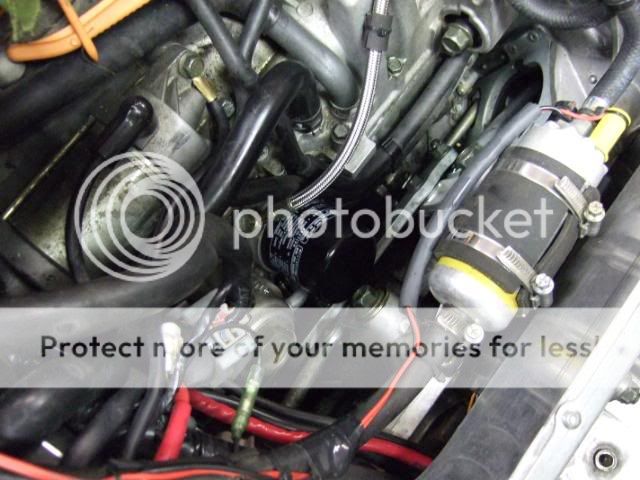
When engine and oil tank have ran dry, place lots of rags under the oil filter and remove the oil filter. Clean up all surfaces well, clean up all oil spill if any. Time to install the new oil filter. Apply oil to the oil seal of the oil filter and on the mounting surface, this has to be done to ensure proper sealing between the filter and the mounting surface, failing to do so can damage the oil filter seal causing it to leak oil. Tighten the oil filter as hard as you can with your bare hands, no need to use a wrench. If you use a wrench please look up the tork specs and use a tork wrench when tighten it down.
Install engine oil drain bolt and copper washer. Install oil tank drain bolt and copper washer. Install inspection plate if you did remove it. Time to fill up the engine with some engine oil, after running Shell Ultra Snowmobile oils for years I'm back on Yamalube. To ease the filling and to avoid oil spill I use a filler neck from plastic gas can like shown in this pic.
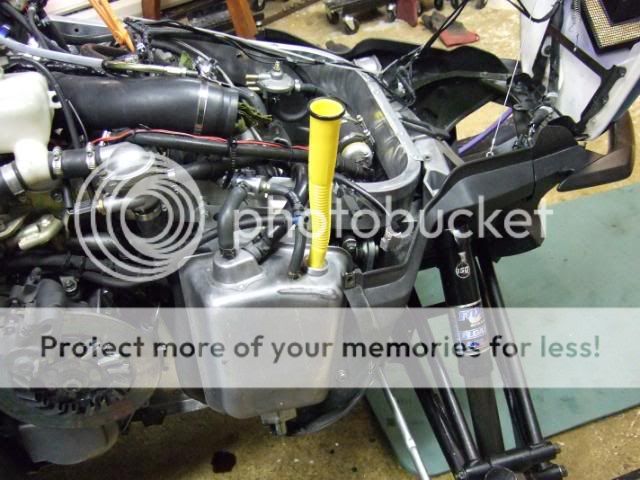
I did fill 2 litres or 2 quarts into the oil tank.
The filler neck inserted into the cylinder head cover.
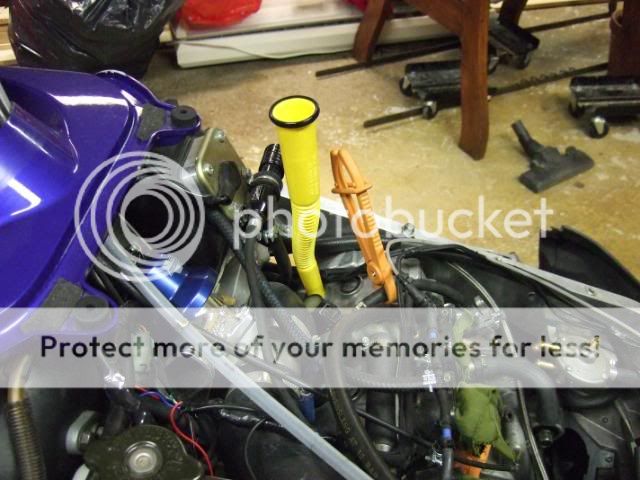
I filled 0.5 litres or 1/2 quart into the cylinder head and installed cap into the cylinder head cover.
I'm not ready to fire the engine at this time so I'll wait until I can run the engine before filling it to the F mark on the dip stick. I will take pics when I'm ready to add the remaining oil into the oil tank.
The work on finshing off the chaincase install is covered in UPDATE - December 4.
Changing the engine oil. Take off the cap in the cylinder head cover.
Remove the dip stick, place a bucket or similar under the oil tank and unscrew the oil tank drain bolt.
Place a bucket or similar under the belly and unscrew the oil drain bolt from underneat the engine. I have made a hole thru both my belly pan and the inspection plate to avoid the hassel of removing a bunch of rivets every time I'm doing an oil change. Those who have access to the inspection plate will have to remove it to get to the engine oil drain bolt.
When engine and oil tank have ran dry, place lots of rags under the oil filter and remove the oil filter. Clean up all surfaces well, clean up all oil spill if any. Time to install the new oil filter. Apply oil to the oil seal of the oil filter and on the mounting surface, this has to be done to ensure proper sealing between the filter and the mounting surface, failing to do so can damage the oil filter seal causing it to leak oil. Tighten the oil filter as hard as you can with your bare hands, no need to use a wrench. If you use a wrench please look up the tork specs and use a tork wrench when tighten it down.
Install engine oil drain bolt and copper washer. Install oil tank drain bolt and copper washer. Install inspection plate if you did remove it. Time to fill up the engine with some engine oil, after running Shell Ultra Snowmobile oils for years I'm back on Yamalube. To ease the filling and to avoid oil spill I use a filler neck from plastic gas can like shown in this pic.
I did fill 2 litres or 2 quarts into the oil tank.
The filler neck inserted into the cylinder head cover.
I filled 0.5 litres or 1/2 quart into the cylinder head and installed cap into the cylinder head cover.
I'm not ready to fire the engine at this time so I'll wait until I can run the engine before filling it to the F mark on the dip stick. I will take pics when I'm ready to add the remaining oil into the oil tank.

1CrazySledder
Lifetime Member
- Joined
- Aug 11, 2005
- Messages
- 2,006
- Reaction score
- 4
- Points
- 1,068
- Location
- Cartersville, GA.
- Country
- USA
- Snowmobile
- None, looking now!
Looks great. You did a fine job. Great write ups.
Question for you. When you were putting your chaincase back piece on the sled, wasn't there a collar that went inside the bottom hole to cover the bearings so dirt doesn't get in there? I had one on my Attak was why I was asking but didn't see it installed in your pics.
-1CS
Question for you. When you were putting your chaincase back piece on the sled, wasn't there a collar that went inside the bottom hole to cover the bearings so dirt doesn't get in there? I had one on my Attak was why I was asking but didn't see it installed in your pics.
-1CS
Similar threads
- Replies
- 3
- Views
- 2K
- Replies
- 3
- Views
- 2K
- Replies
- 46
- Views
- 154K
-
This site uses cookies to help personalise content, tailor your experience and to keep you logged in if you register.
By continuing to use this site, you are consenting to our use of cookies.