- Joined
- Feb 13, 2017
- Messages
- 188
- Age
- 69
- Location
- Amston,CT
- Country
- USA
- Snowmobile
- Renegade 900 ACE,XF 9000 Crosstour,2024 Skidoo Renegade XRS 900R
$180 is cheap to put this factory defect behind you,and get long term reliabilityI installed one in my new 2022. I was changing the track anyway and felt $180 was worth the peace of mind.
Shagnos
TY 4 Stroke Junkie
No field testing yet so that’s unknown but I hope your right.$180 is cheap to put this factory defect behind you,and get long term reliability
")
Hoosiersnow
Extreme
For those who have installed this - what is involved? I have a 2 stroke cat but assume it's similar. It sounds like the driveshaft saver is very easy but do you need to take more part to install this newer solution?
- Joined
- Feb 13, 2017
- Messages
- 188
- Age
- 69
- Location
- Amston,CT
- Country
- USA
- Snowmobile
- Renegade 900 ACE,XF 9000 Crosstour,2024 Skidoo Renegade XRS 900R
For those who have installed this - what is involved? I have a 2 stroke cat but assume it's similar. It sounds like the driveshaft saver is very easy but do you need to take more part to install this newer solution?
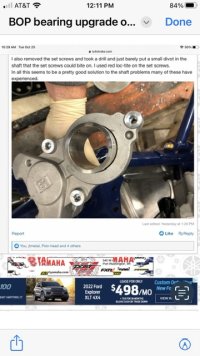
Yes,approximately 2-3 hrs for the installation.Once track tension is released,left footwell removed. Remove 3 chassis bolts ,to remove housing .Removal of disc retaining clip.The entire disc brake housing/caliper should slide off end off shaft.Press out original bearing,and press back in new updated bearing and collar assy. For re-assy ,you will have to either split caliper or remove the belly pan to have enough room to slide the housing with the bearing assy over end of shaft.Remember to remove the o.e.m.ring on shaft before installation.once housing is re-installed with collar install 3 chassis bolts to housing.Then use a small drill to give each Allen screw something to bite on with loctite.Reassemble brake caliper(with clip) and add fluid.Cut and remove original debris shield,not needed .Below is updated bearing and collar assembly pressed into housing before installation on shaftFor those who have installed this - what is involved? I have a 2 stroke cat but assume it's similar. It sounds like the driveshaft saver is very easy but do you need to take more part to install this newer solution?
Attachments
Last edited:
Motorhead
TY 4 Stroke God
- Joined
- Apr 20, 2003
- Messages
- 2,099
- Location
- Augusta, Maine
- Country
- USA
- Snowmobile
- 2017 SW LTX-LE
- LOCATION
- Augusta ME
Nice quick instruction overview. Thanks!Yes,approximately 2-3 hrs for the installation.Once track tension is released,left footwell removed.3 chassis bolts ,to housing remove.Removal of disc retaining clip.The entire disc brake housing/caliper should slide off end off shaft.Press out original bearing,and press back in new updated bearing and collar assy. For re-assy ,you will have to either split caliper or remove the belly pan to have enough room to slide the housing with the bearing assy over end of shaft.Remember to remove the o.e.m.ring on shaft before installation.once housing is re-installed with collar install 3 chassis bolts to housing.Then use a small drill to give each Allen screw something to bite on with loctite.Reassemble brake caliper(with clip) and add fluid.Cut and remove original debris shield,not needed
Shall probably need that FIX next season, and it sounds like what Yamacat should have done many years ago on this Procross chassis ??
Yamarus
Extreme
- Joined
- Oct 4, 2021
- Messages
- 98
- Age
- 54
- Location
- Russia
- Country
- Russia
- Snowmobile
- Yamaha Sidewinder B-TX LE 153
.
Hoosiersnow
Extreme
Thanks. Doesn't seem too bad. My sled is in storage and I won't be able to figure out if the shaft is worn before I get up to work on it (so I'll need parts before that). So I'm leaning towards this as opposed to the cheaper and easier to install saver, just because I'm assuming I do have wear.Yes,approximately 2-3 hrs for the installation.Once track tension is released,left footwell removed. Remove 3 chassis bolts ,to remove housing .Removal of disc retaining clip.The entire disc brake housing/caliper should slide off end off shaft.Press out original bearing,and press back in new updated bearing and collar assy. For re-assy ,you will have to either split caliper or remove the belly pan to have enough room to slide the housing with the bearing assy over end of shaft.Remember to remove the o.e.m.ring on shaft before installation.once housing is re-installed with collar install 3 chassis bolts to housing.Then use a small drill to give each Allen screw something to bite on with loctite.Reassemble brake caliper(with clip) and add fluid.Cut and remove original debris shield,not needed .Below is updated bearing and collar assembly pressed into housing before installation on shaft
NYTurbo
TY 4 Stroke God
THe issue I see with a this design is you now have a smaller bearing due to the collar.
sailor joe
TY 4 Stroke Guru
- Joined
- Apr 4, 2019
- Messages
- 761
- Location
- ma
- Country
- USA
- Snowmobile
- 2016 RS VENTURE TF
2020 SIDEWINDER GT
yes, check the shaft first for wear as BOP has pictures of what degrees of wear look like. My Sidewinder has 4750 miles on it and no shaft wear. I guess I'm just lucky so far. Anyone else out there without shaft wear? just wondering what percentage of bad shafts are out there. JoeThanks. Doesn't seem too bad. My sled is in storage and I won't be able to figure out if the shaft is worn before I get up to work on it (so I'll need parts before that). So I'm leaning towards this as opposed to the cheaper and easier to install saver, just because I'm assuming I do have wear.
Hoosiersnow
Extreme
I didn't realize the price was about the same for the two solutions (considering the "repair" item has the bearing with it). Seems like the only downside is a bit more work for the install.
- Joined
- Feb 13, 2017
- Messages
- 188
- Age
- 69
- Location
- Amston,CT
- Country
- USA
- Snowmobile
- Renegade 900 ACE,XF 9000 Crosstour,2024 Skidoo Renegade XRS 900R
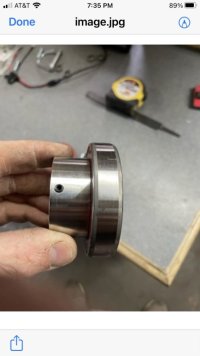
The bearing (F.A.G.) is the same size as the original.The inner race has been machined to accept the flange of the collar,which is pressed in.the picture on the left,below shows the collar before installation into the I.D.of the upgraded bearing.The right pic is the collar pressed into the inner race and how you receive it before install into the disc brake housingTHe issue I see with a this design is you now have a smaller bearing due to the collar.
Attachments


jonlafon1
Lifetime Member
- Joined
- Aug 18, 2014
- Messages
- 4,128
- Age
- 50
- Country
- USA
- Snowmobile
- 2022 Sidewinder LTX_SE
2024 Catalyst RXC
2017 Sidewinder LTX-SE. 11750 miles (SOLD)
If its a quality bearing and serviced(repack) yearly should be no issue at allTHe issue I see with a this design is you now have a smaller bearing due to the collar.
NYTurbo
TY 4 Stroke God
Maybe,, time will tell. We won’t really know till it’s tested for a season .
jonlafon1
Lifetime Member
- Joined
- Aug 18, 2014
- Messages
- 4,128
- Age
- 50
- Country
- USA
- Snowmobile
- 2022 Sidewinder LTX_SE
2024 Catalyst RXC
2017 Sidewinder LTX-SE. 11750 miles (SOLD)
For sure.. I will report back. I will be installing one on a 21 Cat 8000 and running it all year.Maybe,, time will tell. We won’t really know till it’s tested for a season .
- Joined
- Feb 13, 2017
- Messages
- 188
- Age
- 69
- Location
- Amston,CT
- Country
- USA
- Snowmobile
- Renegade 900 ACE,XF 9000 Crosstour,2024 Skidoo Renegade XRS 900R
Better than the O.E.M. It is a German manufactured bearing F.A.G. My 2018 Crosstour will be running this bearing repair kit starting this season also.If its a quality bearing and serviced(repack) yearly should be no issue at all
Similar threads
- Replies
- 5
- Views
- 2K
- Replies
- 1
- Views
- 504
- Replies
- 22
- Views
- 2K
- Replies
- 36
- Views
- 6K
-
This site uses cookies to help personalise content, tailor your experience and to keep you logged in if you register.
By continuing to use this site, you are consenting to our use of cookies.