welterracer
TY 4 Stroke God
Sled looks awsome..


1CrazySledder
Lifetime Member
- Joined
- Aug 11, 2005
- Messages
- 2,006
- Reaction score
- 4
- Points
- 1,068
- Location
- Cartersville, GA.
- Country
- USA
- Snowmobile
- None, looking now!
Curve Industries said:We have some decals that should work. Shoot me a photo of where you want it and what color. I'll fire back a picture of what it would look like, then we'll get some made up!
- Sean
www.CurveXS.com
I'll get a couple pictures this weekend for you and post here or in a PM.
Thanks,
-Vince


1CrazySledder
Lifetime Member
- Joined
- Aug 11, 2005
- Messages
- 2,006
- Reaction score
- 4
- Points
- 1,068
- Location
- Cartersville, GA.
- Country
- USA
- Snowmobile
- None, looking now!
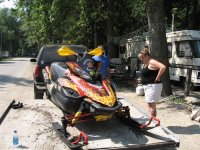
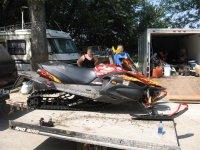
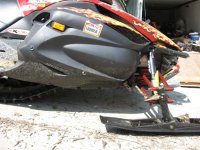
Well, I have some extra work ahead of me now. As some of you know, I was in the flood that swept through lower Wisconsin. My work shop where the sled is stored is about a good 4.5ft of the ground. I still ended up with close to a foot and a half of water in there. Below are pics of my sled after I got her out of there. She sat in the water for about 3 weeks. You can see the scum lines. I pressure washed it, but The panels still look like crap. IMO.
Pretty much from the bottom 1/4 of the primary down got wet. I hope my HyGear 2 into 1 remote rezzi's are'nt wrecked, but we seem to think it is okay? I think the water just got the bottom of the motor a little bit.
The plans now are to remove, clean and install my new bushings in the front, tear down and rebuild the expert, and rebuild the primary. It needs it anyway, even before the flood. I have an extra set of panels that are getting some work done on them as we speak. Might as well take the lower panels off and send them off to where the other ones are. I also have a set of the Curve Skis, (thanks guys ).
I'm done crying now, time to get her cleaned and ready for winter.
The pics below, Mark took. ( Sleaddheadd ) Thanks, bud. lol
Attachments

Curve Industries
TY Advertiser
- Joined
- Jan 20, 2008
- Messages
- 736
- Reaction score
- 13
- Points
- 823
- Location
- Waterville, NY
- Website
- www.curveindustries.com
Everything will be ok Vince. I know without a doubt that come this winter, you will be tearing around as planed and on an incredible piece of equipment to boot. We are all in your corner. Stay strong!
- Sean
- Sean


1CrazySledder
Lifetime Member
- Joined
- Aug 11, 2005
- Messages
- 2,006
- Reaction score
- 4
- Points
- 1,068
- Location
- Cartersville, GA.
- Country
- USA
- Snowmobile
- None, looking now!
Thanks Sean. Yeah, I'll have her all fixed up before winter and ready to hit the snow!!
Have a few other tricks up my sleeve for my girl, so keep an eye open! lol
Have a few other tricks up my sleeve for my girl, so keep an eye open! lol


yamadoo
Yamadoo is a snowmobile ' aholic'.
- Joined
- Jun 3, 2003
- Messages
- 3,645
- Reaction score
- 1,501
- Points
- 1,753
- Country
- USA
- Snowmobile
- 15 Viper STX DX red/white- GPS and KING AIR suspension 4kmiles
13 Apex XTX 45 anniversary RED/WHITE/BLACK 3K miles
10 Vector LTX Blue 9kmiles
11 Venture GT 4k miles
86 SnoScoot(2) for grand kids
Vin,
Man sorry to see your baby so dirty, I know it hurts you but I am sure you will have her shining soon
Yamadoo
Man sorry to see your baby so dirty, I know it hurts you but I am sure you will have her shining soon
Yamadoo


1CrazySledder
Lifetime Member
- Joined
- Aug 11, 2005
- Messages
- 2,006
- Reaction score
- 4
- Points
- 1,068
- Location
- Cartersville, GA.
- Country
- USA
- Snowmobile
- None, looking now!
Sled is cleaned up. I have removed the rear skid, greased and cleaned it, same as the front end. A friend and I changed the red a-arms for black ones to match the rear skid. Over 4,000 miles on the sled and only 1 bad bushing. WooHooo. The inside of the panels still need some cleaning, but atleast she is drivable now. The foam has sucked up allot of the river muck.
Also have changed out my 144X1.5 for a 144X1.25" track and plan to run studs. Would you guys run the tall nuts or the new spacers from Mack studs or nothing at all? Remember this is a boosted sled that will be at 10lbs and eventually with Nitrous. I have the double backers....
My second set of panels are going to be something like solid black. Yeap, pretty much going stealth. I'll still have these flames though. LOL I've just started trying to work with a company to get them to make clear/Lexan NON-TINTED side panels and hood for my girl so I can powder coat the engine compartment area. I have seen the clear hoods, just not the side panels. Sure wish someone made them, would make things allot easier. lol
I'm looking to put a hole in my hood and bring the intake filter up a couple inches to where just the top of the filter is above the hood about an inch.
What would you guys use to make a 3" hole in the hood without cracking it? Not worried about the edges, as I have some trim rings for the hole edges.


- Joined
- Mar 1, 2004
- Messages
- 4,868
- Reaction score
- 502
- Points
- 1,663
- Location
- WINTERPEG / MANITOBA / CANADA
1CrazySledder said:Sled is cleaned up.
I'm looking to put a hole in my hood
What would you guys use to make a 3" hole in the hood without cracking it?
Hey Bro....U Need a 3" Hole........R U In Luck as that's my Specialty making holes
.....Just 4 U Homes...NO FUSS NO MUSS

Attachments


1CrazySledder
Lifetime Member
- Joined
- Aug 11, 2005
- Messages
- 2,006
- Reaction score
- 4
- Points
- 1,068
- Location
- Cartersville, GA.
- Country
- USA
- Snowmobile
- None, looking now!
Cruel. Absolutely cruel, bro. What did the teddy do to you? lol

Curve Industries
TY Advertiser
- Joined
- Jan 20, 2008
- Messages
- 736
- Reaction score
- 13
- Points
- 823
- Location
- Waterville, NY
- Website
- www.curveindustries.com
Vince, possibly I'm too late here but a 3" hole saw will work great. Mark your center and the arbor bit will locate and punch out right where you want it. Your local hardware store is bound to have one. Don't say, "I'll never use it again." I know one day you will.
Take a razor blade after and drag it opposite the cutting edge, not into the cutting edge. This will de-bur the perimeter nicely. If you are going to repaint, you can flame finish around the hole with a propane torch for a near factory molded look.
I've used this technique on many a street bike slider installation. Comes out perfect every time! Don't forget, measure three times and then after you pick the drill up, set it back down and measure again!
- Sean
www.CurveIndustries.com


1CrazySledder
Lifetime Member
- Joined
- Aug 11, 2005
- Messages
- 2,006
- Reaction score
- 4
- Points
- 1,068
- Location
- Cartersville, GA.
- Country
- USA
- Snowmobile
- None, looking now!
Finally got some more time on this thing today. Trying to get here ready for winter and specifically for a 10 day trip in Jan.
I had changed out the RED A-arms for black ones and changed the track from a 1.5 to a 1.25 a few weeks ago.
I put my tunnel protectors back in tonight, and let me tell you, what a pain in the azz. Not hard work, just allot of removing parts. I had to take the flex tubes off just to put the front 4 rivets in. Bet I never remove them again! lol
I must have bent the one a little as it doesn't sit flat against the tunnel above the drivers. I'm hoping going in reverse isn't an issue! There is about a .250" gap there. I'll just have to keep an eye on my track for a bit to see if I am loosing any lugs.
I have also changed out my exhaust. I went with a stock mountain Apex exhaust. Of course that is held off now, as I my 4 exhaust gaskets are no good. I'll have to call Port in the morning and hope they aren't back ordered or anything. While I was in there, I was looking at something for another member, my heat sheild plate just under the flex tubes was loose. It seemed I lost a couple rivets holding that plate down, which caused mine to come up a little. 1 of my flex tubes was hitting it and melted some of the material away. I drilled a few more holes in other places, placed rivets in them, and the 2 I lost. This bottom plate is now flat as can be and sturdy.
As I said in another post, I may end up lining both the bottom and upper heat shields with some header wrap I have. This should help protect the insulation and help with heat control.
Have the 1.400" SS Studs to go in with all Double backers. Thinking around 170 up the middle should give me enough traction...for trails anyways. Last season I spun all over the place, thus earning my self a nick name "snowblower" & "Sweeper".
I have some Curve Skis yet to install and I also have the float remote rezzis to install yet. Should get that done this week yet!
I still need to do something about getting more/ cold air to my prefilter under the hood. I have a few ideas. lol
Pics to come later on when all is done.
I had changed out the RED A-arms for black ones and changed the track from a 1.5 to a 1.25 a few weeks ago.
I put my tunnel protectors back in tonight, and let me tell you, what a pain in the azz. Not hard work, just allot of removing parts. I had to take the flex tubes off just to put the front 4 rivets in. Bet I never remove them again! lol
I must have bent the one a little as it doesn't sit flat against the tunnel above the drivers. I'm hoping going in reverse isn't an issue! There is about a .250" gap there. I'll just have to keep an eye on my track for a bit to see if I am loosing any lugs.

I have also changed out my exhaust. I went with a stock mountain Apex exhaust. Of course that is held off now, as I my 4 exhaust gaskets are no good. I'll have to call Port in the morning and hope they aren't back ordered or anything. While I was in there, I was looking at something for another member, my heat sheild plate just under the flex tubes was loose. It seemed I lost a couple rivets holding that plate down, which caused mine to come up a little. 1 of my flex tubes was hitting it and melted some of the material away. I drilled a few more holes in other places, placed rivets in them, and the 2 I lost. This bottom plate is now flat as can be and sturdy.
As I said in another post, I may end up lining both the bottom and upper heat shields with some header wrap I have. This should help protect the insulation and help with heat control.
Have the 1.400" SS Studs to go in with all Double backers. Thinking around 170 up the middle should give me enough traction...for trails anyways. Last season I spun all over the place, thus earning my self a nick name "snowblower" & "Sweeper".
I have some Curve Skis yet to install and I also have the float remote rezzis to install yet. Should get that done this week yet!
I still need to do something about getting more/ cold air to my prefilter under the hood. I have a few ideas. lol
Pics to come later on when all is done.

Curve Industries
TY Advertiser
- Joined
- Jan 20, 2008
- Messages
- 736
- Reaction score
- 13
- Points
- 823
- Location
- Waterville, NY
- Website
- www.curveindustries.com
Vince, I didn't forget about your sticker request. I just need to sit down and do it!
Nice work getting your ripper ready for winter after the bath it had. Those nicknames are AWESOME! A++ to the people responsible for that! hahaaa!
- Sean
www.CurveIndustries.com
www.RideWithRobbie.com
Nice work getting your ripper ready for winter after the bath it had. Those nicknames are AWESOME! A++ to the people responsible for that! hahaaa!
- Sean
www.CurveIndustries.com
www.RideWithRobbie.com


1CrazySledder
Lifetime Member
- Joined
- Aug 11, 2005
- Messages
- 2,006
- Reaction score
- 4
- Points
- 1,068
- Location
- Cartersville, GA.
- Country
- USA
- Snowmobile
- None, looking now!
Sean,
LMAO.....No rush. I'm sure your busy with other stuff. I'm a patient man. lol
I should have some pics of those nice skis on her this week. Only been 3 months, huh? lol
Yeah, that bare track just swept the corners clean. in the snow, who ever was behind me always were sprayed with snow. lol One rider got it all over the front of the sled and in into the helmet. lmao..... She was a good 15ft back yet to. It was funny. That was scooters' girl! LMAO
Damn Vince, I didnt know u were affected by the floods last June.......What part of Fort are you in?
Hope your life is somewhere back to normal.
Derek
Hope your life is somewhere back to normal.
Derek


1CrazySledder
Lifetime Member
- Joined
- Aug 11, 2005
- Messages
- 2,006
- Reaction score
- 4
- Points
- 1,068
- Location
- Cartersville, GA.
- Country
- USA
- Snowmobile
- None, looking now!
Gonna try some different gearing this season. I had the 23t in her with stock 38 bottom with 9t extroverts and a 1.5" 144 track no studs.
This season, went to a 144 1.25 ripsaw, leaving the 9t extro's in her and gonna run some studs. ( Maybe 114 or so 1.48's to start with ) Leaving her at low boost for now, 5.5ish but will be going up to 10lbs soon.
I have a 24 and 25t tops, just not sure with one to go with for trail/lake stuff. Might as well run the 25t and see what happens? lol
Similar threads
- Replies
- 141
- Views
- 24K
- Replies
- 1
- Views
- 727
- Replies
- 691
- Views
- 154K
-
This site uses cookies to help personalise content, tailor your experience and to keep you logged in if you register.
By continuing to use this site, you are consenting to our use of cookies.


