rxrider
Jan-Ove Pedersen
- Joined
- Apr 25, 2003
- Messages
- 7,355
- Reaction score
- 64
- Points
- 1,753
- Location
- Lakselv - 70N & 25E
- Country
- Norway
- Snowmobile
- 2014 Phazer XTX, 2013 Phazer RTX, 2008 Apex RTX, 2007 Warrior, 2006 Attak
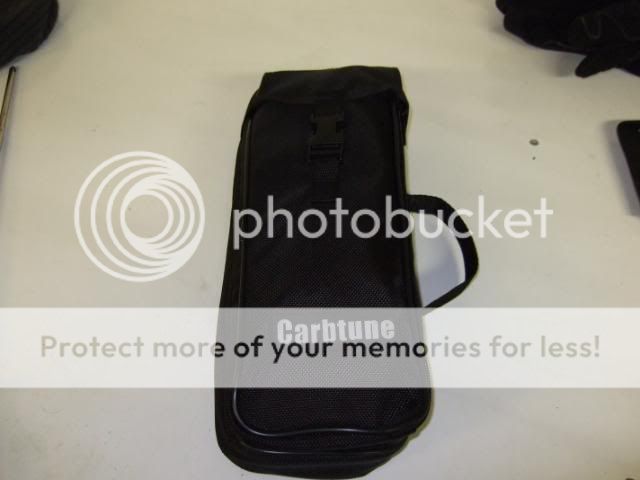
UPDATE - December 11. - Morgan CarbTune Pro preparetion.
Today I prepared the Morgan CarbTune Pro and made it ready to be put into use. The MCTP came packed inside the transportation bag I ordered together with the MCTP. All hardware and the user instructions were packed inside the bag") , very nice put together. I addition to the MCTP there were 4 pcs of 100 cm or 3 ft rubber tubeing, a 10 cm or 4" piece for hard plastic restrictor tubing to go inside the rubber tubing. There were also a plastic tie clip for hanging the MCTP vertical when tuning, it's the type that can be reused, it has a locking and opening mechanism. There where a few modifications to be done to the piping before it was ready to be put into use.
, very nice put together. I addition to the MCTP there were 4 pcs of 100 cm or 3 ft rubber tubeing, a 10 cm or 4" piece for hard plastic restrictor tubing to go inside the rubber tubing. There were also a plastic tie clip for hanging the MCTP vertical when tuning, it's the type that can be reused, it has a locking and opening mechanism. There where a few modifications to be done to the piping before it was ready to be put into use.
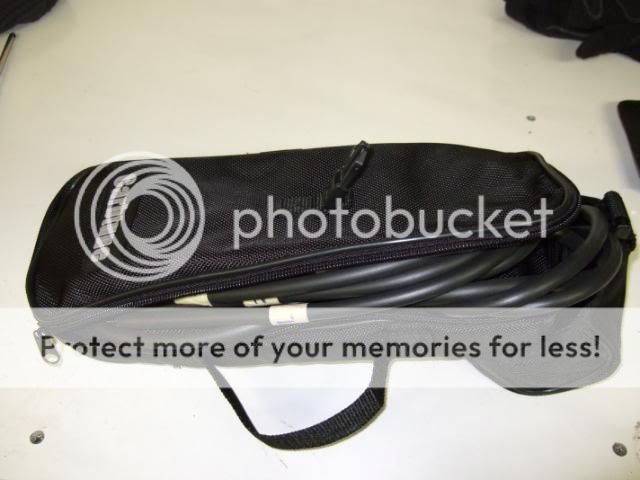
Preparing the MCTP for use. First I had to cut off 10 cm or 4" of the 100 cm or 3 ft hose. Then I had to cut the thin line 10 cm or 4" restrictor plastic into 4 pcs of 2.5 cm or 1" length. Next was inserting the 2.5 cm or 1" plastic restictors half of its length into the 10 cm or 4" rubber lines I cut previously. When done I inserted the other end of the restrictor into the 90 cm or 35.4" lines. The 10 cm or 4" end of the lines is ment to be connected into the intake track of your engine, the 90 or 35.4" part of the rubber lines goes into the MCTP. The reason for this is to create a restrictor to dampen the vacuum fluctuations coming from the engine, this is done to stabilize the readings, or else they would bounce all over the place.
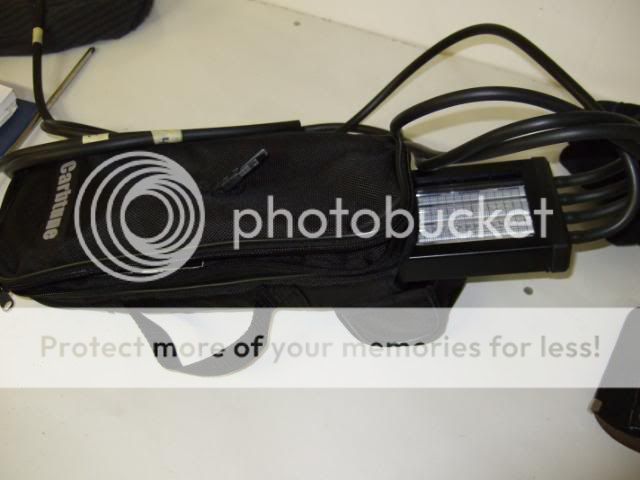
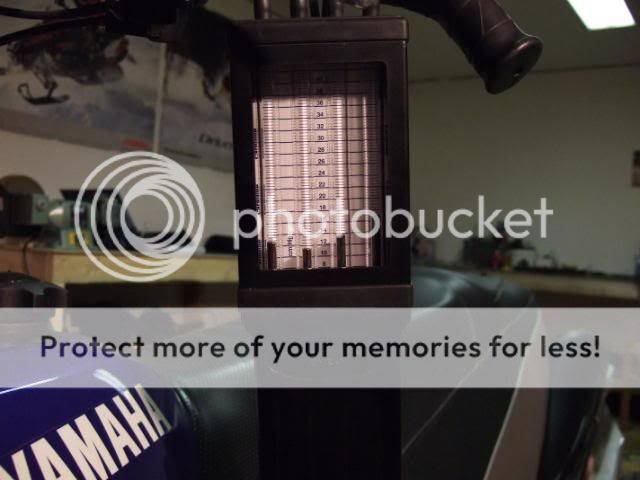
The MCTP is a 4 carbs/throttle bodies at once syncronization tool. It has 4 columns showing its readings in centimeters of mercury (cmHg), scale readings are divided into 0.5 cmHg steps. Now my task is to have the 4 columns read as close to each other as possible. Time to read the Yamaha Service Manual on the topic of carburetor suncronization.

Checked the coolant once more. It was down a little in the cup, checked for leaks but none were found. Filled it up to the line once more. When running the engine with insufficient amount of coolant made the coolant foam, that may be the reason my coolant level went down some since yesterday. Will check this once more tomorrow before heading out to ride the turbo.
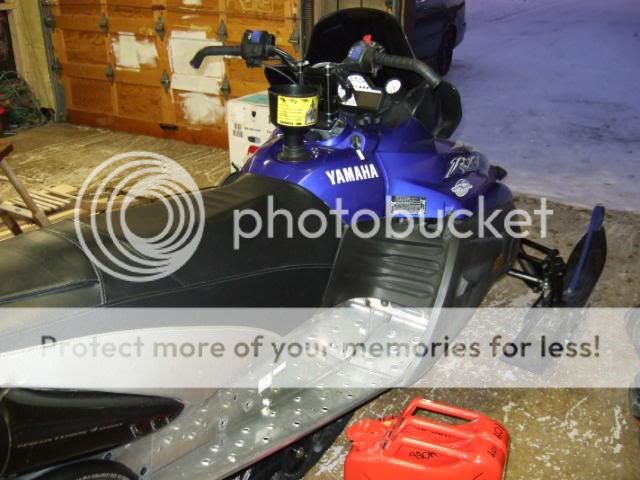
Last thing done today was installing the license plate in the rear of my sled, installed it at the top of the snow flap.
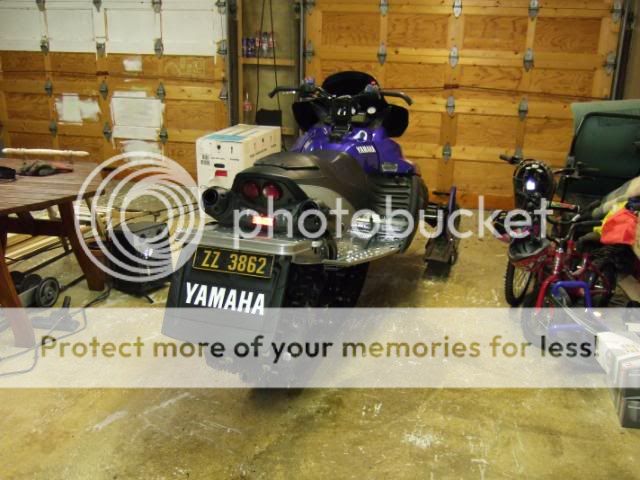
 Ready to ride

!")
Syncronization of the carbs is all there is left to do
Today I prepared the Morgan CarbTune Pro and made it ready to be put into use. The MCTP came packed inside the transportation bag I ordered together with the MCTP. All hardware and the user instructions were packed inside the bag
, very nice put together. I addition to the MCTP there were 4 pcs of 100 cm or 3 ft rubber tubeing, a 10 cm or 4" piece for hard plastic restrictor tubing to go inside the rubber tubing. There were also a plastic tie clip for hanging the MCTP vertical when tuning, it's the type that can be reused, it has a locking and opening mechanism. There where a few modifications to be done to the piping before it was ready to be put into use.
Preparing the MCTP for use. First I had to cut off 10 cm or 4" of the 100 cm or 3 ft hose. Then I had to cut the thin line 10 cm or 4" restrictor plastic into 4 pcs of 2.5 cm or 1" length. Next was inserting the 2.5 cm or 1" plastic restictors half of its length into the 10 cm or 4" rubber lines I cut previously. When done I inserted the other end of the restrictor into the 90 cm or 35.4" lines. The 10 cm or 4" end of the lines is ment to be connected into the intake track of your engine, the 90 or 35.4" part of the rubber lines goes into the MCTP. The reason for this is to create a restrictor to dampen the vacuum fluctuations coming from the engine, this is done to stabilize the readings, or else they would bounce all over the place.
The MCTP is a 4 carbs/throttle bodies at once syncronization tool. It has 4 columns showing its readings in centimeters of mercury (cmHg), scale readings are divided into 0.5 cmHg steps. Now my task is to have the 4 columns read as close to each other as possible. Time to read the Yamaha Service Manual on the topic of carburetor suncronization.
Checked the coolant once more. It was down a little in the cup, checked for leaks but none were found. Filled it up to the line once more. When running the engine with insufficient amount of coolant made the coolant foam, that may be the reason my coolant level went down some since yesterday. Will check this once more tomorrow before heading out to ride the turbo.
Last thing done today was installing the license plate in the rear of my sled, installed it at the top of the snow flap.
Ready to ride Syncronization of the carbs is all there is left to do
jornab
Newbie
WOW! Awesome work rxrider. Really helpful for us who are looking for this kind of info. I especially like the amount of pics. They say more than a thousand words. 
Keep up the good work!!
You guys probably know this, but you must check your coolant level when the engine is at normal operating temperature. I noticed that you didn't say wether it was cold or warm in your last post. If you keep adjusting the level when the engine is cold, the coolant will expand when it gets hot, and the redundant fluid will pass through the outlet-whole in the radiator cap. Ergo, it's easy to think the engine is consuming fluid or there's a leak somewhere. Just a heads up.
rxrider
Jan-Ove Pedersen
- Joined
- Apr 25, 2003
- Messages
- 7,355
- Reaction score
- 64
- Points
- 1,753
- Location
- Lakselv - 70N & 25E
- Country
- Norway
- Snowmobile
- 2014 Phazer XTX, 2013 Phazer RTX, 2008 Apex RTX, 2007 Warrior, 2006 Attak
UPDATE - Update to the December 5. ZX-2 install post.
TY-member Bradford got my attention and I noticed there were a few errors in my writeup on the UPDATE - December 5. Installing the ZX-2.
It had a few errors to it, sorry about that. If you did follow my post to the T you would not be able to install the ZX-2 the way I tried to describe it.
Post has been edited and corrected, and pics are added to better describe the proceedure.
At one point I said "jack the skid up in the front" this was erronous, it should have said "jack the sled up in the front". Also there was no pic of what I told you to do, again sorry. From now on I will read my posts more carefully after posting to check for errors and misspellings.
But then again, thanks to TY-member Bradford for noticing me of the errors. The post has now been edited, misspellings corrected and pic of the jacking procedure added.
rxrider
Jan-Ove Pedersen
- Joined
- Apr 25, 2003
- Messages
- 7,355
- Reaction score
- 64
- Points
- 1,753
- Location
- Lakselv - 70N & 25E
- Country
- Norway
- Snowmobile
- 2014 Phazer XTX, 2013 Phazer RTX, 2008 Apex RTX, 2007 Warrior, 2006 Attak
jornab said:WOW! Awesome work rxrider. Really helpful for us who are looking for this kind of info. I especially like the amount of pics. They say more than a thousand words.
You guys probably know this, but you must check your coolant level when the engine is at normal operating temperature. I noticed that you didn't say wether it was cold or warm. If you keep adjusting the level when the engine is cold, the coolant will expand when it gets hot, and the redundant fluid will pass through the outlet-whole in the radiator cap. Ergo, it's easy to think the engine is consuming fluid or there's a leak somewhere. Just a heads up.
jornab - thank you for noticing me.
No I did not say it directly, but I assumed that if you read the whole post you will see that I added 2.5 litres or 3/4 gallon of fluid and started the engine, and I started the engine a few times during the coolant refill process. So it was refilled on a luke warm engine. I was not doing this by the book. You can say "I did it my way" to say it with Frankie Blue Eyes

I will re-read my post and see if there is anything that is not clear and edit the post accordingly.
rxrider
Jan-Ove Pedersen
- Joined
- Apr 25, 2003
- Messages
- 7,355
- Reaction score
- 64
- Points
- 1,753
- Location
- Lakselv - 70N & 25E
- Country
- Norway
- Snowmobile
- 2014 Phazer XTX, 2013 Phazer RTX, 2008 Apex RTX, 2007 Warrior, 2006 Attak
There were a few things that were not described good enough in the post:
UPDATE - December 10. Adjusting oil and coolant level.
The post has now been edited.
PS! This post is not following the procedures described in the 2003 Yamaha RX-1 Service Manual, but it covers the basics anyway.
I did it my way because I was doing both the oil and coolant refill at the same time. The cruisals have been covered tho, like checking the amount of engine oil and circulation, and bleeding of the coolant system.
The Yamaha Service Manual tells you to fill the coolant to the cold level line when the engine is cold. On my turbo sled I can fill it to the cold level line and I'm not loosing any coolant, but I have the head torked down the proper way for the turbo pressure I run. If you are loosing coolant out the over flow line, you most likely have a minimal leak of combustion gases into the coolant system, thus creating slightly larger pressure inside the coolant system making it puke a tiny bit of coolant out the overflow. On mine, it does not happen.
But the RX-1 has been known to do just what journab says. But it is nothing to worry about, the coolant level drops a bit and then it stops dropping any further. My take is that the expansion tank is just a tad too small.
rxrider
Jan-Ove Pedersen
- Joined
- Apr 25, 2003
- Messages
- 7,355
- Reaction score
- 64
- Points
- 1,753
- Location
- Lakselv - 70N & 25E
- Country
- Norway
- Snowmobile
- 2014 Phazer XTX, 2013 Phazer RTX, 2008 Apex RTX, 2007 Warrior, 2006 Attak
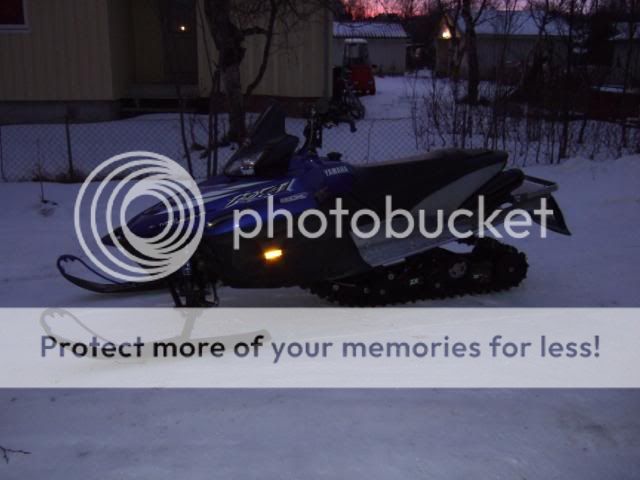
UPDATE - December 12. - Initial testride.
I was out today for a 5 mile test ride to check the suspension, bringing the engine to proper operating temps, and to get a overall feel for the sled. The testride went well, no problems encountered.
First task this morning was to drive my car down to the Statoil gas station to fill up 2 Jerry cans of fuel. Approx 40 litres or 10.5 gallons of premium (98 oktane europe) fuel was purchased. Before heading out I filled up the sled with about 35 litres or 9.2 gallons of fresh fuel from the Jerry cans.
I use a Mr. Funnel filler trackt, it removes all small particles from the fuel as well as water. Last thing I did before heading out was to take a visual check under the hood, specially the coolant level in the can. Coolant level was the same as last night.
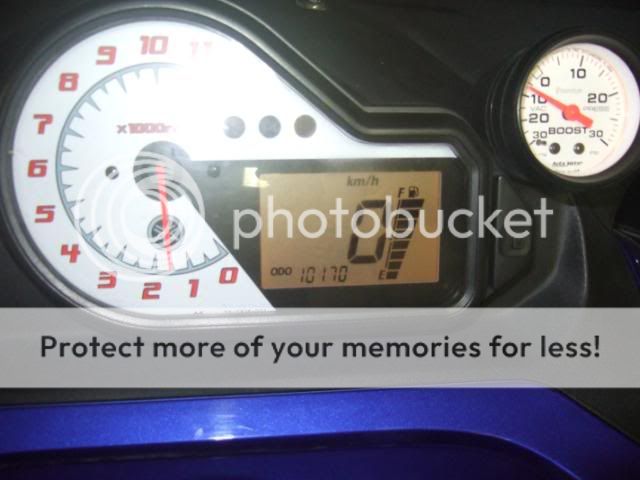
Start odometer: 10162 kilometers or 6315 miles.
Ready to leave the Turbo Garage.
Outside warming up the engine before take off. Notice the amount of daylight we have at 12:00 am.

We have very little snow down at sealevel. Pics are taken in my backyard a mile from my house. Pics were shot at 12:45 pm. The first one is taken to the south and the other to the north.


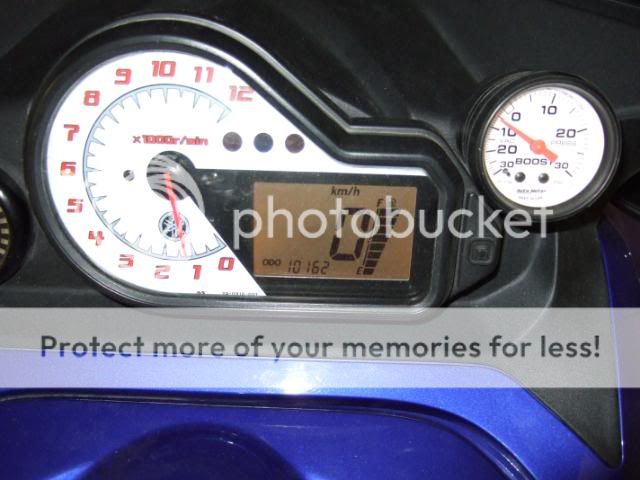
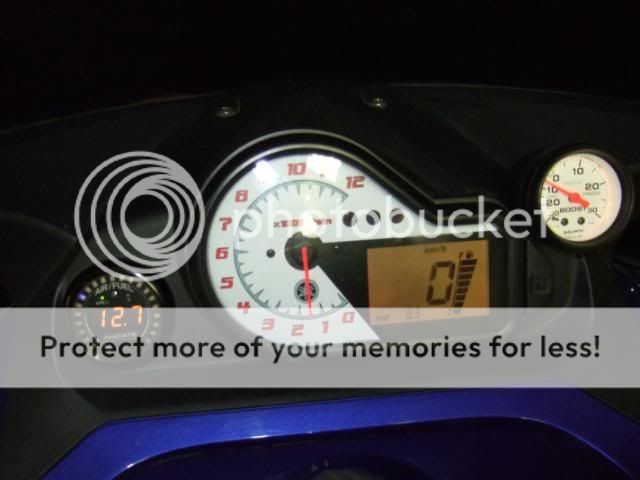
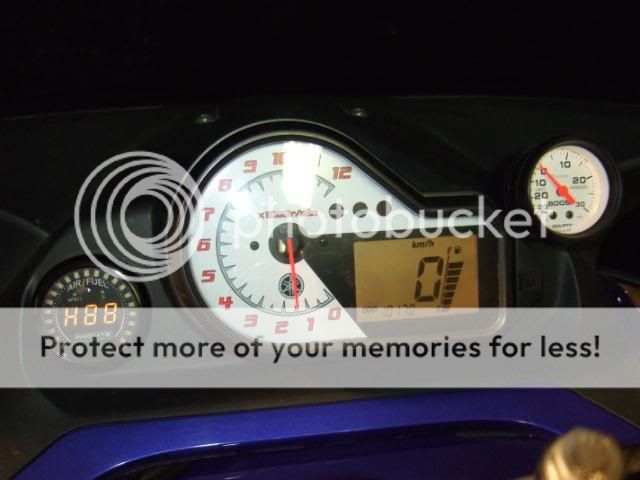
Hot engine idle AFR: 12.7
Idle rpms: 1550
Idle vacuum: 6 HPC
Distance ridden today: 8.4 kms or 5.2 miles
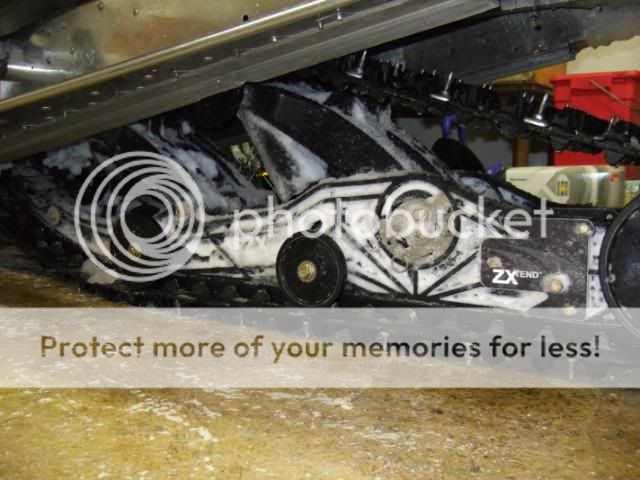
This pic show the amount of snow the skid holds after 5 miles, we have very low snow conditions.
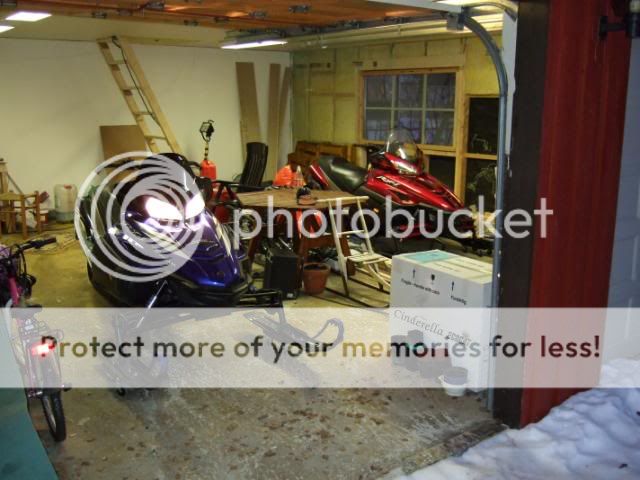
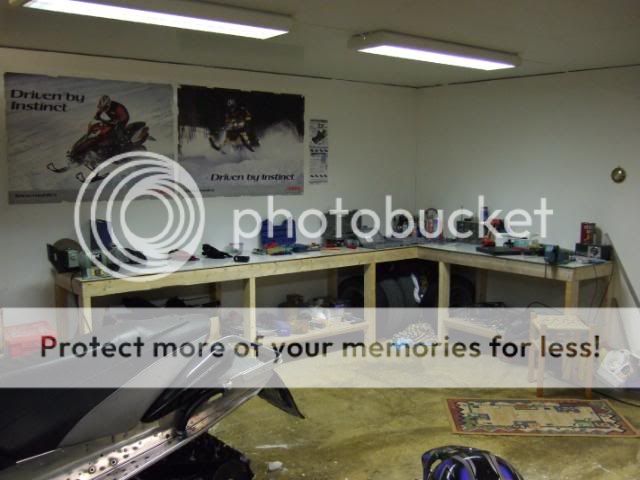
Here's what the Turbo Garage workbench looks like.
Overall I am very pleased with my initial testride. No problems encountered, all systems are working. Throttle response is way better than it ever was. I have reduced amount of weight at the pin to remedy a underrev situation I had giving it WOT from a standstill. I did also go up from 17.5 to 22.5 on the pilot jets which woke up the throttle response big time. I found a ploved snowcovered road with a 200 meter or 660 ft straight where tracktion was superb. From a rolling start of 30kmt or 18 mph I gave it WOT to check if the turbo would build boost, it sure did. The transfer of the ZX-2 is unbelievable, the sled took off like a rocket with the skis off the ground. I held it WOT for 100 meters or 330 ft, MAN my sled is flying. I was not able to watch the meters cause I had a handful holding on to the sled, the transfer of the ZX-2 took me off guard and all I could do was to hang on.
I will have to find a suitable lake to check readings from my meters
I'm very pleased with the performance of my suspension. The Fox Floats up front and the ZX-2 in the rear did soak up all the bumps there was with no kick back at all. To those who have not ridden a ZX-2 yet, go get it asap before the major public finds out what many of us already know. When the word spreads about this skid, my guess is that it will be hard to get hold of the ZX-2 this season.
I am a happy camper when it comes to the suspension on my sled. it made me wanna
 :D") my RX-1
my RX-1
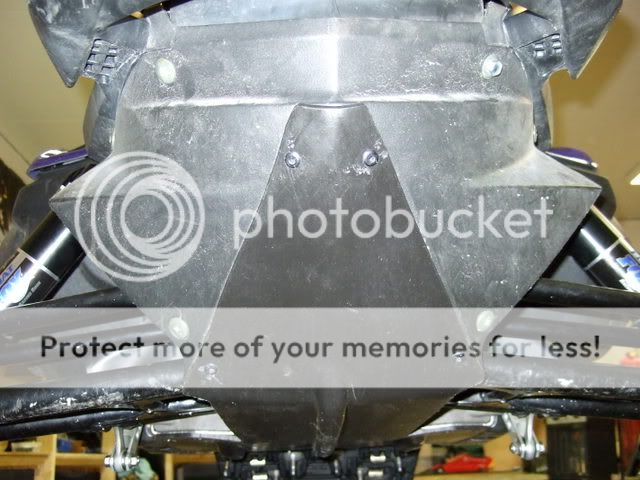
Later in the evening I installed the belly pan protection.
A more extensive test ride will be done any day soon.
I was out today for a 5 mile test ride to check the suspension, bringing the engine to proper operating temps, and to get a overall feel for the sled. The testride went well, no problems encountered.
First task this morning was to drive my car down to the Statoil gas station to fill up 2 Jerry cans of fuel. Approx 40 litres or 10.5 gallons of premium (98 oktane europe) fuel was purchased. Before heading out I filled up the sled with about 35 litres or 9.2 gallons of fresh fuel from the Jerry cans.
I use a Mr. Funnel filler trackt, it removes all small particles from the fuel as well as water. Last thing I did before heading out was to take a visual check under the hood, specially the coolant level in the can. Coolant level was the same as last night.
Start odometer: 10162 kilometers or 6315 miles.
Ready to leave the Turbo Garage.
Outside warming up the engine before take off. Notice the amount of daylight we have at 12:00 am.
We have very little snow down at sealevel. Pics are taken in my backyard a mile from my house. Pics were shot at 12:45 pm. The first one is taken to the south and the other to the north.
Hot engine idle AFR: 12.7
Idle rpms: 1550
Idle vacuum: 6 HPC
Distance ridden today: 8.4 kms or 5.2 miles
This pic show the amount of snow the skid holds after 5 miles, we have very low snow conditions.
Here's what the Turbo Garage workbench looks like.
Overall I am very pleased with my initial testride. No problems encountered, all systems are working. Throttle response is way better than it ever was. I have reduced amount of weight at the pin to remedy a underrev situation I had giving it WOT from a standstill. I did also go up from 17.5 to 22.5 on the pilot jets which woke up the throttle response big time. I found a ploved snowcovered road with a 200 meter or 660 ft straight where tracktion was superb. From a rolling start of 30kmt or 18 mph I gave it WOT to check if the turbo would build boost, it sure did. The transfer of the ZX-2 is unbelievable, the sled took off like a rocket with the skis off the ground. I held it WOT for 100 meters or 330 ft, MAN my sled is flying. I was not able to watch the meters cause I had a handful holding on to the sled, the transfer of the ZX-2 took me off guard and all I could do was to hang on.
I will have to find a suitable lake to check readings from my meters
I'm very pleased with the performance of my suspension. The Fox Floats up front and the ZX-2 in the rear did soak up all the bumps there was with no kick back at all. To those who have not ridden a ZX-2 yet, go get it asap before the major public finds out what many of us already know. When the word spreads about this skid, my guess is that it will be hard to get hold of the ZX-2 this season.
I am a happy camper when it comes to the suspension on my sled.
it made me wanna my RX-1Later in the evening I installed the belly pan protection.
A more extensive test ride will be done any day soon.

kinger
VIP Member
- Joined
- Jan 17, 2005
- Messages
- 7,424
- Reaction score
- 1,557
- Points
- 1,963
- Location
- Clear Lake, IA
- Website
- www.piergenius.com
Awesome!!! Great job on the pictures!! I should be firing mine tonight and test riding myself!
rxrider
Jan-Ove Pedersen
- Joined
- Apr 25, 2003
- Messages
- 7,355
- Reaction score
- 64
- Points
- 1,753
- Location
- Lakselv - 70N & 25E
- Country
- Norway
- Snowmobile
- 2014 Phazer XTX, 2013 Phazer RTX, 2008 Apex RTX, 2007 Warrior, 2006 Attak
Great to hear kinger.
I'll be watching your thread
I'll be watching your thread
rxrider
Jan-Ove Pedersen
- Joined
- Apr 25, 2003
- Messages
- 7,355
- Reaction score
- 64
- Points
- 1,753
- Location
- Lakselv - 70N & 25E
- Country
- Norway
- Snowmobile
- 2014 Phazer XTX, 2013 Phazer RTX, 2008 Apex RTX, 2007 Warrior, 2006 Attak
My checklist is almost done, but I still have some work left:
- Install snow flap - DONE
- Add coolant - DONE
- Do a WBO2 sensor free air calibration - DONE
- Fill up with fresh gas - DONE
- Start the engine - DONE
- Check for engine oil circulation - DONE
- Add more engine oil, adjust to the F mark on the dipstick - DONE
- Adjust track tension - DONE
- Take her out for a TESTRIDE - DONE
- Install belly pan - DONE
- Syncronize the carb rack - DONE
She's ready to ride
sleddheadd
TY 4 Stroke God
awesome thread rxrider!!! great job! glad too hear it is all good! mine will be together this weekend but we have no snow to test it on...... might have to run up to 1crazysledder's place!! lol....

It looks like the ZX-2 puts more track on the ground. What do you think? I'm still waiting for mine. I'll be calling Jeff in the morning. It's snowing again and the trails will be open this weekend.
rxrider
Jan-Ove Pedersen
- Joined
- Apr 25, 2003
- Messages
- 7,355
- Reaction score
- 64
- Points
- 1,753
- Location
- Lakselv - 70N & 25E
- Country
- Norway
- Snowmobile
- 2014 Phazer XTX, 2013 Phazer RTX, 2008 Apex RTX, 2007 Warrior, 2006 Attak
sleddheadd - thanks, great to hear that your sled is almost ready
Jigger - I have not measured so I can't tell, but the hookup is great so that might be true. You lucky ..., we do not have any open trails yet due to very low snow conditions, thin ice on the lakes and rivers. I hope you can get your sled out to ride this weekend
We got some snow last night. Today temps rose to +5 C or 41 F with some rain down here at sealevel - grrrrrrrrrr. I hope it doesn't last too long or the little snow we have will soon be gone. My hope is that the warm weather will not reach into the mountains.
rxrider
Jan-Ove Pedersen
- Joined
- Apr 25, 2003
- Messages
- 7,355
- Reaction score
- 64
- Points
- 1,753
- Location
- Lakselv - 70N & 25E
- Country
- Norway
- Snowmobile
- 2014 Phazer XTX, 2013 Phazer RTX, 2008 Apex RTX, 2007 Warrior, 2006 Attak
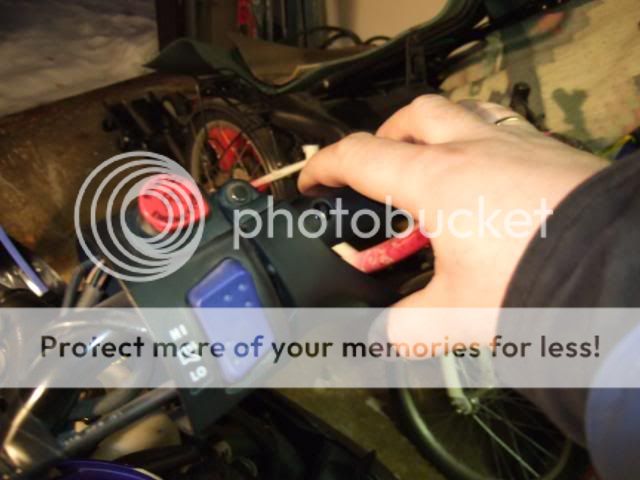
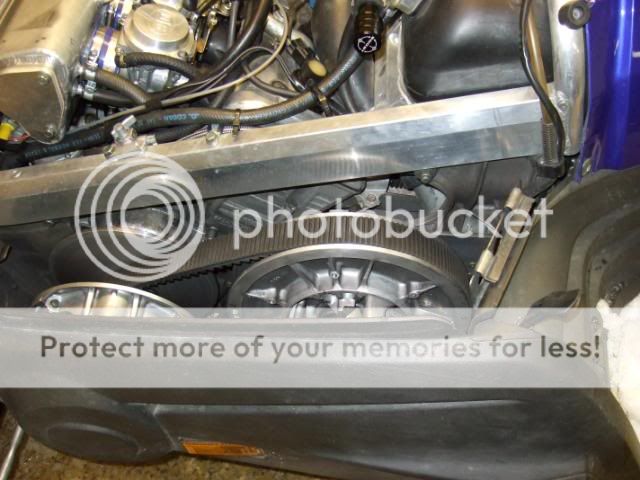
UPDATE - December 13. - Carburetor syncronization.
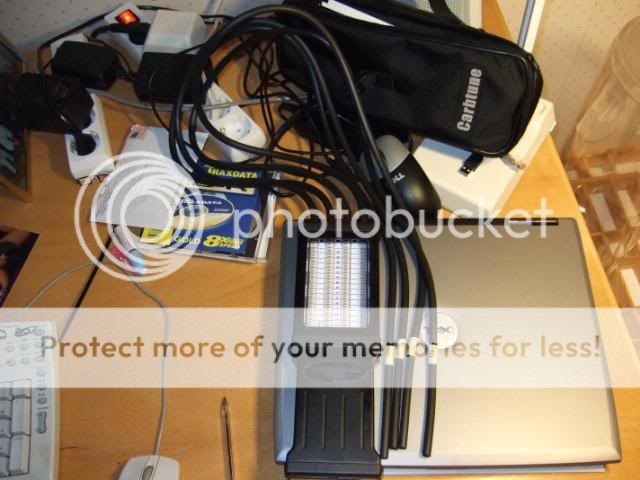
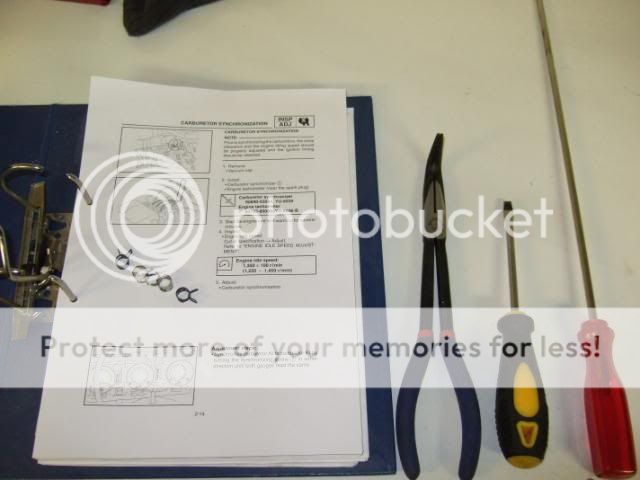
After reading the Morgan Carb Tune Pro user guide I went on reading the carb sync section in the Yamaha 2003 RX-1 Service Manual, section 2-14, 2-15 and 2-16. Tools needed shown below.
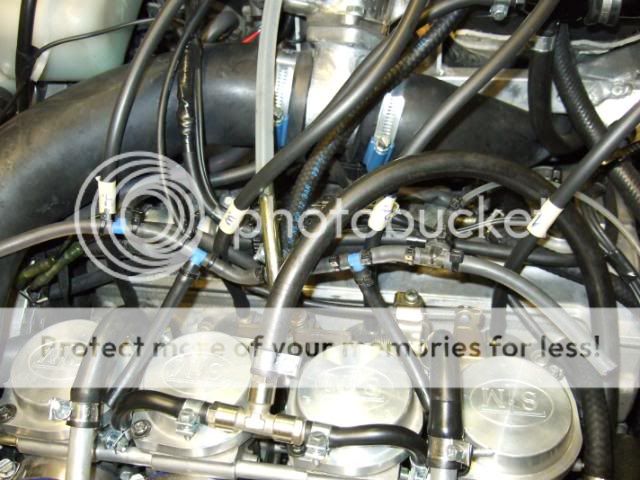
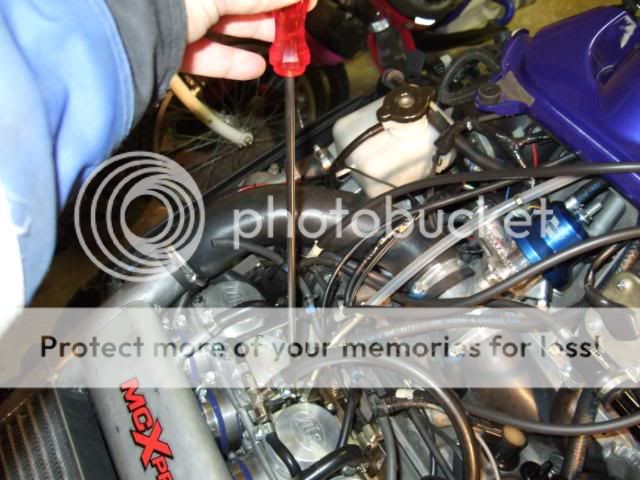
I removed all lines I had going to the carb boots, making it ready to hook up the MCTP sync tool.
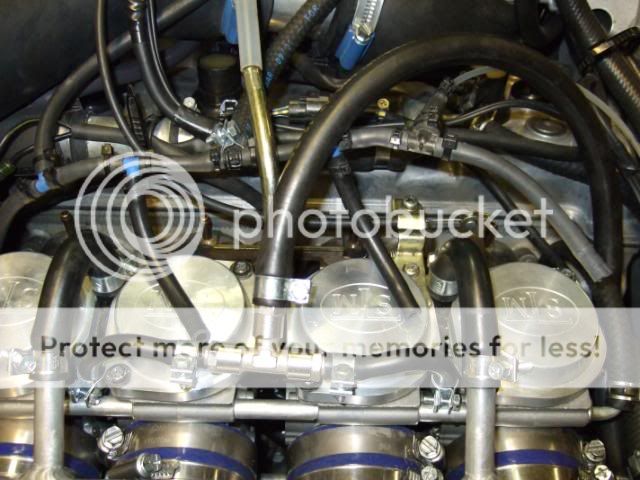
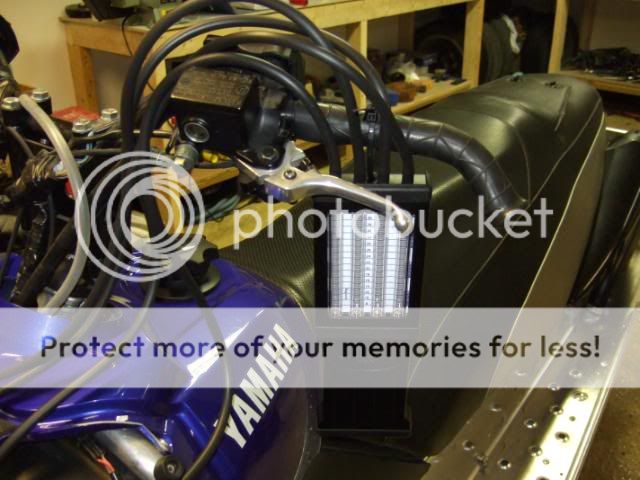
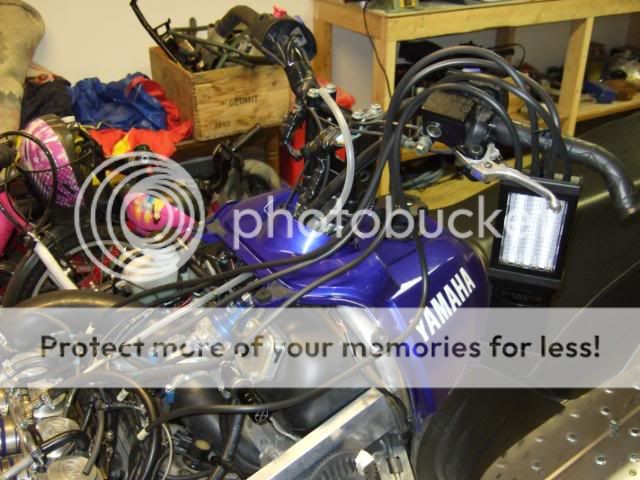
The MCTP shall be used in a vertical positon. I hung it to the handle bars with the enclosed tie strip, it's a reusable type.
Then I hooked up the MCTP vacuum lines to the carb boot nipples, I have numbered the lines to avoid mixing them up.
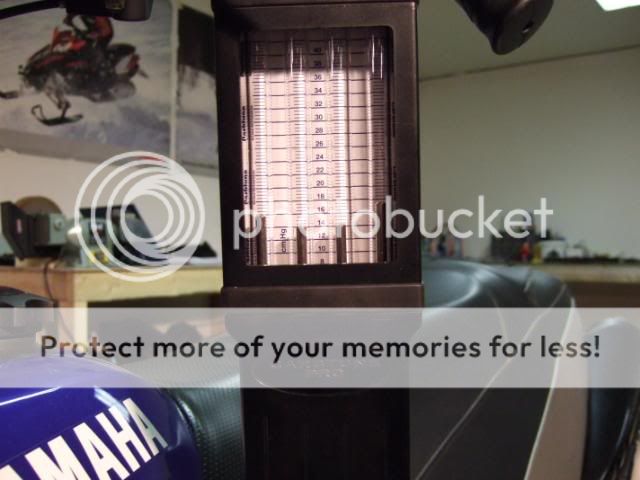
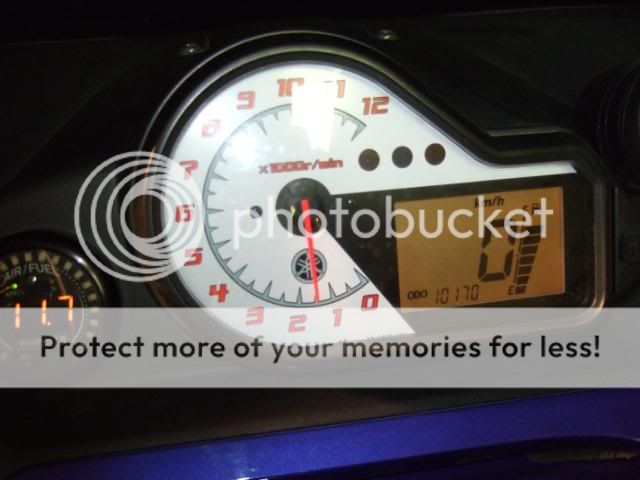
Before your start adjusting the carbs make sure that the idle speed is within spec 1350 +/- 100. I adjusted at 1450 rpms, and did the initial reading. MAN was it way off duh...
 I should have bought the MCTP years ago.
There are 3 philips screws for syncing the carbs to each other. The sync adjustment screws are found down in between the carbs. The #2 carb is fixed from the factory, all other carbs are synced out from that one. So you first sync the #3 carb to the #2 carb by adjusting the sync screw in between those carbs, then you move on to sync carb #1 to #2, finally you sync the #4 carb to #3 carb.
OBS! The drawings in the Service Manual are not very clear when it comes to describe where to look.
You always start the carb sync process by adjusting the carburetor syncronization screw positioned deep in between the #2 and #3 carb, a long philips screwdriver comes in handy. Here we go.

Got the center set.
Every time you adjust the carb sync screws blip the throttle a few times, let idle settle down before making a new reading.
Adjust idle rpms if it moves out of spec.
To prevent overheating I shoveled snow onto the running boards on both sides.

Then I went on to adjust the carb sync screw between carb #1 and #2. Got it set right away.

Last I adjusted the carb sync screw between carb #3 and #4. This one caused me some work to get set correctly.


I finally nailed it. All carbs within 0.5 cmHg, well within spec.

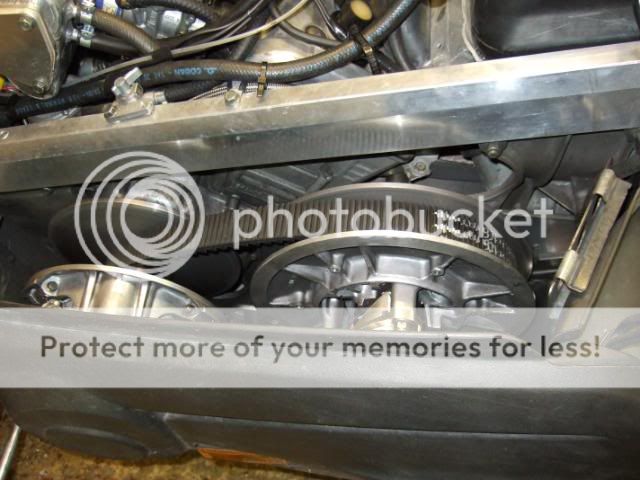
When running the engine for almost an hour (it's my first ever syncronization of any carb what-so-ever) my belt started to squeal. I stopped the engine and took off the clutch cover, opened up the secondary, and pushed the belt down into the secondary to make more slack in the primary to stop the squeling.
WARNING - remember to reinstall the clutch cover before proceeding the carb sync process.
With the sync job done I moved the belt back up in the secondary by rotating the belt backward, it makes the secondary backshift and the belt returns to the top of the secondary. I recommend doing this to prevent starting off in a high gear destroying your belt.
Reinstalled the clutch cover.
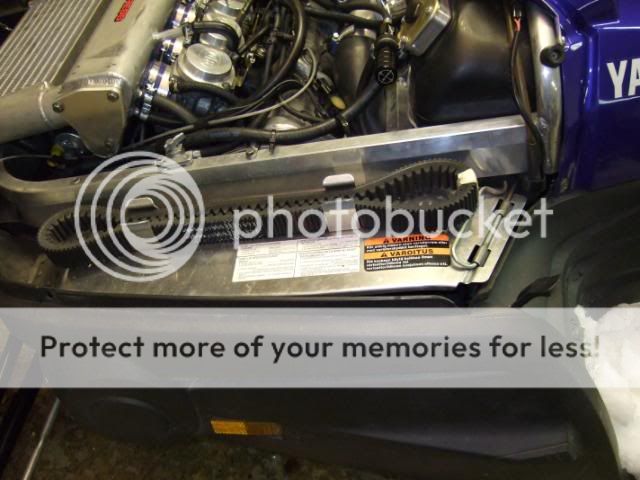
Finally I hooked up the piping to the carb boot nipples, they feed vacuum and boost to my boost controller, boost meter and Vortech bypass valve.
She's done and ready to ride. We desperately need more snow.
LET IT SNOW.

After reading the Morgan Carb Tune Pro user guide I went on reading the carb sync section in the Yamaha 2003 RX-1 Service Manual, section 2-14, 2-15 and 2-16. Tools needed shown below.
I removed all lines I had going to the carb boots, making it ready to hook up the MCTP sync tool.
The MCTP shall be used in a vertical positon. I hung it to the handle bars with the enclosed tie strip, it's a reusable type.
Then I hooked up the MCTP vacuum lines to the carb boot nipples, I have numbered the lines to avoid mixing them up.
Before your start adjusting the carbs make sure that the idle speed is within spec 1350 +/- 100. I adjusted at 1450 rpms, and did the initial reading. MAN was it way off duh...
I should have bought the MCTP years ago.
There are 3 philips screws for syncing the carbs to each other. The sync adjustment screws are found down in between the carbs. The #2 carb is fixed from the factory, all other carbs are synced out from that one. So you first sync the #3 carb to the #2 carb by adjusting the sync screw in between those carbs, then you move on to sync carb #1 to #2, finally you sync the #4 carb to #3 carb.
OBS! The drawings in the Service Manual are not very clear when it comes to describe where to look.
You always start the carb sync process by adjusting the carburetor syncronization screw positioned deep in between the #2 and #3 carb, a long philips screwdriver comes in handy. Here we go.
Got the center set.
Every time you adjust the carb sync screws blip the throttle a few times, let idle settle down before making a new reading.
Adjust idle rpms if it moves out of spec.
To prevent overheating I shoveled snow onto the running boards on both sides.
Then I went on to adjust the carb sync screw between carb #1 and #2. Got it set right away.
Last I adjusted the carb sync screw between carb #3 and #4. This one caused me some work to get set correctly.
I finally nailed it. All carbs within 0.5 cmHg, well within spec.
When running the engine for almost an hour (it's my first ever syncronization of any carb what-so-ever) my belt started to squeal. I stopped the engine and took off the clutch cover, opened up the secondary, and pushed the belt down into the secondary to make more slack in the primary to stop the squeling.
WARNING - remember to reinstall the clutch cover before proceeding the carb sync process.
With the sync job done I moved the belt back up in the secondary by rotating the belt backward, it makes the secondary backshift and the belt returns to the top of the secondary. I recommend doing this to prevent starting off in a high gear destroying your belt.
Reinstalled the clutch cover.
Finally I hooked up the piping to the carb boot nipples, they feed vacuum and boost to my boost controller, boost meter and Vortech bypass valve.
She's done and ready to ride. We desperately need more snow.
LET IT SNOW.
rxrider
Jan-Ove Pedersen
- Joined
- Apr 25, 2003
- Messages
- 7,355
- Reaction score
- 64
- Points
- 1,753
- Location
- Lakselv - 70N & 25E
- Country
- Norway
- Snowmobile
- 2014 Phazer XTX, 2013 Phazer RTX, 2008 Apex RTX, 2007 Warrior, 2006 Attak
Jigger said:It looks like the ZX-2 puts more track on the ground. What do you think? I'm still waiting for mine. I'll be calling Jeff in the morning. It's snowing again and the trails will be open this weekend.
I measured the track on the ground on the ZX-2 and compared it to my MPI extended ProAction skid, this is what I found.
Track on the ground:
ZX-2 136" - 95 cm or 37.4"
PA 136" - 100 cm or 39.4"
Due to the 20 cm or 8" rear idler wheels and long travel we loose a little track on the ground. My first impression is that the ZX-2 keeps the skid more in contact with the ground making the track hook way better than on the ProAction. Any one have any inputs here, I have only 8.4 kms or 5 miles on my ZX-2 so far.
jsjk-4-stroke
Pro
great wright up thank you for all the info. one question - on the carb sync you say center screw - sync screw between 1&2 and sync screw between 3&4. is there 3 screws that have to be adjusted?
i an going to be doing mine this weekend
thank you
i an going to be doing mine this weekend
thank you
Similar threads
- Replies
- 3
- Views
- 2K
- Replies
- 3
- Views
- 2K
- Replies
- 46
- Views
- 155K
-
This site uses cookies to help personalise content, tailor your experience and to keep you logged in if you register.
By continuing to use this site, you are consenting to our use of cookies.