Snowbound98
Expert
- Joined
- Mar 11, 2019
- Messages
- 317
- Reaction score
- 185
- Points
- 388
- Location
- Chicagoland
- Country
- USA
- Snowmobile
- 2015 SR Viper M-TX 153
Not being able to be touched up if scratched or chipped is the only reason why I decided to paint the parts rather than powder coat. The POR15 has held up great on my MTX.I would send them out and get them powder coated. They will strip them down and refinish whatever color you want. Much more durable than paint
But….I did contact the powder coating place because they are always backed up, figured I’d give it a shot. They said they can get these parts done and back to me within a week. Yeah, I’m done sanding and blasting. These things are going in.
My MTX Viper still looks good and that’s POR15.
REDLINE 1
Expert
- Joined
- Sep 20, 2019
- Messages
- 387
- Reaction score
- 308
- Points
- 638
- Location
- ROUND LAKE IL
- Country
- USA
- Snowmobile
- 2018 TCAT
I’ve found the factory powder coating to be thinner and you do get chips but I just touch them up with paint. I had some rails powder coated by an aftermarket company and the coating seemed much thicker and more durable.
Snowbound98
Expert
- Joined
- Mar 11, 2019
- Messages
- 317
- Reaction score
- 185
- Points
- 388
- Location
- Chicagoland
- Country
- USA
- Snowmobile
- 2015 SR Viper M-TX 153
Sled parts are at powder coating shop. I have too much going on to be blasting and painting.
Made it up north to finish the driveway. The gravel has been delivered since the last week of august and wasn’t spread too even so I had to drag the bobcat back up again. Should have gotten pics before I started but all that matters is it’s finally done and will have enough time to dry out. A roller would have been great to have because of all the moisture that was in it. Did the best I could for only having one day to get it done.


Made it up north to finish the driveway. The gravel has been delivered since the last week of august and wasn’t spread too even so I had to drag the bobcat back up again. Should have gotten pics before I started but all that matters is it’s finally done and will have enough time to dry out. A roller would have been great to have because of all the moisture that was in it. Did the best I could for only having one day to get it done.
Snowbound98
Expert
- Joined
- Mar 11, 2019
- Messages
- 317
- Reaction score
- 185
- Points
- 388
- Location
- Chicagoland
- Country
- USA
- Snowmobile
- 2015 SR Viper M-TX 153
Sunday before I left I did a few hours of final grading and it was showing that it was drying out some. This is how I left it.


Got both 2 place, enclosed and small utility trailer in their parking spots and off the grass.

Next year I’ll put some landscaping and bushes along trailer parking to help hide them and make it more cosmetically appealing.
Loaded up and headed home Sunday.

Got both 2 place, enclosed and small utility trailer in their parking spots and off the grass.
Next year I’ll put some landscaping and bushes along trailer parking to help hide them and make it more cosmetically appealing.
Loaded up and headed home Sunday.
Snowbound98
Expert
- Joined
- Mar 11, 2019
- Messages
- 317
- Reaction score
- 185
- Points
- 388
- Location
- Chicagoland
- Country
- USA
- Snowmobile
- 2015 SR Viper M-TX 153
Saturday night I did mess with sled a little. I couldn’t not try to get something done on sled.
Installed the AFR wideband and module. The module had long wiring harness so I mounted that by the coolant fill cap and ran the wires over to the exhaust side and made the connections.


Thanks to this website I found a small boost leak. Pulled the hose off the blow off and seen it was never cut and was not tight at all.

That got fixed. Also installed heated shield plug on the tank cover but didn’t take a pic.
Brought the seat, hood and side panels home with me to get a jump on the wrap and drop the seat with new cover off to get put on. Have to get rid of that hi-vis strip on seat because it doesn’t go with wrap and I’m eliminating all that yellow.
Installed the AFR wideband and module. The module had long wiring harness so I mounted that by the coolant fill cap and ran the wires over to the exhaust side and made the connections.
Thanks to this website I found a small boost leak. Pulled the hose off the blow off and seen it was never cut and was not tight at all.
That got fixed. Also installed heated shield plug on the tank cover but didn’t take a pic.
Brought the seat, hood and side panels home with me to get a jump on the wrap and drop the seat with new cover off to get put on. Have to get rid of that hi-vis strip on seat because it doesn’t go with wrap and I’m eliminating all that yellow.
Snowbound98
Expert
- Joined
- Mar 11, 2019
- Messages
- 317
- Reaction score
- 185
- Points
- 388
- Location
- Chicagoland
- Country
- USA
- Snowmobile
- 2015 SR Viper M-TX 153
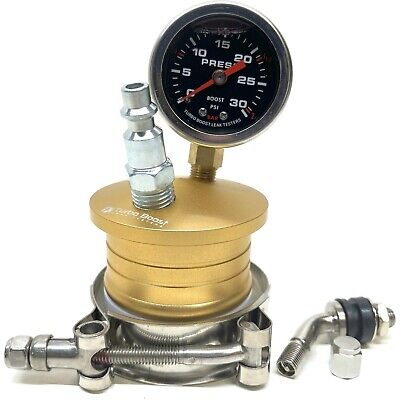
Before I went up I put together a leak tester. Made it from 2” PVC and it wouldn’t fit in my charge pipe. I did get it to fit in my air intake elbow but I didn’t want to charge it too much because I was afraid I’d blow that plastic intake apart.

Forgot to get measurement on charge piping. What is it? 1-3/4? The 2” X 1/2” PVC bushing I used measures 2-3/8”. Seems like a 1-1/2” would be too small. Do I need to use a 1-1/2” PVC pipe with an adapter on that? Guess I’ll make up a few different sizes and bring ‘em with me next time.
I did charge to 12psi and found that leak at blowoff and also a small leak at charge pipe to air box. I changed that clamp to a better one but I think I may buy all new quality clamps. Who uses what and from where?
I removed my risers and brought them home. I want to drill out the bottom clamping bolts and install heli-coils because I don’t trust the bolt threaded into the aluminum. They rotated down on me a few times on the last rides and I’m afraid to pull the threads if I tighten any more. I think thread inserts will help that.

Got my new DuPonts from Port Yamaha. Still have 2 other sets on order but I’m gonna keep them coming just for spares because I don’t wanna get caught in that predicament again where they are on a national back order.
Forgot to get measurement on charge piping. What is it? 1-3/4? The 2” X 1/2” PVC bushing I used measures 2-3/8”. Seems like a 1-1/2” would be too small. Do I need to use a 1-1/2” PVC pipe with an adapter on that? Guess I’ll make up a few different sizes and bring ‘em with me next time.
I did charge to 12psi and found that leak at blowoff and also a small leak at charge pipe to air box. I changed that clamp to a better one but I think I may buy all new quality clamps. Who uses what and from where?
I removed my risers and brought them home. I want to drill out the bottom clamping bolts and install heli-coils because I don’t trust the bolt threaded into the aluminum. They rotated down on me a few times on the last rides and I’m afraid to pull the threads if I tighten any more. I think thread inserts will help that.
Got my new DuPonts from Port Yamaha. Still have 2 other sets on order but I’m gonna keep them coming just for spares because I don’t wanna get caught in that predicament again where they are on a national back order.


Turboflash
Lifetime Member
- Joined
- Mar 18, 2019
- Messages
- 2,920
- Reaction score
- 2,932
- Points
- 1,113
- Location
- Southern MN
- Country
- USA
- Snowmobile
- '17 ZR9000 Ltd. 137 - PEFI Stage 4
I
Anyway, get one that connects to intercooler tube right at outlet if turbo.
I'm sure you know this but there is never any boost pressure in the tube leading from airbox to turbo. Personally, I would not apply pressure there. The center seal in the turbo is made to seal boost outlet side from exhaust side and inlet side. Not sure if it could get compromised by having pressure applied to it from other side?Before I went up I put together a leak tester. Made it from 2” PVC and it wouldn’t fit in my charge pipe. I did get it to fit in my air intake elbow but I didn’t want to charge it too much because I was afraid I’d blow that plastic intake apart.
View attachment 173564
Forgot to get measurement on charge piping. What is it? 1-3/4? The 2” X 1/2” PVC bushing I used measures 2-3/8”. Seems like a 1-1/2” would be too small. Do I need to use a 1-1/2” PVC pipe with an adapter on that? Guess I’ll make up a few different sizes and bring ‘em with me next time.
I did charge to 12psi and found that leak at blowoff and also a small leak at charge pipe to air box. I changed that clamp to a better one but I think I may buy all new quality clamps. Who uses what and from where?
I removed my risers and brought them home. I want to drill out the bottom clamping bolts and install heli-coils because I don’t trust the bolt threaded into the aluminum. They rotated down on me a few times on the last rides and I’m afraid to pull the threads if I tighten any more. I think thread inserts will help that.
View attachment 173565
Got my new DuPonts from Port Yamaha. Still have 2 other sets on order but I’m gonna keep them coming just for spares because I don’t wanna get caught in that predicament again where they are on a national back order.
Anyway, get one that connects to intercooler tube right at outlet if turbo.
Turbo Boost Leak Tester 2" O.D. END CAP KIT - Test to 30 PSI - PREMIUM fix P0299 | eBay
PULL HARDER, IMPROVE MPG & KEEP YOUR MOTOR HEALTHY -- BY ELIMINATING BOOST LEAKS! This is an important tool every turbo car owner needs in their arsenal of tools. It will keep the turbo healthy by eliminating leaks in the boost path and not allowing it to over speed compensating for a boost leak.
www.ebay.com
Snowbound98
Expert
- Joined
- Mar 11, 2019
- Messages
- 317
- Reaction score
- 185
- Points
- 388
- Location
- Chicagoland
- Country
- USA
- Snowmobile
- 2015 SR Viper M-TX 153
Yep, I know all that. Just wanted to do a test to see if I was gonna have to pull throttle bodies next trip up. I have so much to get done I’ll probably end up throwing the skid in and front end on and dragging it back home.I
I'm sure you know this but there is never any boost pressure in the tube leading from airbox to turbo. Personally, I would not apply pressure there. The center seal in the turbo is made to seal boost outlet side from exhaust side and inlet side. Not sure if it could get compromised by having pressure applied to it from other side?
Anyway, get one that connects to intercooler tube right at outlet if turbo.
Turbo Boost Leak Tester 2" O.D. END CAP KIT - Test to 30 PSI - PREMIUM fix P0299 | eBay
PULL HARDER, IMPROVE MPG & KEEP YOUR MOTOR HEALTHY -- BY ELIMINATING BOOST LEAKS! This is an important tool every turbo car owner needs in their arsenal of tools. It will keep the turbo healthy by eliminating leaks in the boost path and not allowing it to over speed compensating for a boost leak.www.ebay.com
Snowbound98
Expert
- Joined
- Mar 11, 2019
- Messages
- 317
- Reaction score
- 185
- Points
- 388
- Location
- Chicagoland
- Country
- USA
- Snowmobile
- 2015 SR Viper M-TX 153
After seeing my buddy Nick’s Pilot X skis were worn on the outsides where he couldn’t put the outside carbides on, I’m glad I ordered a new set of skis because mine were the same way. I’ll run them this season but I think next summer I’ll go a different route with the skis.


Compared to the new ski there wasn’t much left on the outside. Inside wasn’t as bad but had wear. I hope running an outside carbide helps the issue as well as bite harder in the turns.

The guys all made fun of me when we would get into a bare parking lot or gas station because I would stop and flip down my ski mounted wheels but I didn’t care because I could steer and not wear my carbides out.
Couple weeks ago I get this picture sent to me from Nick, says he’s ready to go. Lol.

Compared to the new ski there wasn’t much left on the outside. Inside wasn’t as bad but had wear. I hope running an outside carbide helps the issue as well as bite harder in the turns.
The guys all made fun of me when we would get into a bare parking lot or gas station because I would stop and flip down my ski mounted wheels but I didn’t care because I could steer and not wear my carbides out.
Couple weeks ago I get this picture sent to me from Nick, says he’s ready to go. Lol.
Snowbound98
Expert
- Joined
- Mar 11, 2019
- Messages
- 317
- Reaction score
- 185
- Points
- 388
- Location
- Chicagoland
- Country
- USA
- Snowmobile
- 2015 SR Viper M-TX 153
Swapped my wheels over from old skis to new. Had to first knock out inside bushing for mounting to fit in ski mounting hole.


Snowbound98
Expert
- Joined
- Mar 11, 2019
- Messages
- 317
- Reaction score
- 185
- Points
- 388
- Location
- Chicagoland
- Country
- USA
- Snowmobile
- 2015 SR Viper M-TX 153
Couple things I didn’t like, the bottom of the roller mounts didn’t sit flush with ski which would allow the roller bracket to rock. The second thing was a long self taper that may have been there to prevent the rocking motion of the bracket but I decided to add a 1/4” stainless bolt and locknut to give it more of a rigid mount.
I added a piece of 1/8” adhesive backed neoprene to the ski to take up the gap between ski and bottom of bracket. 4-3/8” long by 1” wide is all it took.

That combined with the 1/4” bolt, there’s no rocking motion now.

Next I’ll add my stainless steel cable scratchers to the skis after I make a mounting bracket that I can tack weld the cable scratcher to. I lost one last season even with a liberal amount of red loc-tite on threads. And one is left hand thread so it should have been trying to tighten with resistance of snow pushing up on it. Figured welding it to a stainless plate will keep it from rotating in bolt hole and give me a better way to secure it using 2 mounting bolts.
I added a piece of 1/8” adhesive backed neoprene to the ski to take up the gap between ski and bottom of bracket. 4-3/8” long by 1” wide is all it took.
That combined with the 1/4” bolt, there’s no rocking motion now.
Next I’ll add my stainless steel cable scratchers to the skis after I make a mounting bracket that I can tack weld the cable scratcher to. I lost one last season even with a liberal amount of red loc-tite on threads. And one is left hand thread so it should have been trying to tighten with resistance of snow pushing up on it. Figured welding it to a stainless plate will keep it from rotating in bolt hole and give me a better way to secure it using 2 mounting bolts.
Last edited:
Snowbound98
Expert
- Joined
- Mar 11, 2019
- Messages
- 317
- Reaction score
- 185
- Points
- 388
- Location
- Chicagoland
- Country
- USA
- Snowmobile
- 2015 SR Viper M-TX 153
Parts are back from powder coating.


And an upper arm compared to the parts that I blasted and painted with POR15 myself. Little contrast but I’m ok with that because the wrap has both of these colors in it.

And an upper arm compared to the parts that I blasted and painted with POR15 myself. Little contrast but I’m ok with that because the wrap has both of these colors in it.
Snowbound98
Expert
- Joined
- Mar 11, 2019
- Messages
- 317
- Reaction score
- 185
- Points
- 388
- Location
- Chicagoland
- Country
- USA
- Snowmobile
- 2015 SR Viper M-TX 153
I have decals pulled off side panels besides one registration sticker.

And the new wrap showed up so I’ll start on that 2mrw.

I also had one rim repaired and recoated because it had a hairline crack in it. The wife will be happy to get her wheels back on her Escalade and I’ll be happy to get my wheels off hers and put them back on my Escalade so I can drive it again.

And the new wrap showed up so I’ll start on that 2mrw.
I also had one rim repaired and recoated because it had a hairline crack in it. The wife will be happy to get her wheels back on her Escalade and I’ll be happy to get my wheels off hers and put them back on my Escalade so I can drive it again.
Snowbound98
Expert
- Joined
- Mar 11, 2019
- Messages
- 317
- Reaction score
- 185
- Points
- 388
- Location
- Chicagoland
- Country
- USA
- Snowmobile
- 2015 SR Viper M-TX 153
Skid came together and looks good.

The idler wheels were a pain to get back on. Coming off they were just hammered off using a blunt chisel and hammer. After I painted the arm with POR, the bearings didn’t want to tap on as easily. I tried using a threaded rod to squeeze the bearings on the shafts but that didn’t work.

Ended up having to use the press to push them on all the way.


The idler wheels were a pain to get back on. Coming off they were just hammered off using a blunt chisel and hammer. After I painted the arm with POR, the bearings didn’t want to tap on as easily. I tried using a threaded rod to squeeze the bearings on the shafts but that didn’t work.
Ended up having to use the press to push them on all the way.
Snowbound98
Expert
- Joined
- Mar 11, 2019
- Messages
- 317
- Reaction score
- 185
- Points
- 388
- Location
- Chicagoland
- Country
- USA
- Snowmobile
- 2015 SR Viper M-TX 153
Made another run up north to get things done but I mostly worked on the Viper putting the caliper back on and bleeding that thing out.

Got up there Friday night about 11:30pm and. And home Sunday about 2pm so really only had Saturday to get anything done.

I did get the front arms back on. I took the spindles and skis back off because it was easier to walk around that way.

It’s always a sad day when I have to leave the north woods to go back home to work. But I’m making progress and I should be ready.

Got up there Friday night about 11:30pm and. And home Sunday about 2pm so really only had Saturday to get anything done.
I did get the front arms back on. I took the spindles and skis back off because it was easier to walk around that way.
It’s always a sad day when I have to leave the north woods to go back home to work. But I’m making progress and I should be ready.
Similar threads
- Replies
- 15
- Views
- 3K
- Replies
- 39
- Views
- 18K
- Replies
- 155
- Views
- 25K
-
This site uses cookies to help personalise content, tailor your experience and to keep you logged in if you register.
By continuing to use this site, you are consenting to our use of cookies.