sleddingfarmer
TY 4 Stroke God
Well, I'm catching glimpses of different lights. I'm trying to hold onto this hobby but it's getting tough with the bad seasons. This season is looking good in the UP. If I only ride in the UP this year AGAIN...i might dump everything and buy a newer mountain sled. So we'll see.Sleddingfarmer, you've seen the light?
Sent from my XT1254 using Tapatalk

Doc Harley
TY 4 Stroke God
- Joined
- Oct 17, 2016
- Messages
- 3,868
- Reaction score
- 1,906
- Points
- 1,503
- Location
- Here & there
- Country
- USA
- Snowmobile
- '17 Sidewinder LTX SE
IDK, farmer.
Stay strong.....
Stay strong.....
LouTurbo
Expert
- Joined
- Dec 19, 2016
- Messages
- 208
- Reaction score
- 69
- Points
- 633
- Location
- Vaughan, ON Canada
- Country
- Canada
- Snowmobile
- 2017 Sidewinder LTX LE, Hurricane Tune on the fly
Pilot Skiis,
- LOCATION
- Woodbridge, ON
..lots of heat comes off that engine/header out that vent!
Definitely a good sandwich/drink warmer.

ROCKERDAN
OCD Sledhead
- Joined
- Oct 8, 2005
- Messages
- 7,496
- Reaction score
- 3,612
- Points
- 2,003
- Location
- Huntsville Ontario & Niagara NY
- Country
- Other
- Snowmobile
- '18 RTX 50th "Winder"
Brake Rotor Protector - Drill hole for drain
Did this same thing on the cat in 2012. It does not look like they changed the design much, so this bottom protector gets snow in it, and it melts and/or freezes.....Holds quite abit of water. So I drilled a 3/16 hole in bottom most section, where it will drain best.
Mine was full right up with water, which was ice before I heated up the shop.
Dan
Last edited:
ROCKERDAN
OCD Sledhead
- Joined
- Oct 8, 2005
- Messages
- 7,496
- Reaction score
- 3,612
- Points
- 2,003
- Location
- Huntsville Ontario & Niagara NY
- Country
- Other
- Snowmobile
- '18 RTX 50th "Winder"
Clutch Offset Part 1
Mine stock has one shim behind secondary. Offset measured approx 62.5mm. Lots of belt dust with stock 8jp.
I wanted to eye mine up for peace of mind. And with these sleds you must remove the belt guard, so its abit of work but was worth it for me to make sure how the belt runs.
It was a tad out by eye, at this spec.....Video below.
**Lowered the offset to 59mm, aiming for better belt life**
Last edited:

DennyTuna
RIP-Logan-Dylan-Never forgotten!
- Joined
- Jan 28, 2017
- Messages
- 779
- Reaction score
- 681
- Points
- 1,128
- Location
- Ohio
- Country
- USA
- Snowmobile
- 25 Winder LTX LE w/EPS
18 Winder LTX LE W/EPS
97 SX Vmax 600
Good tip! At least this one won't cost me money...lol. Got the GPS installed Dan (2797) and the LinQ bag as well. I'm going to love both of these additions. Thanks for sharing your sled build with us. So far I have done a lot of your mods. Curve skis with bergstrom triple points, JT big wheel kit, TD clutch kit, excell charge tubes, battery tender plus, BOP belt protector, BOP belt adjuster, SS Turbo bolts with never seize, Garmin GPS, LinQ tunnel bag W/whiteout tech brackets and I'm sure there's more just can't remember it all.
ROCKERDAN
OCD Sledhead
- Joined
- Oct 8, 2005
- Messages
- 7,496
- Reaction score
- 3,612
- Points
- 2,003
- Location
- Huntsville Ontario & Niagara NY
- Country
- Other
- Snowmobile
- '18 RTX 50th "Winder"
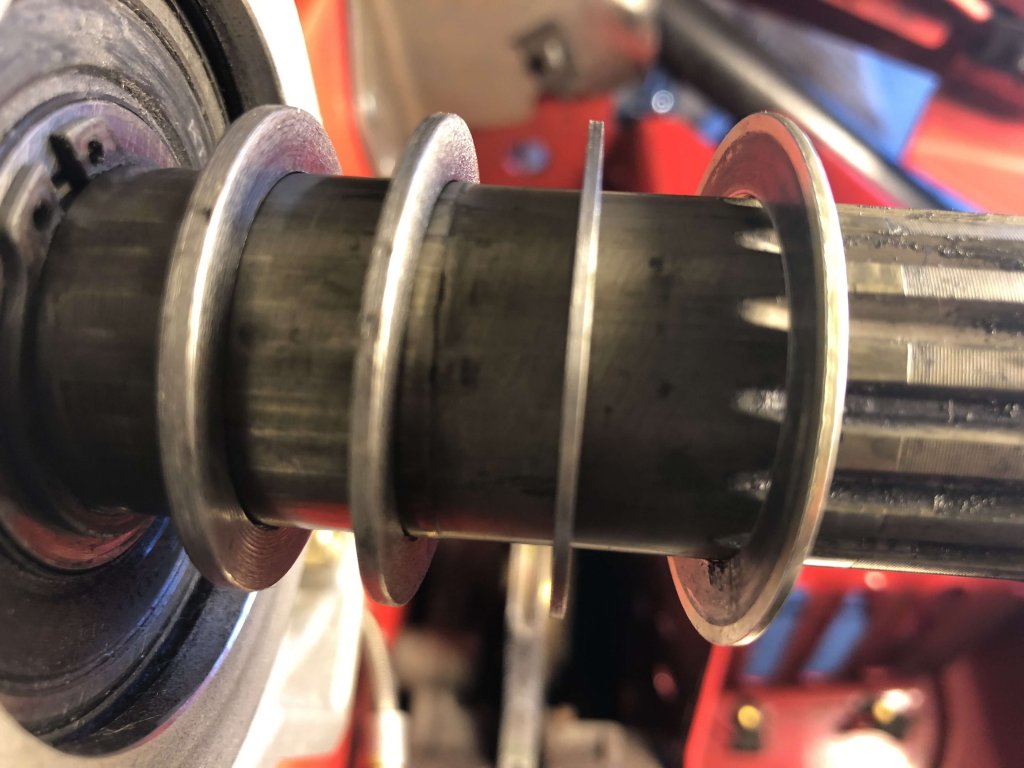
Clutch Offset part 2 - 59mm
Got my secondary back from my machinist.....
Had him take off 4mm off rear of hub, which makes it just a tad past flush when full shifted. And then I had him make me 3 shims, that are a slightly smaller OD then stock YAM shims, So they don't rub. This way I can shim it wherever I want, and it will allow the shim to go inside if need be.
I had him make me a 2mm, 1.5mm, 1mm, shown in pic below....and then the stock 1mm which is larger OD.
I am now able to put my clutch anywhere from 58mm on up to 61. Where mine sits, I use the 1.5mm and end up right around 58.8mm or just under 59mm. Which I think is where I will put it now.
Dan
Remove spring, open fully

Stock, approx 3.8mm sticking out when max open without spring.

Take apart and take for machining


After machining off 4mm, just a tad past flush when opened fully.


Custom made(smaller OD) 2mm, 1.5mm, 1mm and the larger OD stock 1mm

Got my secondary back from my machinist.....
Had him take off 4mm off rear of hub, which makes it just a tad past flush when full shifted. And then I had him make me 3 shims, that are a slightly smaller OD then stock YAM shims, So they don't rub. This way I can shim it wherever I want, and it will allow the shim to go inside if need be.
I had him make me a 2mm, 1.5mm, 1mm, shown in pic below....and then the stock 1mm which is larger OD.
I am now able to put my clutch anywhere from 58mm on up to 61. Where mine sits, I use the 1.5mm and end up right around 58.8mm or just under 59mm. Which I think is where I will put it now.
Dan
Remove spring, open fully
Stock, approx 3.8mm sticking out when max open without spring.
Take apart and take for machining
After machining off 4mm, just a tad past flush when opened fully.
Custom made(smaller OD) 2mm, 1.5mm, 1mm and the larger OD stock 1mm
Last edited:
ROCKERDAN
OCD Sledhead
- Joined
- Oct 8, 2005
- Messages
- 7,496
- Reaction score
- 3,612
- Points
- 2,003
- Location
- Huntsville Ontario & Niagara NY
- Country
- Other
- Snowmobile
- '18 RTX 50th "Winder"
Clutching: Secondary spring, Rollers, Helix (See Updates)
Wanted to start with one clutching aspect. I am going to do one thing at a time with this sled. Power wise, remaining stock for now.
I have felt the biggest bang will be with replacing the stock secondary spring. And I think this likely could be single biggest thing that is lacking on the winder. Now that we have a couple choices, this yr will be alot better then last season. The stock secondary spring is so whimpy next to the stout TP orange. UPDATE: Must be careful to set the TP Orange to a lesser degree setting, as its a stout spring. I recommend contacting Terry at ThunderProducts for latest info.
Im starting with the orange TP secondary spring, set to 3-3. And the Dalton helix(33/35 REVERSE ANGLE). And OSP rollers, which im really glad I decided to do even if the new 18 rollers are better, they are still far narrower. Look at the comparison pics from stock rollers to OSP Torlons. See Below in red, updates I have made.
Will post more about results, but only had a quick rip on her so far and it feels like the instant snap is increased tenfold. I will elaborate on this alot more as this is what I am hoping to get from this sled, be it clutching or tune that gets it there. The reverse angle helix works well for STOCK ENGINES, and very LOW tuned engines(225 or less IMO). As soon as I went to a tune of 240 and higher, The reverse angle is not good IMO, See updates below.
*UPDATE(Jan 25th): I have gone to a 39/35 helix as the reverse is too low for the big tunes, and therefore hard on belts. I recommend a 41/35 to a 37/35 for the early spool tunes. I also updated to BOP deflection adjuster and Hi-Torque rollers. I also like the Dalton B/O sec spring much more with a tune. The 39/35 worked really well overall on 240 and 270 maps. See updates below.
**UPDATE(Oct/2018): I will be testing a 37/35 for season 2019. Please see this newer post for info on latest helix and new B/O updated Dalton spring-LINK:https://ty4stroke.com/threads/my-rtx-le-50th-build-thread-rockerdan.149801/page-30#post-1442912
Dan
Last edited:
Hammer70
GRIPNRIP
- Joined
- Sep 6, 2015
- Messages
- 824
- Reaction score
- 651
- Points
- 1,228
- Location
- Niagara, Ontario.
- Country
- Canada
- Snowmobile
- 82SS440/96VMAX/02SRX/08APE/15SRVIPER/17SIDEWINDER
Dan when you installed belt guard did you put rivets back inClutch Offset Part 1
Mine stock has one shim behind secondary. Offset measured approx 62.5mm. Lots of belt dust with stock 8jp.
I wanted to eye mine up for peace of mind. And with these sleds you must remove the belt guard, so its abit of work but was worth it for me to make sure how the belt runs.
It was a tad out by eye, at this spec.....Video below.
Thanks Pan
ROCKERDAN
OCD Sledhead
- Joined
- Oct 8, 2005
- Messages
- 7,496
- Reaction score
- 3,612
- Points
- 2,003
- Location
- Huntsville Ontario & Niagara NY
- Country
- Other
- Snowmobile
- '18 RTX 50th "Winder"
The guard is quite rigid in there with that one rear screw and the nut and then the two up front. What I did was put some 3m exterior glazing tape between the frame and guard, it covers holes and also stop any wear on powdercoat. Its a real thick two sides exterior tape that will stick in there and never move after awhile.Dan when you installed belt guard did you put rivets back in
Thanks Pan
UPDATE: I have since riveted the guard back in place since I am not needing to remove it anymore.
Dan
Few more pics with guard off....
Last edited:
swampcat
TY 4 Stroke Junkie
- Joined
- Mar 17, 2014
- Messages
- 623
- Reaction score
- 378
- Points
- 668
- Location
- N. E. Wi.
- Country
- USA
- Snowmobile
- 2020 S W LTX-GT
Cat should have designed that clutch guard to be removable, with the pulling of a couple pins. All this NEW technology, but NO functionality.
ROCKERDAN
OCD Sledhead
- Joined
- Oct 8, 2005
- Messages
- 7,496
- Reaction score
- 3,612
- Points
- 2,003
- Location
- Huntsville Ontario & Niagara NY
- Country
- Other
- Snowmobile
- '18 RTX 50th "Winder"
I assume with the coolant overflow tank and airbox intake, they felt it should be non removable. I think that is why they rivet it in back, so guys aren't removing them all the time.Cat should have designed that clutch guard to be removable, with the pulling of a couple pins. All this NEW technology, but NO functionality.
It sure was nice to get it all opened up at least once, to get an eye on it all...with no obstruction.
Dan
Hammer70
GRIPNRIP
- Joined
- Sep 6, 2015
- Messages
- 824
- Reaction score
- 651
- Points
- 1,228
- Location
- Niagara, Ontario.
- Country
- Canada
- Snowmobile
- 82SS440/96VMAX/02SRX/08APE/15SRVIPER/17SIDEWINDER
Awesome Dan so that’s what I will do alsoNope.....Not needed IMO the guard is quite rigid in there with that one rear screw and the nut and then the two up front. What I did was put some 3m exterior glazing tape between the frame and guard, it covers holes and also stop any wear on powdercoat. Its a real thick two sides exterior tape that will stick in there and never move after awhile.
Dan
View attachment 135485
Few more pics with guard off....
View attachment 135486 View attachment 135487
Thanks Pan
actionjack
TY 4 Stroke God
- Joined
- Apr 9, 2005
- Messages
- 2,519
- Reaction score
- 623
- Points
- 1,483
- Location
- Westminster, Maryland
- Website
- www.inspectorjack.com
- Country
- USA
- Snowmobile
- 2017 SideWinder LTX-LE
Interesting my offset is well over 62 mm. It was suggested here on TY that the high side of spec was better.
KnappAttack
24X ISR World Drag Racing Champion
- Joined
- Feb 19, 2004
- Messages
- 4,974
- Reaction score
- 6,305
- Points
- 1,733
- Location
- Welch MN
- Country
- USA
- Snowmobile
- 2023 Sidewinder LTX-LE
2017 Sidewinder LTX-LE
Dan,
Come on, that shitt metal screw and barely hold the cheap coating on let a lone hold the guard in place if a belt explosion should happen. You got to do something different there bud. Even the factory setup is none too strong. You're just asking for trouble there should a belt let go.
Come on, that shitt metal screw and barely hold the cheap coating on let a lone hold the guard in place if a belt explosion should happen. You got to do something different there bud. Even the factory setup is none too strong. You're just asking for trouble there should a belt let go.
Similar threads
- Replies
- 42
- Views
- 16K
- Replies
- 7
- Views
- 33K
- Replies
- 74
- Views
- 14K
-
This site uses cookies to help personalise content, tailor your experience and to keep you logged in if you register.
By continuing to use this site, you are consenting to our use of cookies.