tator
TY 4 Stroke Junkie
Dave, thats a great idea with the plastic bushing for removing the belt. i dont have the adjuster but thinking about it. if i get one you can bet there will be a bushing made and put in the storage bag.


Blue Dave
Lifetime Member
- Joined
- Jan 7, 2008
- Messages
- 2,888
- Age
- 61
- Location
- Ham Lake, MN
- Country
- USA
- Snowmobile
- '17 Sidewinder LTX DX
Sorry ya the bolts on back and the plate is removed. I did run it on stand and rechecked and kept backing collar out to the point I felt I shouldnt go any further. What about trying a new belt. The 8 dn I have was a used one a nytro buddy let me try. ?
A used belt will be narrower and will require that the sheaves are closer together which requires that the threaded collar be loosened more.
When you back the threaded collar out to the point that you describe (outer edge past the end of the threaded aluminum part) is the cupped plate still being pressed against the helix?
On mine as soon as I turn the collar out to just past flush with the end of the treaded aluminum part then the cupped plate is no longer putting pressure on the helix.
Please feel free to give me a call if you want to discuss this over the phone rather than posting back & forth in the forum.
Dave
612-868-7686
Last edited:
Blue Dave
Lifetime Member
- Joined
- Jan 7, 2008
- Messages
- 2,888
- Age
- 61
- Location
- Ham Lake, MN
- Country
- USA
- Snowmobile
- '17 Sidewinder LTX DX
Dave, thats a great idea with the plastic bushing for removing the belt. i dont have the adjuster but thinking about it. if i get one you can bet there will be a bushing made and put in the storage bag.
Buy the tool. Seriously, every Viper owner should have one. Jim makes a quality product and it is worth every cent he charges IMO.
stingray719
TY 4 Stroke God
Buy the tool. Seriously, every Viper owner should have one. Jim makes a quality product and it is worth every cent he charges IMO.
Yep, if you run the stock 8JP belt you will need adjustment often

csederlund
Pro
Dave, what was the size of the two saw bits you used? That's a great idea because I have trouble changing belts even with the tool.
bleedyamaha
TY 4 Stroke Master
- Joined
- Sep 28, 2013
- Messages
- 1,491
- Location
- Northern Iowa
- Country
- USA
- Snowmobile
- 2017 Yamaha Sidewinder Rtx Le 2012 Yamaha Vector Ltx
I get a F for this. I didn't pay attention to where my sheaves were before I took them apart or which stud the helix goes over. Can anybody tell me where the sheaves need to be in a certain position. Pictures maybe. I did get the spring in 6/1 right!!!Only need to remove the internal plate if intending to run the 8dn belt. If you do. Yes the three nuts holding the spring and helix on need to be removed to separate the secondary halves. Probably not needed but I put the halves back together in same. Position as original. Also when removing helix pay attention as to what holes each tang on spring ends goes into and what studs helix is on. Put it back same. The three 8mm bolts and washers on back are removed and if 8dn being used those and the 3 Phillips screws and plate are removed. In both cases the aluminum tube spacer and outside shim is also not used.
tator
TY 4 Stroke Junkie
Dave, what was the size of the two saw bits you used? That's a great idea because I have trouble changing belts even with the tool.
wonder if a piece of PVC pipe cut thin would work. could make 1000 out of a 10 foot stick. 1'' or 1.25'' or 1.5'' or 2'' these are available sizes that are close, would be inside measurements.
kubba
Newbie
- Joined
- Mar 9, 2009
- Messages
- 22
- Location
- Zeeland, MI
- Country
- USA
- Snowmobile
- 2012 Apex XTX
2015 Viper LTX SE
I picked up a new 2015 LTX SE Saturday I tried to put the OSP adjuster on today by removing the the bolts on the rear of secondary then removing spacer inside secondary, reinstalled secondary with both spacers on jack shaft as it was when I removed it and there is no float even with OSP backed all the way out only get float by removing one of the two spacers ps. it did float before installing OSP adjuster should I leave on spacer out or not let it float?
tator
TY 4 Stroke Junkie
it will only float when in use and the belt rides into the secondary which is where it is needed. it uses the shaft and end nut to adjust deflection when you move and drive the belt into the secondary all float is restored because as the secondary opens it pulls the helix away from the adjuster.
kubba
Newbie
- Joined
- Mar 9, 2009
- Messages
- 22
- Location
- Zeeland, MI
- Country
- USA
- Snowmobile
- 2012 Apex XTX
2015 Viper LTX SE
Thanks for the reply but I thought if I had the adjuster nut backed all the way off it would float. It would not float when I ran the adjuster in to adjust belt deflection which that part I get as the helix goes in it gains that room back to float.
Blue Dave
Lifetime Member
- Joined
- Jan 7, 2008
- Messages
- 2,888
- Age
- 61
- Location
- Ham Lake, MN
- Country
- USA
- Snowmobile
- '17 Sidewinder LTX DX
Dave, what was the size of the two saw bits you used? That's a great idea because I have trouble changing belts even with the tool.
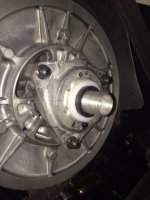
I used a 2.125" hole saw for the OD and a 1.5" hole saw for the ID. The ID is important because it needs to be larger than the OD of the shaft that the helix slides on.
1.5" is a slip fit as you can see in this picture that shows the spacer on the shaft with the helix pushed in which is how it will look right after putting a new belt on because the belt has not been run up to the top of the secondary clutch sheaves yet.
2.125" is a little less than the OD of the cupped washer but that is what I had on hand for a hole saw. This works fine as it simply needs to catch the lipped edge of the cupped washer.
Attachments
Last edited:
tator
TY 4 Stroke Junkie
so 1.5 inch pvc is the answer. 1.5 is the inside diameter. could put the spacer on either side of the cup correct?
Blue Dave
Lifetime Member
- Joined
- Jan 7, 2008
- Messages
- 2,888
- Age
- 61
- Location
- Ham Lake, MN
- Country
- USA
- Snowmobile
- '17 Sidewinder LTX DX
Thanks for the reply but I thought if I had the adjuster nut backed all the way off it would float. It would not float when I ran the adjuster in to adjust belt deflection which that part I get as the helix goes in it gains that room back to float.
I have one OEM spacer washer on the jackshaft behind the secondary clutch. When I have the OSP tool's threaded collar spun away from the cupped plate (no pressure on the helix) I do get a small amount of secondary clutch float. This however is not important as it is not needed at idle.
What is important is that you will get a lot more secondary clutch float as the clutches shift out and the helix moves into the secondary clutch. The secondary clutch float while underway allows the centerline of the clutches to be aligned so that the belt runs true and straight.
Last edited:
Blue Dave
Lifetime Member
- Joined
- Jan 7, 2008
- Messages
- 2,888
- Age
- 61
- Location
- Ham Lake, MN
- Country
- USA
- Snowmobile
- '17 Sidewinder LTX DX
so 1.5 inch pvc is the answer. 1.5 is the inside diameter. could put the spacer on either side of the cup correct?
Yes, 1.5" PVC pipe would work and would be much easier than what I did. You could make thousands of them out of a stick of PVC with a chop saw. I made my temporary spacer 1/4" thick simply because that was the thickness of the plastic sheet that I cut it out of. If you cut one out of a PVC pipe you could go a little thicker but if it is too much thicker the threaded adjustment collar will not be able to catch the threads on the aluminum center part of the OSP tool.
To answer your question regarding where to place it, the temporary spacer must be placed between the cupped plate and the helix. This is what allows the helix to push in far enough to get the belt off easier. Putting the temporary spacer between the cupped plate and the threaded adjustment collar accomplishes nothing.
Last edited:
Thanks for the reply but I thought if I had the adjuster nut backed all the way off it would float. It would not float when I ran the adjuster in to adjust belt deflection which that part I get as the helix goes in it gains that room back to float.
It should float with the adjuster collar backed off to no pressure on the black spacer ring. I did notice that mine with a used 8jp does not close enough to force the belt up flush with the top of the sheaves. I did run it this weekend though and felt very strong. Going to try with the carlisle ultramax 8 dn this week.
Similar threads
- Replies
- 4
- Views
- 2K
- Replies
- 6
- Views
- 2K
- Replies
- 25
- Views
- 50K
-
This site uses cookies to help personalise content, tailor your experience and to keep you logged in if you register.
By continuing to use this site, you are consenting to our use of cookies.