
ROCKERDAN
OCD Sledhead
- Joined
- Oct 8, 2005
- Messages
- 7,496
- Reaction score
- 3,609
- Points
- 2,003
- Location
- Huntsville Ontario & Niagara NY
- Country
- Other
- Snowmobile
- '18 RTX 50th "Winder"
I considered this too...as I always have a bucket load of rivets here. But I thought about if I wanted to remove it quickly for some reason, I would have to drill out all 5 rivets and the ones from bottom would be a pain for sure..... I would like the screws.I used rivits
I hope to have time tomorrow....I think Im going to just use the screws, and make new holes so they work. Not like anyone looks under there.
Just odd they have this accessory screwed up for many seasons now apparently....either put bigger screws in kit, or stop drilling the holes in bumper too large. Even the directions talk about drilling....so maybe the early bumpers were not drilled out and all worked well, but now they are drilled, and match up with flares, but are too darn big! grrr
Last edited:
GlennM
Expert
- Joined
- Jan 25, 2017
- Messages
- 410
- Reaction score
- 123
- Points
- 638
- Location
- Quebec
- Country
- Canada
- Snowmobile
- Sidewinder ltx-le
SR-Viper 2015
Apex ltx 40th
BRP Renegade mxz 800
I considered this too...as I always have a bucket load of rivets here. But I thought about if I wanted to remove it quickly for some reason, I would like the screws.
I hope to have time tomorrow....I think Im going to just use the screws, and make new holes so they work. Not like anyone looks under there.
Just odd they have this accessory screwed up for many seasons now apparently....either out bigger screws in kit, or stop drilling the holes in bumper too large. Even the directions talk about drilling....so maybe the early bumpers were not drilled out and all worked well, but now they are drilled, and match up with flares, but are too darn big! grrr
Thats what the supplied rivits are for!

ROCKERDAN
OCD Sledhead
- Joined
- Oct 8, 2005
- Messages
- 7,496
- Reaction score
- 3,609
- Points
- 2,003
- Location
- Huntsville Ontario & Niagara NY
- Country
- Other
- Snowmobile
- '18 RTX 50th "Winder"
In my flare kit, it only comes with 2 rivets. And those are the locating rivets used on top of footwells. They use a rivet here since that is the only area of connection that is seen by the eye. So that needs to look smooth and nice. All the remaining connections are to bottom of bumper, and use self-tapping style torx screws like much of the rest of these chassis have.Thats what the supplied rivits are for!
Will post up pics. Probably just gonna drill out new holes.
Dan
XP123
TY 4 Stroke Master
- Joined
- Dec 25, 2016
- Messages
- 1,494
- Reaction score
- 1,437
- Points
- 958
- Location
- Chautauqua NY
- Country
- USA
- Snowmobile
- Sidewinder XTX LE 137
What is the cost of the tunnel flares? I'm thinking they will keep more snow in the suspension for cooling and lube right? Also I'm sure they will keep snow off your back.In my flare kit, it only comes with 2 rivets. And those are the locating rivets used on top of footwells. They use a rivet here since that is the only area of connection that is seen by the eye. So that needs to look smooth and nice. All the remaining connections are to bottom of bumper, and use self-tapping style torx screws like much of the rest of these chassis have.
Will post up pics. Probably just gonna drill out new holes.
Dan

ROCKERDAN
OCD Sledhead
- Joined
- Oct 8, 2005
- Messages
- 7,496
- Reaction score
- 3,609
- Points
- 2,003
- Location
- Huntsville Ontario & Niagara NY
- Country
- Other
- Snowmobile
- '18 RTX 50th "Winder"
Just installed them Joe today.....I agree, less snow flying forward, more dust stays under tunnel for cooling, and the bonus is I really think it finishes off the look of sled nicely.What is the cost of the tunnel flares? I'm thinking they will keep more snow in the suspension for cooling and lube right? Also I'm sure they will keep snow off your back.
Pics to come in a few mins....


ROCKERDAN
OCD Sledhead
- Joined
- Oct 8, 2005
- Messages
- 7,496
- Reaction score
- 3,609
- Points
- 2,003
- Location
- Huntsville Ontario & Niagara NY
- Country
- Other
- Snowmobile
- '18 RTX 50th "Winder"
Tunnel flares - SMA-8JPTN-FL-BK
First off, the above part number for the YAM flares was not available at the time. So dealer just got me the cat ones(part # below) which should be an identical kit. My dealer told me about the screw size issue ahead of time, so I believe this issue is same with Yam or Cat flares, as they should be identical.
Kit comes with 8 self-tapping torx head screws, they are black and have a nice large flange style head to hold onto the plastic lip of the flare from bottom up into the bumper from below. Also comes with two 3/16" black rivets and two backer washers for rivets.
So the flares plastic lip is pre-drilled with 4 holes. There are coinciding holes in the bottom of bumper, however they are drilled out too large for the screws in kit. Dealer told me this has been going on for many yrs. Who knows why cat/yam would not correct this.
The instructions make no mention of the holes in bottom of bumper, and tell you to drill 1/8" holes for the screws. Well that wont work as they are already pre-drilled and too large...lol My guess is maybe early on, cat did not pre-drill these bumpers and then somewhere along the line started drilling them, and these flare kits never got updated. Who knows.lol
So you can either go get larger screws, which is not that easy when you consider you want a nice flange head, and a self-tap type thread, and something that wont rust. And these torx screws in the kit are nice screws, so I took the route of just drilling new holes altogether through both the plastic lip of flare, and into the bumper with 1/8" bit and just made sure to locate the areas where there are NO HOLES prior, as there are several other holes under these bumpers, likely for bungee cord type accessories to hook to.
I will say, they sure look nice once installed...they really make the sled look more finished off, and will go a long way to keeping more snowdust under the tunnel and help with cooling....and keep more snow off your back, and your seat, and your tunnel bag/luggage.


Drill out this factory rivet


Use Backer washer on bottom of rivet

Showing backer washer on bottom of rivet


BEFORE

AFTER


First off, the above part number for the YAM flares was not available at the time. So dealer just got me the cat ones(part # below) which should be an identical kit. My dealer told me about the screw size issue ahead of time, so I believe this issue is same with Yam or Cat flares, as they should be identical.
Kit comes with 8 self-tapping torx head screws, they are black and have a nice large flange style head to hold onto the plastic lip of the flare from bottom up into the bumper from below. Also comes with two 3/16" black rivets and two backer washers for rivets.
So the flares plastic lip is pre-drilled with 4 holes. There are coinciding holes in the bottom of bumper, however they are drilled out too large for the screws in kit. Dealer told me this has been going on for many yrs. Who knows why cat/yam would not correct this.
The instructions make no mention of the holes in bottom of bumper, and tell you to drill 1/8" holes for the screws. Well that wont work as they are already pre-drilled and too large...lol My guess is maybe early on, cat did not pre-drill these bumpers and then somewhere along the line started drilling them, and these flare kits never got updated. Who knows.lol
So you can either go get larger screws, which is not that easy when you consider you want a nice flange head, and a self-tap type thread, and something that wont rust. And these torx screws in the kit are nice screws, so I took the route of just drilling new holes altogether through both the plastic lip of flare, and into the bumper with 1/8" bit and just made sure to locate the areas where there are NO HOLES prior, as there are several other holes under these bumpers, likely for bungee cord type accessories to hook to.
I will say, they sure look nice once installed...they really make the sled look more finished off, and will go a long way to keeping more snowdust under the tunnel and help with cooling....and keep more snow off your back, and your seat, and your tunnel bag/luggage.
Drill out this factory rivet
Use Backer washer on bottom of rivet
Showing backer washer on bottom of rivet
BEFORE
AFTER
Last edited:
XP123
TY 4 Stroke Master
- Joined
- Dec 25, 2016
- Messages
- 1,494
- Reaction score
- 1,437
- Points
- 958
- Location
- Chautauqua NY
- Country
- USA
- Snowmobile
- Sidewinder XTX LE 137
They look nice Dan. Are they the same for 137" models or are they longer?

ROCKERDAN
OCD Sledhead
- Joined
- Oct 8, 2005
- Messages
- 7,496
- Reaction score
- 3,609
- Points
- 2,003
- Location
- Huntsville Ontario & Niagara NY
- Country
- Other
- Snowmobile
- '18 RTX 50th "Winder"
Should all be same I believe. I have not seen them on LTX in real life though, Don has them on his and Mr Sled has red ones(no longer avail) so Id assume they dont go right to back like my 129...have to search up his sled pics he posted last fall.They look nice Dan. Are they the same for 137" models or are they longer?
Dan
TurboJamie
TY 4 Stroke God
WOW incredible built here lots of parts being bolted on how much weight do you think it all adds? Do you think adding the tunnel linq brackets, protectors, flares, 4th wheel kit all at the rear will throw off the balance of the machine?
actionjack
TY 4 Stroke God
- Joined
- Apr 9, 2005
- Messages
- 2,517
- Reaction score
- 617
- Points
- 1,483
- Location
- Westminster, Maryland
- Website
- www.inspectorjack.com
- Country
- USA
- Snowmobile
- 2017 SideWinder LTX-LE
Shame we cannot get them in red now.
snowbeast
TY 4 Stroke God
- Joined
- Apr 13, 2003
- Messages
- 5,498
- Reaction score
- 780
- Points
- 1,883
- Location
- E waterboro,maine
- Country
- USA
- Snowmobile
- 2015 apex xtx traded for a 2017 sidewinder L-tx-le
- yes
- YOUTUBE
- yes
I installed mine on my 137 a month ago,just like you did,as I to,found out the screws did not fit,my rivets worked great.Should all be same I believe. I have not seen them on LTX in real life though, Don has them on his and Mr Sled has red ones(no longer avail) so Id assume they dont go right to back like my 129...have to search up his sled pics he posted last fall.
Dan
XP123
TY 4 Stroke Master
- Joined
- Dec 25, 2016
- Messages
- 1,494
- Reaction score
- 1,437
- Points
- 958
- Location
- Chautauqua NY
- Country
- USA
- Snowmobile
- Sidewinder XTX LE 137
I think it will help balance it out. These turbo's need a few hundred extra lbs out back to offset the buffalo sitting over the ski's. Remember these sleds are huge pigs and nowhere near the fun of the lighter 2 strokes.WOW incredible built here lots of parts being bolted on how much weight do you think it all adds? Do you think adding the tunnel linq brackets, protectors, flares, 4th wheel kit all at the rear will throw off the balance of the machine?


Beerman
I can actually hear myself getting fatter
- Joined
- Nov 22, 2004
- Messages
- 1,093
- Reaction score
- 783
- Points
- 1,458
- Location
- Plymouth, MN
- Website
- www.loyalshepherd.com
- Country
- USA
- Snowmobile
- Sidewinder LTX-SE
- YOUTUBE
- arttyszka
Dan, my mom said I can't play with you any more. "He's a bad influence" whatever that means.
This is now window #6 if you count the fact I sold my original SE and have a Yamaha Mid Sport on back order. Plus the hand guards, apparently I "needed" the LED lighting and the BRP clear ones I had were no longer functional.
Oh, at least I can't blame the blue LEDs on you, though I tried, those were already there . . .
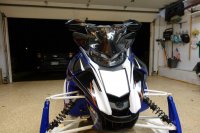
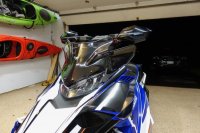
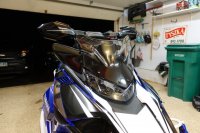

 View attachment 132605
This is now window #6 if you count the fact I sold my original SE and have a Yamaha Mid Sport on back order. Plus the hand guards, apparently I "needed" the LED lighting and the BRP clear ones I had were no longer functional.
Oh, at least I can't blame the blue LEDs on you, though I tried, those were already there . . .


 View attachment 132605
Last edited:
TurboJamie
TY 4 Stroke God
Very impressed at all the parts being bolted right on, sweet sweet build. Do you recommend any specific tunnel polishes to keep the machine looking like new? Have you seen some of the new ceramic coatings available for paint? They maybe a good choice for keeping things looking like new???

Doc Harley
TY 4 Stroke God
- Joined
- Oct 17, 2016
- Messages
- 3,714
- Reaction score
- 1,814
- Points
- 1,413
- Location
- Here & there
- Country
- USA
- Snowmobile
- '17 Sidewinder LTX SE
Dan, those self tapping screws can be had in s.s.
Also, did some digging around at other house. Found these., Two pair of 5.7s. It's a tough one......

Also, did some digging around at other house. Found these., Two pair of 5.7s. It's a tough one......
Similar threads
- Replies
- 22
- Views
- 41K
- Replies
- 4
- Views
- 33K
- Replies
- 25
- Views
- 51K
-
This site uses cookies to help personalise content, tailor your experience and to keep you logged in if you register.
By continuing to use this site, you are consenting to our use of cookies.
