Nikolai
TY 4 Stroke God
Agreed. I’m going to try and make a mold and make the sides, top and front a 1-piece tunnel liner. That would cut the fasteners needed to hold it in place by at least half.
I was also off on my weights. I allowed myself 1.5 lbs for heat shields at flex joints and 4 lbs for the tunnel liner/skin so I should be under that and well on my way to a 50 lb frame with cooling system.
I was also off on my weights. I allowed myself 1.5 lbs for heat shields at flex joints and 4 lbs for the tunnel liner/skin so I should be under that and well on my way to a 50 lb frame with cooling system.
Nikolai
TY 4 Stroke God
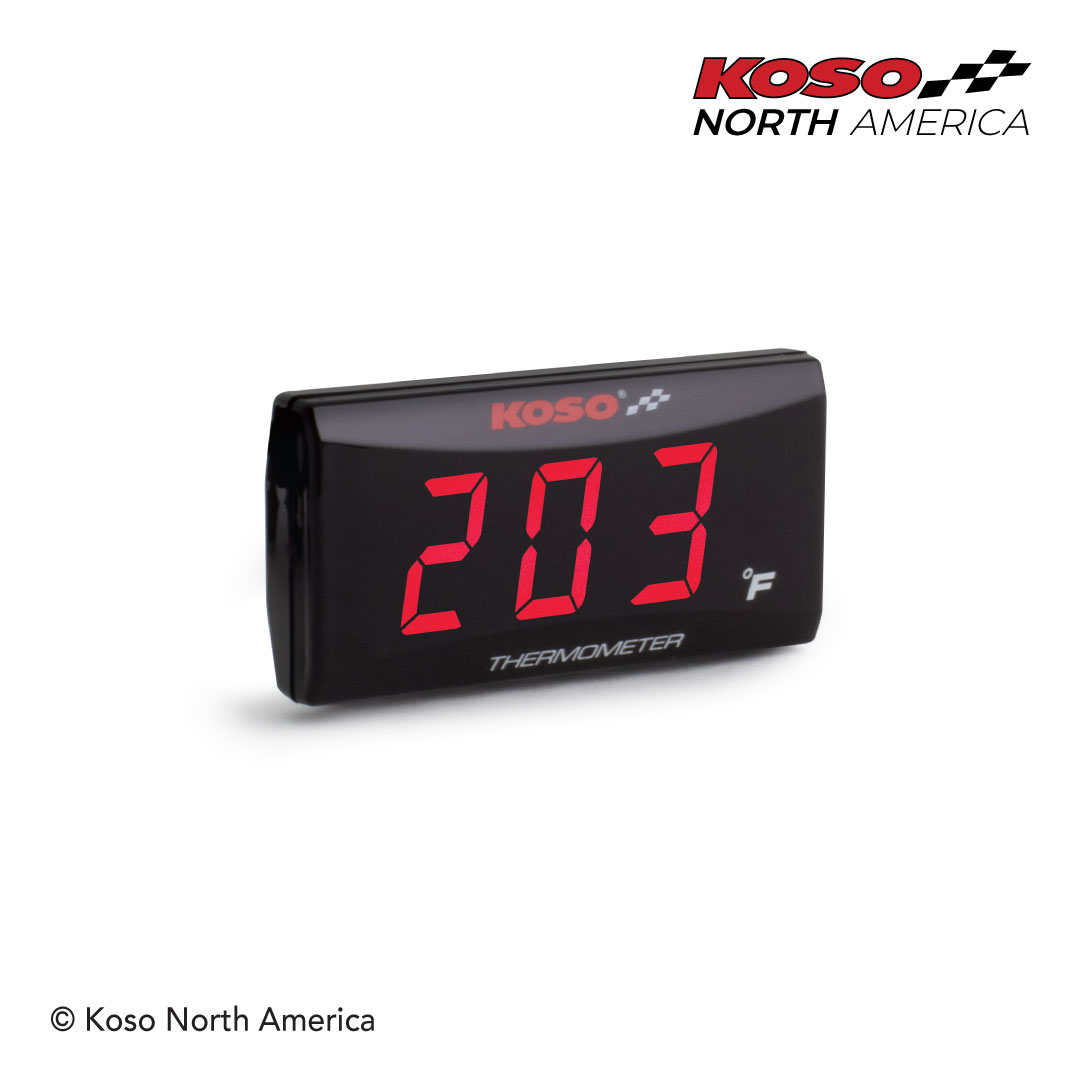
Want to run a temp gauge. Koso Super Slim is the smallest digital garage I could find. Planning on drilling and tapping the thermostat housing for the sensor. Any reason this wouldn’t be a good spot?
 kosonorthamerica.com

SUPER SLIM STLYLE | Fahrenheit thermometer - red - KOSO North America
The compact size of our Super Slim Style Thermometer makes it very easy to install at almost any location on your bike. Available in red and blue digits.
kosonorthamerica.com
HighSpeedLowDrag
Pro
I would want a gauge that reads to at least -40 degrees. It doesn't make sense to have engine temperatures which will exceed the limits of the gauge reading.
Nikolai
TY 4 Stroke God
My Dad happened to have a brand new Trail Tech he’s giving me, it goes down to -40F.
 www.trailtech.net
Surface TTO, Temperature, Black, Radiator Hose, 25mm | TrailTech
The TTO Digital Temperature Gauge allows you to easily monitor your engine's temperature ensuring you that your engine is not over heating..
www.trailtech.net

kinger
VIP Member
- Joined
- Jan 17, 2005
- Messages
- 7,426
- Reaction score
- 1,559
- Points
- 1,963
- Location
- Clear Lake, IA
- Website
- www.piergenius.com
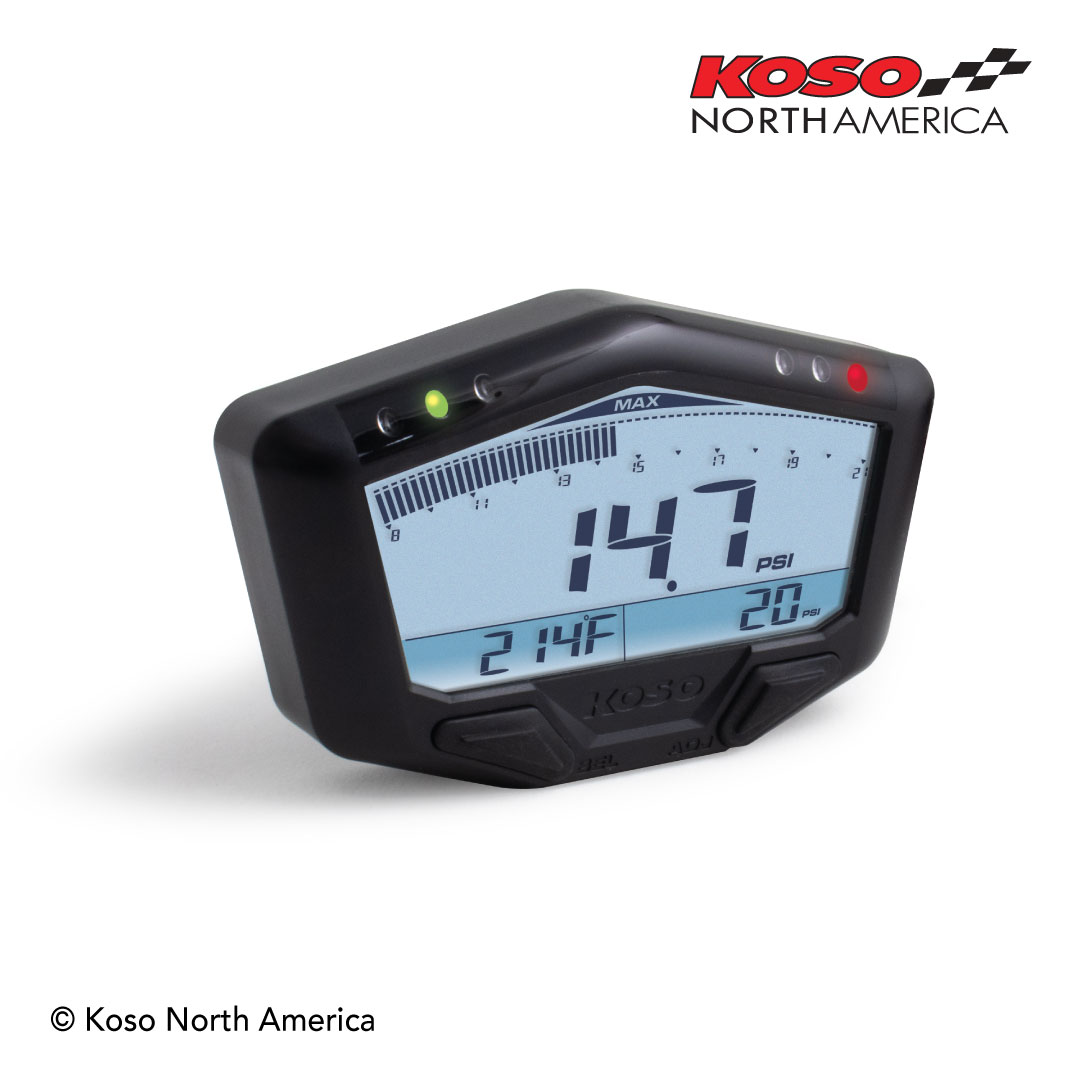
You are going to have a Wideband too right? When I was on my apex weight quest I got a Koso 3 in 1 gauge to replace my analog ones. Water temp, boost, and AFR
Nikolai
TY 4 Stroke God
I will have boost and AFR and have separate gauges for them, I’ll look at the Koso 3 in 1, that would be a cleaner setup.
Something like this? Pricey.
 kosonorthamerica.com
Something like this? Pricey.
X-2 | Boost Gauge | with Wideband Air/fuel Ratio & Temperature - KOSO North America
The X-2 Boost Gauge is a great multifunction unit for all horsepower enthusiast that are upgrading their engine with Turbo or Supercharger.
kosonorthamerica.com
Last edited:
kinger
VIP Member
- Joined
- Jan 17, 2005
- Messages
- 7,426
- Reaction score
- 1,559
- Points
- 1,963
- Location
- Clear Lake, IA
- Website
- www.piergenius.com
Yes that is the one, man inflation is a B****! I think I paid $299 for mine LOL. Its still BNID I didn't get a chance to use it before I crashed that apex. I was going to add it to my Orange flame just to see what is going on and figure out why its popping motors.I will have boost and AFR and have separate gauges for them, I’ll look at the Koso 3 in 1, that would be a cleaner setup.
Something like this? Pricey.
X-2 | Boost Gauge | with Wideband Air/fuel Ratio & Temperature - KOSO North America
The X-2 Boost Gauge is a great multifunction unit for all horsepower enthusiast that are upgrading their engine with Turbo or Supercharger.
zx4ever
Expert
- Joined
- Apr 14, 2011
- Messages
- 345
- Reaction score
- 247
- Points
- 1,178
- Location
- Northern BC canada
- Country
- Canada
- Snowmobile
- 08 nytro ty4stroke customized
That is exactly the setup and spot I use on all 3 of my Yamahas. Works great.Want to run a temp gauge. Koso Super Slim is the smallest digital garage I could find. Planning on drilling and tapping the thermostat housing for the sensor. Any reason this wouldn’t be a good spot?
SUPER SLIM STLYLE | Fahrenheit thermometer - red - KOSO North America
The compact size of our Super Slim Style Thermometer makes it very easy to install at almost any location on your bike. Available in red and blue digits.
View attachment 169926
Nikolai
TY 4 Stroke God
These are the boost and AFR gauges I was using years ago.

kinger
VIP Member
- Joined
- Jan 17, 2005
- Messages
- 7,426
- Reaction score
- 1,559
- Points
- 1,963
- Location
- Clear Lake, IA
- Website
- www.piergenius.com
The Koso is like 200 grams or something, I thought it was going to save me like .5lb over the 3 gauge set up IIRC. Nothing wrong with either, I did like the Koso can set up warning lights and I thought it would be a little easier to see. At over 20 lbs of boost the gauge becomes a blur.
Nikolai
TY 4 Stroke God
Very easy for me to get sidetracked, back to oil tanks now. Did a practice run to make sure I could get all the bends in. I wanted to bend it like this so I could fit the baffling easier. The outer cap I weld on will have a bend on the left and right that overlap 1” so I can get really nice lap welds since I’m only using .063.
Quick and dirty test run


Quick and dirty test run
Nikolai
TY 4 Stroke God
After some practice bends on scraps and getting the brake adjusted right I bent up the two pieces. Total depth in the center is 2.75”, Nytro tank is a little over 5”.
The cardboard was the goal, the white piece is what I traced out after it was bent up. Some of the bends weren’t exact but it ended up slightly larger which is better than being smaller.


The outside piece overlaps each side 0.75” for an easy weld.


Going to cut apart the stock tank tomorrow and start dissecting the baffling.
The cardboard was the goal, the white piece is what I traced out after it was bent up. Some of the bends weren’t exact but it ended up slightly larger which is better than being smaller.
The outside piece overlaps each side 0.75” for an easy weld.
Going to cut apart the stock tank tomorrow and start dissecting the baffling.


earthling
Lifetime Member
- Joined
- Dec 1, 2017
- Messages
- 2,068
- Reaction score
- 2,029
- Points
- 1,263
- Location
- Ontario
- Country
- Canada
- Snowmobile
- 2021 SRX
2006 ATTAK
Very nice. Love those little clamps.
Nikolai
TY 4 Stroke God
Been busy with some other stuff but flex joints came in so I was able to wrap up the turbo mount.
Glad I waited because the new flex joints are slightly longer. They seem like they allow for more flex as well.

New copper gaskets and ordered new bolts with 10mm heads to make installation easier.

Cut a .040 spacer to put below the header bracket to account for future heat shield.

I pushed the header forward a little to lightly preload the flex joints before tightening the bolts. Then made the turbo bracket out of .063 plate. Was hoping to be under 0.1 lbs and it ended up 0.03 lbs.


Probably cut out the aluminum heat shield for above the header next and then finish the oil tank.
Glad I waited because the new flex joints are slightly longer. They seem like they allow for more flex as well.
New copper gaskets and ordered new bolts with 10mm heads to make installation easier.
Cut a .040 spacer to put below the header bracket to account for future heat shield.
I pushed the header forward a little to lightly preload the flex joints before tightening the bolts. Then made the turbo bracket out of .063 plate. Was hoping to be under 0.1 lbs and it ended up 0.03 lbs.
Probably cut out the aluminum heat shield for above the header next and then finish the oil tank.
Nikolai
TY 4 Stroke God
Template for aluminum heat shield so far. The rest will be CF. Thoughts on if the aluminum should be bigger or smaller? Less alu the better for ice buildup but I would think that small of piece should stay clear with heat from the header. If CF can take the heat I could narrow the sides up another 1/2-3/4 on each side so instead of overlapping the header it’s the exact size of it. Essentially trimming it down to the permanent marker.


Similar threads
- Replies
- 623
- Views
- 237K
- Replies
- 29
- Views
- 7K
- Replies
- 466
- Views
- 126K
-
This site uses cookies to help personalise content, tailor your experience and to keep you logged in if you register.
By continuing to use this site, you are consenting to our use of cookies.